Aller au contenu principal

Dell Studio 1737 Optical Drive (CD Drive) Replacement

Ce dont vous avez besoin

  1. Dell Studio 1737 Optical Drive (CD Drive) Replacement, Battery: étape 1, image 1 de 2 Dell Studio 1737 Optical Drive (CD Drive) Replacement, Battery: étape 1, image 2 de 2
    • Slide the battery release slider all the way to the right and push the battery straight out of the back of the computer

  2. Dell Studio 1737 Optical Drive (CD Drive) Replacement, Back Panel: étape 2, image 1 de 3 Dell Studio 1737 Optical Drive (CD Drive) Replacement, Back Panel: étape 2, image 2 de 3 Dell Studio 1737 Optical Drive (CD Drive) Replacement, Back Panel: étape 2, image 3 de 3
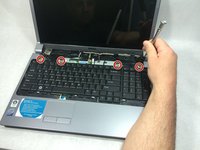
    • Unscrew the 8 Phillips head screws marked in the photo.

    • Even when the screws are fully detached, they will not come out of the panel.

    • Use a plastic opening tool to pry the panel away from the laptop body.

    • Lift the panel up and away.

  3. Dell Studio 1737 Optical Drive (CD Drive) Replacement, Keyboard: étape 3, image 1 de 1
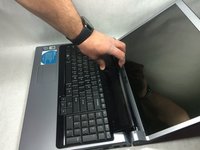
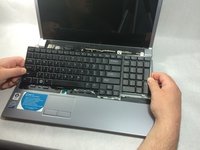
    • Use a plastic opening tool to detach the internal clips (marked with red boxes in photo) and release the small plastic panel above the keyboard

    • This panel doesn't come off just yet, this step is just to make it easier when it comes time to remove it

  4. Dell Studio 1737 Optical Drive (CD Drive) Replacement: étape 4, image 1 de 1
    • Remove the 4mm ph1 screw under the battery

  5. Dell Studio 1737 Optical Drive (CD Drive) Replacement: étape 5, image 1 de 3 Dell Studio 1737 Optical Drive (CD Drive) Replacement: étape 5, image 2 de 3 Dell Studio 1737 Optical Drive (CD Drive) Replacement: étape 5, image 3 de 3
    • Pry black panel away from laptop body starting at the base of the screen

    • Be careful when flipping the panel over, as the panel is still attached by the fragile ribbon cable

    • Flip the panel over onto the keyboard

    • Detach the ribbon cable from the motherboard as shown

  6. Dell Studio 1737 Optical Drive (CD Drive) Replacement: étape 6, image 1 de 1
    • Starting at the top where you just removed the black panel, pry the black bezel away from the outside of the keyboard

  7. Dell Studio 1737 Optical Drive (CD Drive) Replacement: étape 7, image 1 de 2 Dell Studio 1737 Optical Drive (CD Drive) Replacement: étape 7, image 2 de 2
    • Use a small screwdriver to take out the 4 4mm ph1 screws along the top of the keyboard

    • Lift from the top of the keyboard and flip it over onto the palmrest

    • Again, be very careful of the ribbon cable attaching it, as these are easily damaged

  8. Dell Studio 1737 Optical Drive (CD Drive) Replacement: étape 8, image 1 de 2 Dell Studio 1737 Optical Drive (CD Drive) Replacement: étape 8, image 2 de 2
    • Remove the ribbon cable as shown

  9. Dell Studio 1737 Optical Drive (CD Drive) Replacement, Palmrest Assembly: étape 9, image 1 de 1
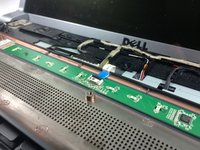
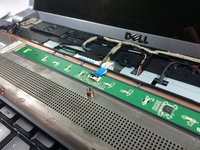
    • Remove the 8 8mm ph1 philips head screws (red)

    • Remove also the one 4mm ph 1 philips head screw (blue)

  10. Dell Studio 1737 Optical Drive (CD Drive) Replacement: étape 10, image 1 de 1
    • Pull the antenna cables off of the wireless card(s)

    • Depending on the setup of the laptop, there may be as many as 3 wireless cards, and all of the antennas must be detached

  11. Dell Studio 1737 Optical Drive (CD Drive) Replacement: étape 11, image 1 de 1
    • Remove the two 4mm ph1 screws along the black panel to which the speakers are attached

    • One of the screws is located under a wire channel and can be difficult to spot, look closely at the photo to make sure you get the right one

  12. Dell Studio 1737 Optical Drive (CD Drive) Replacement: étape 12, image 1 de 1
    • Unplug the 6 marked cables from the motherboard

    • The connectors that aren't standard plugs or ribbon cables are detached by simply lifting straight up away from the computer

    • Pull the antenna cables out through the motherboard, free them from their cable channels, and route them in such a way that they don't interfere with the next step

  13. Dell Studio 1737 Optical Drive (CD Drive) Replacement: étape 13, image 1 de 1
    • Using a plastic opening tool, pry the palmrest away from the body of the laptop all the way from one hinge to the other, disconnecting all of the internal clips along the way

    • Lift the palmrest up and off of the laptop

    • A small piece of this panel will get caught under the attachment point for the left hinge, just slide the panel slightly to the right to free it

  14. Dell Studio 1737 Optical Drive (CD Drive) Replacement, Optical Drive (CD Drive): étape 14, image 1 de 3 Dell Studio 1737 Optical Drive (CD Drive) Replacement, Optical Drive (CD Drive): étape 14, image 2 de 3 Dell Studio 1737 Optical Drive (CD Drive) Replacement, Optical Drive (CD Drive): étape 14, image 3 de 3
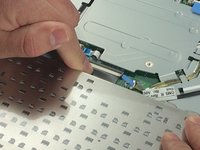
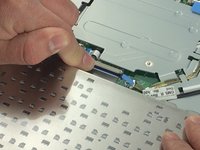
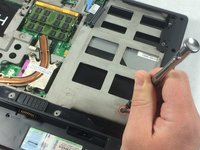
    • Unscrew the 2mm ph1 screw located in the first photo

    • Flip the laptop over and unscrew the 8mm screw located in the second photo

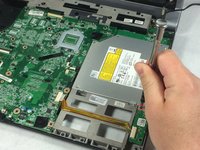
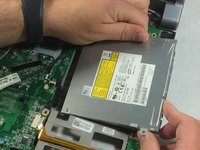
    • Flip the laptop back over, lift the optical drive up and pull it out

    • The optical drive has a connector on the side facing the motherboard, so when removing the drive, it must be slid out horizontally away from the computer

Conclusion

To reassemble your device, follow these instructions in reverse order.

2 autres ont terminé cette réparation.

Ben Green

Membre depuis le 03/06/17

143 Réputation

1 tutoriel rédigé

Équipe

UMass Dartmouth, Team S8-G4, Catania Spring 2017 Membre de l'équipe UMass Dartmouth, Team S8-G4, Catania Spring 2017

UMASSD-CATANIA-S17S8G4

3 membres

8 tutoriels rédigés

0 commentaires

Ajouter un commentaire

Nombre de vues :

Dernières 24 heures : 0

7 derniers jours : 0

30 derniers jours : 3

Total : 871