Aller au contenu principal
HP Envy 23-d060qd TouchSmart Hard Drive Replacement

HP Envy 23-d060qd TouchSmart Hard Drive Replacement

Zachary Dicks

Zachary Dicks et 5 autres contributeurs

Dernière mise à jour le December 28, 2017

10 - 15 minutes
Facile

My computer doesn't have enough room anymore for the music and photos that I want to store! I don't want to say good-bye to any files. What can I do so that I am able to store more files on my computer? Replacing the hard drive won't be too hard!

Ce dont vous avez besoin

iFixit touche une commission lorsque vous achetez par l'intermédiaire de ces liens.
  1. HP Envy 23-d060qd TouchSmart Hard Drive Replacement, Back Panel: étape 1, image 1 de 1
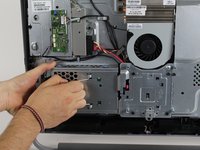
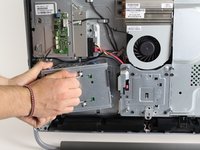
    • Use your hands to unclip the plastic snaps on the back panel of the device.

  2. HP Envy 23-d060qd TouchSmart Hard Drive Replacement: étape 2, image 1 de 1
    • Remove the three 11.5mm PH2 screws from the back panel.

    • The screws will not fall out of the back panel, but they will unscrew to release the back panel.

  3. HP Envy 23-d060qd TouchSmart Hard Drive Replacement: étape 3, image 1 de 1
    • Now, take the back panel off by pulling at it gently with your hands.

  4. HP Envy 23-d060qd TouchSmart Hard Drive Replacement, Hard Drive: étape 4, image 1 de 1
    • Remove the one 13.5mm PH2 screw.

  5. HP Envy 23-d060qd TouchSmart Hard Drive Replacement: étape 5, image 1 de 1
    • Unsnap the wire mechanism to release the hard drive.

  6. HP Envy 23-d060qd TouchSmart Hard Drive Replacement: étape 6, image 1 de 2 HP Envy 23-d060qd TouchSmart Hard Drive Replacement: étape 6, image 2 de 2
    • Detach the hard drive assembly by pulling it out of the socket.

  7. HP Envy 23-d060qd TouchSmart Hard Drive Replacement: étape 7, image 1 de 1
    • Remove the two 8.5mm PH2 screws on each side of the hard drive cover.

  8. HP Envy 23-d060qd TouchSmart Hard Drive Replacement: étape 8, image 1 de 1
    • Detach the hard drive cover by sliding it off from the rest of the hard drive

    • Replace the old hard drive with your new hard drive.

Conclusion

To reassemble your device, follow these instructions in reverse order.

5 autres ont terminé cette réparation.

Zachary Dicks

Membre depuis le 10/01/15

1 135 Réputation

7 tutoriels rédigés

Équipe

Cal Poly, Team 5-10, Maness Fall 2015 Membre de l'équipe Cal Poly, Team 5-10, Maness Fall 2015

CPSU-MANESS-F15S5G10

4 membres

14 tutoriels rédigés

2 commentaires de tutoriel

Thank you so much my hard drive is bad this is going to be a quick fix and save me money you made this for dummies I LOVE IT can u tell me when I replace the hard drive will I lose everything on my computer already such as photos,files, I have everything in office purchased on the computer ? If so is there a way not to lose anything

jessica Kramer - Réponse

Yes you will, unless you back them up. All your data is stored on that hard drive.

Dane Elliott-Dyson -

Ajouter un commentaire

Nombre de vues :

Dernières 24 heures : 0

7 derniers jours : 10

30 derniers jours : 29

Total : 7,306