
HTC Touch Pro 2 Logic Board Replacement
Introduction
Passez à l'étape 1The HTC Touch Pro 2 is a smartphone with internet access, 3-G/LTE bandwidth, and extended battery life.
Before moving forward, make sure you’ve gone over the Troubleshooting page to ensure the issue is with the logic board. General issues regarding logic boards can be caused by water damage, overheating, a chipped board preventing it from turning on, or usage over a long period without cleaning.
This guide’s purpose is to assist you in replacing the logic board, a printed circuit board that contains logic circuits responsible for managing and controlling the data flow between the CPU, RAM, and storage devices.
CPU - Central Processing Unit, meant to process the input and output of the device aka. “The Control Center”
RAM - Random Access Memory, meant to temporarily store information for quick access
Ce dont vous avez besoin


-
-
Apply pressure and slide upward to remove back cover.
-
Lift the back cover up away from the phone.
-
-
-
-
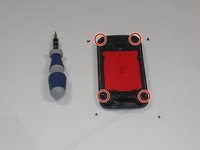
Using a T5 screwdriver, remove the four screws in corners as shown.
-
Lift the top portion of the rear case.
-
-
-
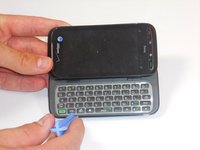
Using an IfixIt Plastic Tool, detach the plastic casing from the keyboard. This may require some force.
-
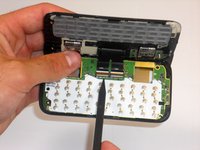
Using a spudger or other thin tool, carefully pry up ZIF connectors as shown. This will allow the black ribbons to detach from the keyboard.
-
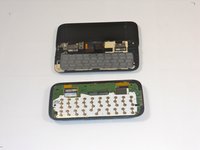
Slide the two parts away from each other so that the black ribbons slide through the slots and you will now have housing into two parts.
-


To reassemble your device, follow these instructions in reverse order.
To reassemble your device, follow these instructions in reverse order.
Annulation : je n'ai pas terminé ce tutoriel.
2 autres ont terminé cette réparation.
Équipe

Cal Poly, Team 9-64, Walters Spring 2011 Membre de l'équipe Cal Poly, Team 9-64, Walters Spring 2011
CPSU-WALTERS-S11S9G64
5 membres
18 tutoriels rédigés