Aller au contenu principal
Lenovo Legion 5-15ACH6 SSD Replacement

Lenovo Legion 5-15ACH6 SSD Replacement

Patrick Underwood

Patrick Underwood et 4 autres contributeurs

Dernière mise à jour le March 20, 2024

30 - 40 minutes
Modérée
Nécessite plus d'images

Use this guide to upgrade your current storage size for your Lenovo Legion 5-15ACH6 laptop.

The SSD Drive is a storage device that stores data in your computer. If you have a Lenovo Legion 5-15ACH6 laptop, you already have an SSD installed. However, if you are running low on storage space and wish to upgrade your SSD, you are in luck. The process to install additional storage is simple. Follow this easy step-by-step guide, and you should have plenty of storage in no time.

Be sure to backup your data on your current SSD so you don't lose it while you install your new SSD. Make sure to power off your laptop entirely before you start the process and unplug it from the charger.

Ce dont vous avez besoin

Pièces

Outils

Afficher plus…

  1. Lenovo Legion 5-15ACH6 SSD Replacement, SSD: étape 1, image 1 de 1
    • Prepare your work area on a flat surface.

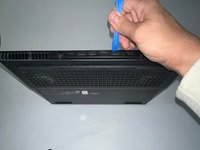
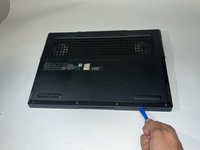
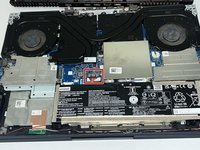
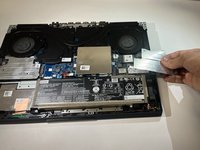
    • Lay your laptop down with the back case facing up.

  2. Lenovo Legion 5-15ACH6 SSD Replacement: étape 2, image 1 de 1
    • Use a Philips #1 screwdriver to remove the six 11.1 mm on the back of the device.

    • Use a Philips #00 screwdriver to remove the four 4.1 mm screws on the back case.

  3. Lenovo Legion 5-15ACH6 SSD Replacement: étape 3, image 1 de 3 Lenovo Legion 5-15ACH6 SSD Replacement: étape 3, image 2 de 3 Lenovo Legion 5-15ACH6 SSD Replacement: étape 3, image 3 de 3
    • Starting from the back of the laptop slide your opening tool between the bottom cover and laptop chassis.

    • Run the opening tool along the seam to separate the bottom cover from the chassis.

    • Remove the bottom cover and place to the side.

  4. Lenovo Legion 5-15ACH6 SSD Replacement: étape 4, image 1 de 3 Lenovo Legion 5-15ACH6 SSD Replacement: étape 4, image 2 de 3 Lenovo Legion 5-15ACH6 SSD Replacement: étape 4, image 3 de 3
    • To disconnect the battery cable safely, use the pointed tip of a spudger to carefully push on each side of the connector.

    • Alternating from one side to the other, gently “walk” the connector out of its socket.

    • Always pull cables by their connectors and not the wires themselves.

    • Touching any electrical component with the battery plugged in can result in damage to the motherboard.

  5. Lenovo Legion 5-15ACH6 SSD Replacement: étape 5, image 1 de 2 Lenovo Legion 5-15ACH6 SSD Replacement: étape 5, image 2 de 2
    • Remove the three 4.1mm Phillips #00 screws holding the metal shield in place.

    • Remove the metal shield and place it to the side.

  6. Lenovo Legion 5-15ACH6 SSD Replacement: étape 6, image 1 de 1
    • Remove the single 4.1 mm Philips #00 screw holding the SSD in place.

    • Pull the SSD out and away from the socket.

Conclusion

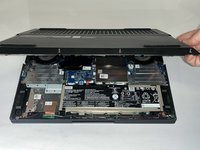
To reassemble your device, follow these instructions in reverse order.

4 autres ont terminé cette réparation.

Patrick Underwood

Membre depuis le 10/24/23

196 Réputation

1 tutoriel rédigé

Équipe

CSU Los Angeles, Team 12-5, Ribeiro Fall 2023 Membre de l'équipe CSU Los Angeles, Team 12-5, Ribeiro Fall 2023

CSULA-RIBEIRO-F23S12G5

3 membres

1 tutoriel rédigé

0 commentaires

Ajouter un commentaire

Nombre de vues :

Dernières 24 heures : 8

7 derniers jours : 78

30 derniers jours : 173

Total : 1,376