Aller au contenu principal
Lenovo ThinkPad X1 Yoga (6th Gen) Coin Cell Battery Replacement

Lenovo ThinkPad X1 Yoga (6th Gen) Coin Cell Battery Replacement

Taylor Morgan

Taylor Morgan et 3 autres contributeurs

Dernière mise à jour le October 19, 2023

10 minutes
Modérée
Meilleure introduction

If you are noticing difficulties with your computer starting up, or if presets, like the date and time, are continuously resetting, it might be time to replace the coin cell battery. For more possible troubleshooting click here.

Ce dont vous avez besoin

Outils

  • Spudger
    Spudger
  • Phillips #1 Screwdriver
    Phillips #1 Screwdriver
  1. Lenovo ThinkPad X1 Yoga (6th Gen) Coin Cell Battery Replacement, Base Panel: étape 1, image 1 de 3 Lenovo ThinkPad X1 Yoga (6th Gen) Coin Cell Battery Replacement, Base Panel: étape 1, image 2 de 3 Lenovo ThinkPad X1 Yoga (6th Gen) Coin Cell Battery Replacement, Base Panel: étape 1, image 3 de 3
    • Use a Phillips #1 screwdriver to remove the five 5 mm screws that secure the base panel.

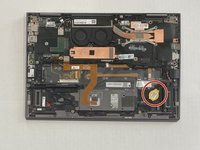
    • Wedge a spudger between the base panel and chassis, and pry around the entire perimeter until you hear a pop and the base panel releases.

    • Lift the base panel up and off of the chassis.

  2. Lenovo ThinkPad X1 Yoga (6th Gen) Coin Cell Battery Replacement, Battery: étape 2, image 1 de 3 Lenovo ThinkPad X1 Yoga (6th Gen) Coin Cell Battery Replacement, Battery: étape 2, image 2 de 3 Lenovo ThinkPad X1 Yoga (6th Gen) Coin Cell Battery Replacement, Battery: étape 2, image 3 de 3
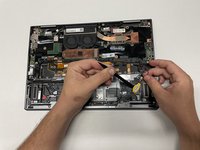
    • Use a Phillips #1 screwdriver to remove the five 4.5 mm screws securing the battery.

    • Lift the battery up and out.

  3. Lenovo ThinkPad X1 Yoga (6th Gen) Coin Cell Battery Replacement, Coin Cell Battery: étape 3, image 1 de 2 Lenovo ThinkPad X1 Yoga (6th Gen) Coin Cell Battery Replacement, Coin Cell Battery: étape 3, image 2 de 2
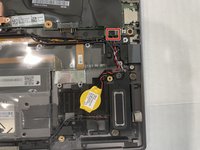
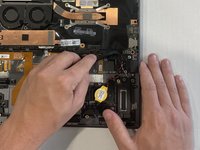
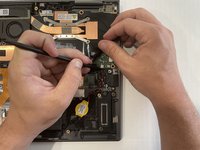
    • Use a spudger to pry the coin cell battery until it releases from the chassis.

    • There is an adhesive holding the battery in place; patiently pry around the coin cell until it releases from the housing, and don't use excessive force.

  4. Lenovo ThinkPad X1 Yoga (6th Gen) Coin Cell Battery Replacement: étape 4, image 1 de 3 Lenovo ThinkPad X1 Yoga (6th Gen) Coin Cell Battery Replacement: étape 4, image 2 de 3 Lenovo ThinkPad X1 Yoga (6th Gen) Coin Cell Battery Replacement: étape 4, image 3 de 3
    • Use a spudger to "walk" out the coin cell's plug from its motherboard port, gently levering from each side until it releases.

    • Lift the coin cell battery out.

Conclusion

To reassemble your device, follow these instructions in reverse order.

Taylor Morgan

Membre depuis le 02/15/22

527 Réputation

5 tutoriels rédigés

Équipe

0 commentaires

Ajouter un commentaire

Nombre de vues :

Dernières 24 heures : 0

7 derniers jours : 4

30 derniers jours : 13

Total : 521