Aller au contenu principal
Lenovo ThinkPad Yoga 11e Gen 6 Hinges Replacement

Lenovo ThinkPad Yoga 11e Gen 6 Hinges Replacement

Lex

Lex et 5 autres contributeurs

Dernière mise à jour le January 30, 2025

45 minutes - 1 heure
Modérée

The hinges allow the Lenovo ThinkPad Yoga 11e Gen 6 to fold 360 degrees to transform from laptop to tablet. If the laptop is not folding or closing properly, you may need to replace the hinges. This guide will demonstrate the process of replacing the hinges.

Ce dont vous avez besoin

  1. Lenovo ThinkPad Yoga 11e Gen 6 Hinges Replacement, Screen: étape 1, image 1 de 2 Lenovo ThinkPad Yoga 11e Gen 6 Hinges Replacement, Screen: étape 1, image 2 de 2
    • Wearing the anti-static wrist strap will prevent a static shock from damaging the components in the laptop.

    • Disconnect the laptop from power and make sure it is completely powered off.

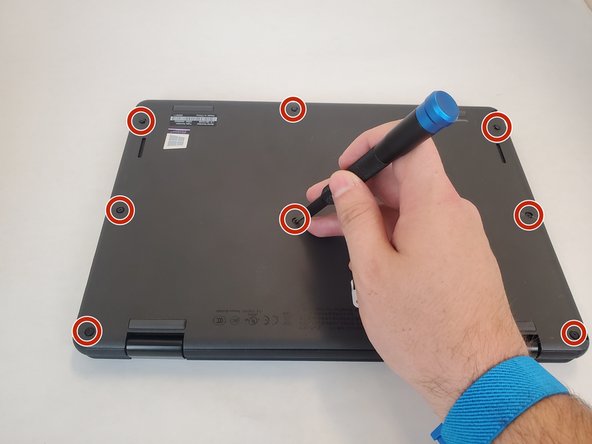
    • Turn the laptop facing down.

    • Loosen the eight captive screws using a JIS #0 screwdriver.

    • The screws are attached to the panel and cannot be removed.

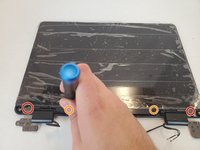
    • Carefully remove the panel.

  2. Lenovo ThinkPad Yoga 11e Gen 6 Hinges Replacement: étape 2, image 1 de 3 Lenovo ThinkPad Yoga 11e Gen 6 Hinges Replacement: étape 2, image 2 de 3 Lenovo ThinkPad Yoga 11e Gen 6 Hinges Replacement: étape 2, image 3 de 3
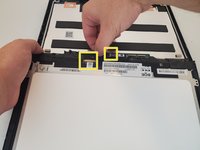
    • Carefully disconnect the two sliding connectors in the left and right corner.

    • Disconnect the sliding connector on the Wi-Fi board.

    • Loosen the four 9.7 mm screws on the hinges in the top left and right corners using a Phillips #0 screwdriver.

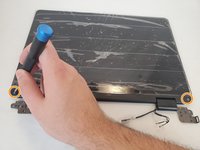
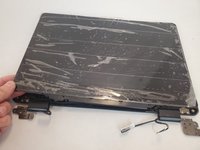
    • Carefully lift the closest part of the laptop away from the screen side of the laptop.

  3. Lenovo ThinkPad Yoga 11e Gen 6 Hinges Replacement: étape 3, image 1 de 3 Lenovo ThinkPad Yoga 11e Gen 6 Hinges Replacement: étape 3, image 2 de 3 Lenovo ThinkPad Yoga 11e Gen 6 Hinges Replacement: étape 3, image 3 de 3
    • Using tweezers, gently pry and remove the covers on the LCD strip.

    • Remove the two 3.3 mm screws that were previously under the covers on the LCD strip using a Phillips #0 screwdriver.

    • Carefully lift and remove the LCD strip.

  4. Lenovo ThinkPad Yoga 11e Gen 6 Hinges Replacement: étape 4, image 1 de 3 Lenovo ThinkPad Yoga 11e Gen 6 Hinges Replacement: étape 4, image 2 de 3 Lenovo ThinkPad Yoga 11e Gen 6 Hinges Replacement: étape 4, image 3 de 3
    • Remove the two 3.3 mm screws from the silver panels using a Phillips #0 screwdriver.

    • Remove the two 3.3 mm screws from the LCD panel using a Phillips #0 screwdriver.

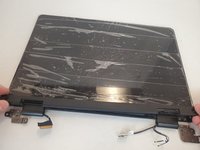
    • Carefully lift the screen towards you. You may use the spudger to assist lifting the screen. There will be one more connector on the side of the screen.

    • Carefully remove the ribbon connectors by gently pulling with your fingers.

  5. Lenovo ThinkPad Yoga 11e Gen 6 Hinges Replacement, Hinges: étape 5, image 1 de 3 Lenovo ThinkPad Yoga 11e Gen 6 Hinges Replacement, Hinges: étape 5, image 2 de 3 Lenovo ThinkPad Yoga 11e Gen 6 Hinges Replacement, Hinges: étape 5, image 3 de 3
    • Remove the four 3 mm screws that are closest to you using a Phillips #0 screwdriver.

    • Remove the two 4 mm screws that are further from you using a Phillips #0 screwdriver.

  6. Lenovo ThinkPad Yoga 11e Gen 6 Hinges Replacement: étape 6, image 1 de 2 Lenovo ThinkPad Yoga 11e Gen 6 Hinges Replacement: étape 6, image 2 de 2
    • Grab the stopper and pull it out of the right hinge.

    • Remove the wire from the hinge.

  7. Lenovo ThinkPad Yoga 11e Gen 6 Hinges Replacement: étape 7, image 1 de 3 Lenovo ThinkPad Yoga 11e Gen 6 Hinges Replacement: étape 7, image 2 de 3 Lenovo ThinkPad Yoga 11e Gen 6 Hinges Replacement: étape 7, image 3 de 3
    • Grab the stopper and pull it out of the left hinge.

    • Remove the wire from the hinge.

Conclusion

To reassemble your device, follow these instructions in reverse order.

Lex

Membre depuis le 10/02/24

509 Réputation

4 tutoriels rédigés

Équipe

0 commentaires

Ajouter un commentaire

Nombre de vues :

Dernières 24 heures : 1

7 derniers jours : 6

30 derniers jours : 22

Total : 76