Aller au contenu principal
Lenovo Thinkpad X220 Keyboard Replacement

Lenovo Thinkpad X220 Keyboard Replacement

Mariska Gramlow

Mariska Gramlow et 6 autres contributeurs

Dernière mise à jour le August 31, 2018

10 minutes
Modérée
Tutoriel réalisé par la communauté
Photos d’action
Conditions préalables manquantes
Meilleure introduction
Tutoriel Archivé
Ce tutoriel est conservé uniquement à des fins de suivis historiques. Utilisez la version actuelle du tutoriel pour effectuer votre réparation.

This is an old version of this guide, use the new one here.

Ce dont vous avez besoin

  1. Lenovo Thinkpad X220 Keyboard Replacement, Battery: étape 1, image 1 de 3 Lenovo Thinkpad X220 Keyboard Replacement, Battery: étape 1, image 2 de 3 Lenovo Thinkpad X220 Keyboard Replacement, Battery: étape 1, image 3 de 3
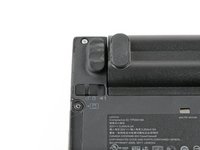
    • Locate the two switches that lock the battery.

    • Then push the left switch outward into the "unlocked" position.

    • This switch will remain in the unlocked position.

  2. Lenovo Thinkpad X220 Keyboard Replacement: étape 2, image 1 de 2 Lenovo Thinkpad X220 Keyboard Replacement: étape 2, image 2 de 2
    • Now push and hold the right switch to the right while using the other hand to gently slide the battery upwards out of the laptop.

  3. Lenovo Thinkpad X220 Keyboard Replacement: étape 3, image 1 de 2 Lenovo Thinkpad X220 Keyboard Replacement: étape 3, image 2 de 2
    • This is a rechargeable Li-Ion battery that has a capacity of 4400 mAh, if you have the 6 cell model.

    • The 4 or 9 cell model has different ratings.

  4. Lenovo Thinkpad X220 Keyboard Replacement, Keyboard: étape 4, image 1 de 1
    • Remove the two J00 screws on the backside.

  5. Lenovo Thinkpad X220 Keyboard Replacement: étape 5, image 1 de 1
    • Remove the plate next to the battery.

    • Remove the side panel.

  6. Lenovo Thinkpad X220 Keyboard Replacement: étape 6, image 1 de 1
    • Close laptop.

    • Flip laptop over so battery side is facing down.

    • The screen needs to be open when separating the keyboard and trackpad from the base.

  7. Lenovo Thinkpad X220 Keyboard Replacement: étape 7, image 1 de 3 Lenovo Thinkpad X220 Keyboard Replacement: étape 7, image 2 de 3 Lenovo Thinkpad X220 Keyboard Replacement: étape 7, image 3 de 3
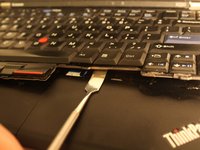
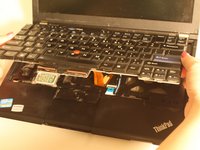
    • Using the Metal Spudger, place between the trackpad and the keyboard and lift up to remove the keyboard and trackpad.

    • Pull keyboard towards yourself.

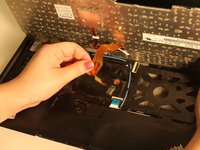
    • Grab the tab on the ribbon wire, pull off to release the keyboard.

    • Pull keyboard towards yourself exposing the ribbon wire that attaches it.

    • Grab the tab on the ribbon wire and pull up to release.

  8. Lenovo Thinkpad X220 Keyboard Replacement: étape 8, image 1 de 1
    • Grab new keyboard and clamp the ribbon into place.

    • Gently push the sides of keyboard into place.

    • Keyboard is now replaced and ready for use.

Conclusion

To reassemble your device, follow these instructions in reverse order.

4 autres ont terminé cette réparation.

Mariska Gramlow

Membre depuis le 01/06/16

926 Réputation

5 tutoriels rédigés

2 commentaires

you're removing way too many screws, you're actually unscrewing the palmrest and some of the motherboard with the keyboard.

alphaLONE - Réponse

this is an absolutely awful guide...do not unscrew all those screws and do NOT use a metal spludger unless you want chips of plastic flying everywhere.

Jesus.

Nice Volcano - Réponse

Ajouter un commentaire

Nombre de vues :

Dernières 24 heures : 0

7 derniers jours : 4

30 derniers jours : 14

Total : 2,617