Aller au contenu principal

MacBook Air 13" Mid 2012 I/O Board Replacement

Ce dont vous avez besoin

  1. MacBook Air 13" Mid 2012 I/O Board Replacement, Lower Case: étape 1, image 1 de 1
    Outil utilisé dans cette étape :
    P5 Pentalobe Screwdriver Retina MacBook Pro and Air
    $5.99
    J'achète
    • Before proceeding, power down your MacBook. Close the display and lay it on a soft surface, top-side down.

    • Use a P5 Pentalobe driver to remove ten screws securing the lower case, of the following lengths:

    • Two 9 mm screws

    • Eight 2.6 mm screws

  2. MacBook Air 13" Mid 2012 I/O Board Replacement: étape 2, image 1 de 1
    • Wedge your fingers between the display and the lower case and pull upward to pop the lower case off the Air.

    • Remove the lower case and set it aside.

  3. MacBook Air 13" Mid 2012 I/O Board Replacement, Battery Connector: étape 3, image 1 de 2 MacBook Air 13" Mid 2012 I/O Board Replacement, Battery Connector: étape 3, image 2 de 2
    • As a precaution against accidental discharge or shock, disconnect the battery connector from the logic board.

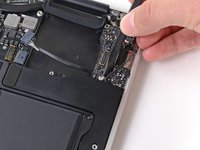
    • Grab the clear plastic pull tab attached to the battery connector and pull it toward the front edge of the Air to disconnect the battery from the logic board.

    • Be sure to pull the connector horizontally toward the battery, and not straight up from the Air, or you may damage the socket on the logic board.

  4. MacBook Air 13" Mid 2012 I/O Board Replacement, I/O Board Cable: étape 4, image 1 de 1
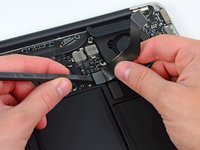
    • Use the flat end of a spudger to pry the I/O board cable connector upward out of its socket on the I/O board.

  5. MacBook Air 13" Mid 2012 I/O Board Replacement: étape 5, image 1 de 1
    • Carefully peel the I/O board cable from the top of the fan.

  6. MacBook Air 13" Mid 2012 I/O Board Replacement: étape 6, image 1 de 2 MacBook Air 13" Mid 2012 I/O Board Replacement: étape 6, image 2 de 2
    • The following connector has an especially deep socket. Use care when disconnecting it.

    • While gently pulling the I/O board cable upward near its connection to the logic board, use the tip of a spudger to pry upward on alternating sides of the connector to help "walk" it out of its socket.

    • Remove the I/O board cable.

  7. MacBook Air 13" Mid 2012 I/O Board Replacement, Fan: étape 7, image 1 de 1
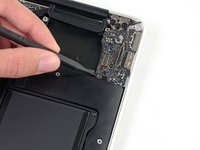
    • Use the tip of a spudger to carefully flip up the retaining flap on the fan cable ZIF socket.

    • Be sure you are prying up on the hinged retaining flap, not the socket itself.

  8. MacBook Air 13" Mid 2012 I/O Board Replacement: étape 8, image 1 de 1
    • Peel the rubber gasket off the adhesive on the top of the fan.

  9. MacBook Air 13" Mid 2012 I/O Board Replacement: étape 9, image 1 de 1
    • Remove the following three screws securing the fan to the upper case:

    • One 3.6 mm T5 Torx screw

    • One 2.7 mm T5 Torx screw

    • One 3.6 mm T5 Torx screw with a short head

  10. MacBook Air 13" Mid 2012 I/O Board Replacement: étape 10, image 1 de 1
    • Lift the fan out of the upper case and carefully pull the fan ribbon cable out of its socket as you remove it from the Air.

  11. MacBook Air 13" Mid 2012 I/O Board Replacement, I/O Board: étape 11, image 1 de 1
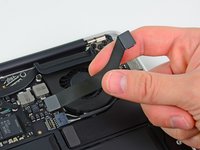
    • Disconnect the I/O board by pulling the power cable away from its socket on the logic board.

    • Pull the cable parallel to the face of the logic board toward the right edge of the Air.

  12. MacBook Air 13" Mid 2012 I/O Board Replacement: étape 12, image 1 de 1
    • Pull the camera cable parallel to the face of the I/O board toward the hinge of the Air to disconnect it from its socket, using the tip of a spudger to help push the connector out of its socket.

    • Do not lift upward on this cable as you disconnect it, as its socket may break off the logic board.

  13. MacBook Air 13" Mid 2012 I/O Board Replacement: étape 13, image 1 de 1
    • Use the flat end of a spudger to pry the left speaker cable connector up and out of its socket on the I/O board.

    • Pry up from beneath the wires.

  14. MacBook Air 13" Mid 2012 I/O Board Replacement: étape 14, image 1 de 2 MacBook Air 13" Mid 2012 I/O Board Replacement: étape 14, image 2 de 2
    • Use the tip of a spudger to flip up the retaining flap securing the microphone ribbon cable to the I/O board.

    • Use the tip of a spudger to remove the volume button ribbon cable from its ZIF connector on the I/O board.

  15. MacBook Air 13" Mid 2012 I/O Board Replacement: étape 15, image 1 de 1
    • Remove the single 4.0 mm T5 Torx screw securing the I/O board to the upper case.

  16. MacBook Air 13" Mid 2012 I/O Board Replacement: étape 16, image 1 de 1
    • Carefully lift the I/O board from its edge nearest the logic board and remove it from the upper case.

Conclusion

To reassemble your device, follow these instructions in reverse order.

41 autres ont terminé cette réparation.

Andrew Optimus Goldheart

Membre depuis le 10/17/09

502 275 Réputation

407 tutoriels rédigés

Équipe

iFixit Membre de l'équipe iFixit

Staff

136 membres

16 560 tutoriels rédigés

4 commentaires

Where can I buy the 2012 I/O board?

Andrew - Réponse

I bought a used I/O board on ebay for $30. Replacing the i/o board solved my problem with the "fan stack" heat sensor which had been unreadable and causing the computer to run very slowly and the fan to run full speed. It was listed like this:

2012 13" MacBook Air MagSafe II DC audio I/O Power Board A1466

fornext - Réponse

HELP NEEDED PLEASE !

While removing the Board I torn apart the pièce at the end of the cable (linked to side) on the l'est of the lasr image. What is it and Howard Can I remplace it ?

Sasha Baba - Réponse

The is a connection that is near the middle outside of the board (near the wifi card) and it looks similar to the I/O connection. Would anyone be able to identify what that connection is and what it is for. I have a 2012 MBA and I wondered if it is a PCIe connection that is unused???

Andy - Réponse

Ajouter un commentaire

Nombre de vues :

Dernières 24 heures : 2

7 derniers jours : 24

30 derniers jours : 86

Total : 30,634