Aller au contenu principal

MacBook Unibody Model A1342 Display Data/Camera Cable Replacement

Ce dont vous avez besoin

  1. MacBook Unibody Model A1342 Display Data/Camera Cable Replacement, Lower Case: étape 1, image 1 de 1
    • Remove the eight 4 mm Phillips screws securing the lower case to the MacBook.

  2. MacBook Unibody Model A1342 Display Data/Camera Cable Replacement: étape 2, image 1 de 3 MacBook Unibody Model A1342 Display Data/Camera Cable Replacement: étape 2, image 2 de 3 MacBook Unibody Model A1342 Display Data/Camera Cable Replacement: étape 2, image 3 de 3
    • The lower case is constructed of rubber-coated aluminum. Do not excessively bend the aluminum during removal, as any permanent deformation will cause tolerance issues after reassembly.

    • Slightly lift the lower case near the vent opening.

    • Continue running your fingers between the lower and upper cases until the upper case pops off its retaining clips.

    • The location of these three clips is shown in the third picture.

  3. MacBook Unibody Model A1342 Display Data/Camera Cable Replacement, Battery: étape 3, image 1 de 1
    • For precautionary purposes, we advise that you disconnect the battery connector from the logic board to avoid any electrical discharge. This step is optional and is not required.

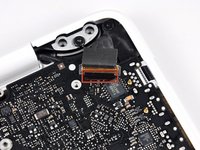
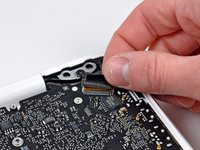
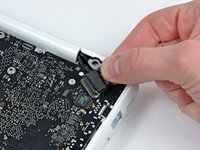
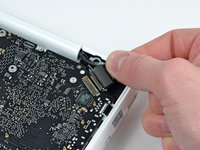
    • Use the flat end of a spudger to lift the battery connector up out of its socket on the logic board.

    • It may be easier to use your fingernails to lift up on both sides of the connector.

  4. MacBook Unibody Model A1342 Display Data/Camera Cable Replacement, Rear Vent: étape 4, image 1 de 1
    • Remove the following screws from the optical drive side of the rear vent:

    • Two 10 mm T8 Torx

    • Two 5.2 mm Phillips

  5. MacBook Unibody Model A1342 Display Data/Camera Cable Replacement: étape 5, image 1 de 1
    • Remove the following screws from the port side of rear vent:

    • Two 10 mm T8 Torx

    • Two 5.2 mm Phillips

  6. MacBook Unibody Model A1342 Display Data/Camera Cable Replacement: étape 6, image 1 de 1
    • Carefully lift the rear vent out of the upper case.

  7. MacBook Unibody Model A1342 Display Data/Camera Cable Replacement, Display: étape 7, image 1 de 1
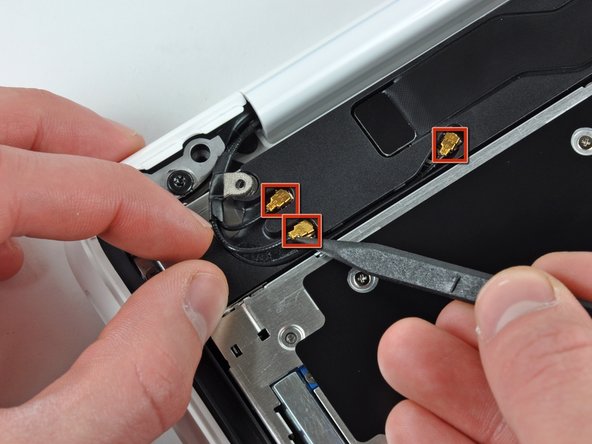
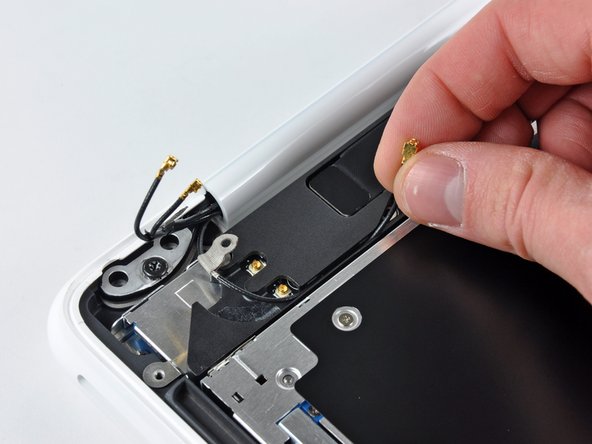
    • Remove the single 3 mm Phillips screw securing the AirPort/Bluetooth antenna ground strap to the rear speaker.

  8. MacBook Unibody Model A1342 Display Data/Camera Cable Replacement: étape 8, image 1 de 2 MacBook Unibody Model A1342 Display Data/Camera Cable Replacement: étape 8, image 2 de 2
    • Use the tip of a spudger to pry the AirPort and Bluetooth antenna connectors (3 total) up off the AirPort/Bluetooth card.

    • De-route the long antenna from its channel in the rear speaker housing.

  9. MacBook Unibody Model A1342 Display Data/Camera Cable Replacement: étape 9, image 1 de 2 MacBook Unibody Model A1342 Display Data/Camera Cable Replacement: étape 9, image 2 de 2
    • Grab the plastic pull tab secured to the display data cable lock and rotate it toward the DC-In side of the computer.

    • There is also a thin metal lock clip under the plastic tab that has to be released ( Use the tip of a spudger ) before you can disconnect the display data cable.

  10. MacBook Unibody Model A1342 Display Data/Camera Cable Replacement: étape 10, image 1 de 2 MacBook Unibody Model A1342 Display Data/Camera Cable Replacement: étape 10, image 2 de 2
    • Gently pull the display data cable connector away from its socket on the logic board.

    • Pull the socket parallel to the face of the logic board.

    • The display data cable socket is made of very thin metal and is easily bent. Be sure to pull the connector straight away from its socket.

  11. MacBook Unibody Model A1342 Display Data/Camera Cable Replacement: étape 11, image 1 de 1
    • Open your MacBook so the display is perpendicular to the upper case.

    • Place your opened MacBook on a table as pictured.

    • While holding the display and upper case together with your left hand, remove the remaining 7.8 mm with lock washer T8 Torx screw from the lower display bracket.

  12. MacBook Unibody Model A1342 Display Data/Camera Cable Replacement: étape 12, image 1 de 1
    • Be sure to hold the display and upper case together with your left hand. Failure to do so may cause the freed display/upper case to fall, potentially damaging each component.

    • Remove the last remaining T8 Torx screw securing the display to the upper case.

  13. MacBook Unibody Model A1342 Display Data/Camera Cable Replacement: étape 13, image 1 de 2 MacBook Unibody Model A1342 Display Data/Camera Cable Replacement: étape 13, image 2 de 2
    • Grab the upper case with your right hand and rotate it slightly toward the top of the display so the upper display bracket clears the edge of the upper case.

    • The display data cable may cause the upper display bracket to get caught on the upper case. It may be helpful to slightly rotate the upper case away from the display for more clearance.

    • Rotate the display slightly away from the upper case.

  14. MacBook Unibody Model A1342 Display Data/Camera Cable Replacement: étape 14, image 1 de 1
    • Lift the display up and away from the upper case, minding any brackets or cables that may get caught.

  15. MacBook Unibody Model A1342 Display Data/Camera Cable Replacement, Front Display Bezel: étape 15, image 1 de 3 MacBook Unibody Model A1342 Display Data/Camera Cable Replacement, Front Display Bezel: étape 15, image 2 de 3 MacBook Unibody Model A1342 Display Data/Camera Cable Replacement, Front Display Bezel: étape 15, image 3 de 3
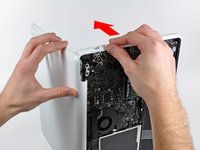
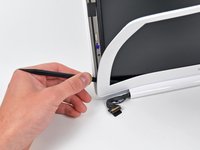
    • Insert the flat end of a spudger between the thin rubber strip surrounding the front display bezel and the rear display bezel.

    • Do not try to insert the spudger between the thin rubber strip and the plastic face of the front display bezel.

    • Use the flat end of your spudger to carefully pry the front display bezel away from the adhesive securing it to the rear display bezel.

    • Do not pry against the fragile glass LCD panel. Also, do not excessively bend the plastic as it may permanently deform.

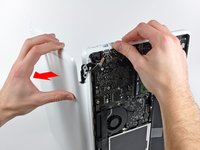
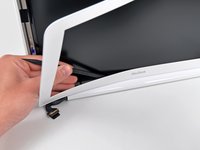
    • Continue prying until the front display bezel is free along the right side of the display and behind the right clutch hinge.

  16. MacBook Unibody Model A1342 Display Data/Camera Cable Replacement: étape 16, image 1 de 2 MacBook Unibody Model A1342 Display Data/Camera Cable Replacement: étape 16, image 2 de 2
    • Use the flat end of a spudger to pry the front display bezel off the top edge of the display assembly.

    • It may be helpful to insert and twist the flat end of your spudger to enlarge the gap between the front & rear display bezels as you work your way around the edge of the display.

    • Continue separating until the top edge of the front display bezel is free from the display assembly.

    • Be careful when prying near the iSight camera board, as it has exposed circuitry and is delicate.

  17. MacBook Unibody Model A1342 Display Data/Camera Cable Replacement: étape 17, image 1 de 2 MacBook Unibody Model A1342 Display Data/Camera Cable Replacement: étape 17, image 2 de 2
    • Use your spudger to pry the left side of the front display bezel away from the display assembly.

    • Carefully pry up the area behind the left clutch hinge.

    • During reassembly, be sure the small plastic pegs on the front display bezel mate up with the holes in the rear display bezel (shown in red). Failure to do so will prevent the front display bezel from sitting flush against the rear bezel.

  18. MacBook Unibody Model A1342 Display Data/Camera Cable Replacement: étape 18, image 1 de 3 MacBook Unibody Model A1342 Display Data/Camera Cable Replacement: étape 18, image 2 de 3 MacBook Unibody Model A1342 Display Data/Camera Cable Replacement: étape 18, image 3 de 3
    • Slowly work your way across the lower edge of the front display bezel until it is free from the display assembly.

    • Be sure to pry up as far away from the LCD as possible, as it extends below the edge of the front display bezel.

    • When you get about half way across, pry up from the other side of the front display bezel's lower edge to ease the process.

  19. MacBook Unibody Model A1342 Display Data/Camera Cable Replacement: étape 19, image 1 de 1
    • Remove the front display bezel from the display assembly.

    • To help the adhesive avoid losing is tackiness, do not excessively handle the adhesive and be sure to keep it clean until you are ready for installation.

  20. MacBook Unibody Model A1342 Display Data/Camera Cable Replacement, Clutch Cover: étape 20, image 1 de 1
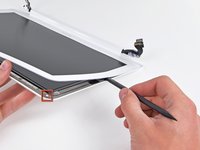
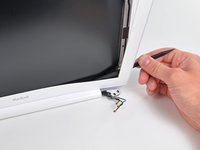
    • Remove the two 3 mm Phillips screws securing the clutch cover to the rear display bezel.

  21. MacBook Unibody Model A1342 Display Data/Camera Cable Replacement: étape 21, image 1 de 3 MacBook Unibody Model A1342 Display Data/Camera Cable Replacement: étape 21, image 2 de 3 MacBook Unibody Model A1342 Display Data/Camera Cable Replacement: étape 21, image 3 de 3
    • Insert the flat end of a spudger into the open end of the clutch cover and pry up to release it from the rear display bezel.

    • Pry up from both sides of the clutch cover until it is completely free from the display assembly.

  22. MacBook Unibody Model A1342 Display Data/Camera Cable Replacement: étape 22, image 1 de 1
    • Remove the clutch cover from the display assembly.

  23. MacBook Unibody Model A1342 Display Data/Camera Cable Replacement, LCD: étape 23, image 1 de 1
    • Remove following six screws securing the LCD to the rear display bezel:

    • Four 3.4 mm Phillips.

    • Two 3 mm Phillips.

  24. MacBook Unibody Model A1342 Display Data/Camera Cable Replacement: étape 24, image 1 de 1
    • Do not try to remove the LCD yet. The circuitry along its lower edge is wedged in a gap along the lower edge of the display recess in the plastic display assembly.

    • Hold the display vertically and tip it enough to grab the top edge of the LCD and rotate it slightly out of the display assembly, being careful not to break the circuitry off its lower edge.

  25. MacBook Unibody Model A1342 Display Data/Camera Cable Replacement: étape 25, image 1 de 1
    • Peel the piece of tape covering the display data cable connector away from the edge closest to the LCD.

  26. MacBook Unibody Model A1342 Display Data/Camera Cable Replacement: étape 26, image 1 de 2 MacBook Unibody Model A1342 Display Data/Camera Cable Replacement: étape 26, image 2 de 2
    • Use the tip of a spudger to flip up the thin steel retaining clip securing the display data cable to its socket on the LCD.

    • Pull the display data cable straight away from its socket on the LCD.

    • Lift the LCD out of the display assembly and set it aside.

  27. MacBook Unibody Model A1342 Display Data/Camera Cable Replacement, Display Data/Camera Cable: étape 27, image 1 de 1
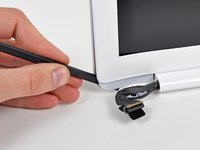
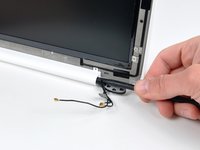
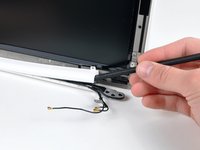
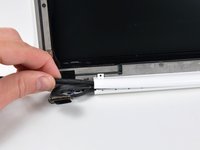
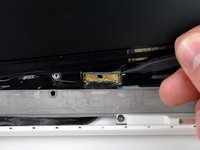
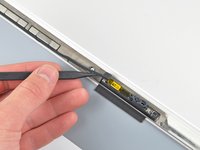
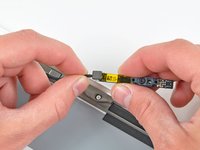
    • Remove the two small pieces of black tape securing the display data/camera cable to the rear display bezel.

  28. MacBook Unibody Model A1342 Display Data/Camera Cable Replacement: étape 28, image 1 de 2 MacBook Unibody Model A1342 Display Data/Camera Cable Replacement: étape 28, image 2 de 2
    • Use the pointed tip of a spudger to pry the camera board off the display assembly.

    • Disconnect the camera cable by pulling its connector away from the socket on the camera board.

  29. MacBook Unibody Model A1342 Display Data/Camera Cable Replacement: étape 29, image 1 de 1
    • De-route the display data/camera cable from the slot cut into the rear display bezel.

  30. MacBook Unibody Model A1342 Display Data/Camera Cable Replacement: étape 30, image 1 de 1
    • Carefully pull the display data/camera cable out from under the frame attached to the rear display bezel and remove it from the display assembly.

Conclusion

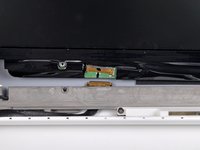
To reassemble your device, follow these instructions in reverse order.

29 autres ont terminé cette réparation.

2 commentaires

I hate apple! Freaks!!

Paul van Gool - Réponse

Where Can I buy the Display Data/Camera Cable?

I only found the installing guide..

oliveribarra - Réponse

Ajouter un commentaire

Nombre de vues :

Dernières 24 heures : 1

7 derniers jours : 10

30 derniers jours : 31

Total : 36,817