Aller au contenu principal
PSP Go Analog Joystick Replacement

PSP Go Analog Joystick Replacement

Miroslav Djuric

Miroslav Djuric et 5 autres contributeurs

Dernière mise à jour le May 7, 2024

20 minutes
Modérée

Use this guide to put a fresh analog joystick into the PSP Go!

Ce dont vous avez besoin

Pièces

Outils

Afficher plus…

  1. PSP Go Analog Joystick Replacement, Back Cover: étape 1, image 1 de 2 PSP Go Analog Joystick Replacement, Back Cover: étape 1, image 2 de 2
    • Unscrew the four Phillips screws on the back of the PSP Go.

    • Rotate the PSP so you can see the top of the device.

    • Unscrew the two Phillips screws next to the volume buttons.

  2. PSP Go Analog Joystick Replacement: étape 2, image 1 de 2 PSP Go Analog Joystick Replacement: étape 2, image 2 de 2
    • Use a plastic opening tool around the perimeter of the back cover to loosen it on all sides.

    • Open the back cover by gently lifting the right side, and rotating it to the left side (as if you were opening a book).

    • Be careful not to rotate the back cover from the bottom, as you will break the plastic screw holes on top of the device.

  3. PSP Go Analog Joystick Replacement, Top Cover: étape 3, image 1 de 1
    • Pull the top cover upwards gently from its housing.

  4. PSP Go Analog Joystick Replacement, Bottom Plate: étape 4, image 1 de 2 PSP Go Analog Joystick Replacement, Bottom Plate: étape 4, image 2 de 2
    • Remove the two Phillips screws holding the bottom plate.

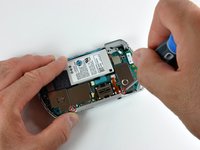
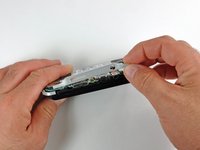
    • Gently lift the bottom plate away from the device.

  5. PSP Go Analog Joystick Replacement, Analog Joystick: étape 5, image 1 de 1
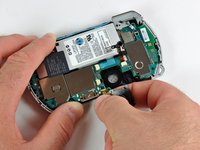
    • Use a #00 Phillips screwdriver to remove both screws holding the analog joystick in place.

  6. PSP Go Analog Joystick Replacement: étape 6, image 1 de 2 PSP Go Analog Joystick Replacement: étape 6, image 2 de 2
    Outil utilisé dans cette étape :
    Tweezers
    $4.99
    • Use a plastic opening tool to gently flip up the analog joystick's cable connector.

    • Use your fingers or tweezers to gently pull out the analog joystick cable from its connector.

Conclusion

To reassemble your device, follow these instructions in reverse order.

5 autres ont terminé cette réparation.

1 commentaire de tutoriel

What about the plastic tab on the ribbon cable how do i attach the ribbon cable to the connector its very delicate

daniel - Réponse

Ajouter un commentaire

Nombre de vues :

Dernières 24 heures : 1

7 derniers jours : 12

30 derniers jours : 64

Total : 22,798