
Philips Kettle HD4685 Capacitors Replacement
Introduction
Passez à l'étape 1I found the instructions partly at this pages and decided to upload the completely new here:
http://www.brunwinkel.de/2011/09/wasserk... (german)
Ce dont vous avez besoin


-
-
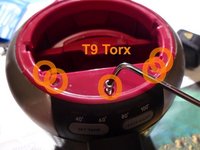
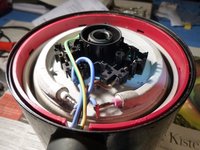
Remove top lid
-
Unscrew 5x Torx (T8)
-
Remove red cover
-
Remember position of metallic bracket
-
-
-
Carefully remove metallic strip
-
llift-up the entire black electric carrying unit carefully about 1 cm
-
Un-click the fix of the black front cover and remove
Om the one I have the front cover is gray. But the proses works so no worries.
-
-
-
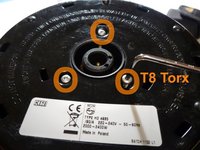
Unscrew 3 Torx T8 at the bottom of the kettle
-
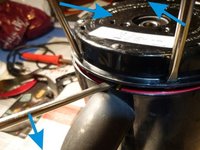
take 3 big flat screwdriver to 3 of the 6 holes and gently apply pressure directed to the middle to unlock the bottom cover
-
in parallel: with a 3rd screwdriver lift the cover by help of the occuring slit at the side
-
bottom cover should be revomed with gently force
Bottom cover was removed without any problem
My one have 11 holes. That made it difficult. Ended up using 6 screwdrivers to gett the jobb done. After getting the cover off. I observed that only half of them hade a hock that needed me to use a screwdriver. The two closest to the handle have hocks. Then it's every other.
-
-
-
-
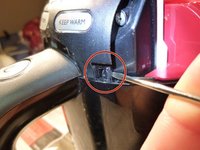
Unscrew the two Torx T8 to open the electric carrying unit to a half
-
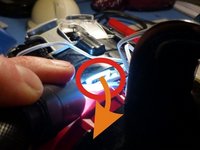
unlock carefully the white rectacgular clip to release the black cover completely
It was really hard to find this rectagular grip. It is right in the middle. But I took off the black cover without unlocking it anyway, used some force, but better dont do it.
Same for me. Ended up using force. Wasn't a problem. But better not if you can help it.
-
-
-
Lift the electric unit
-
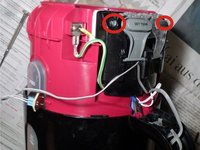
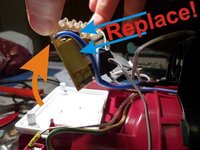
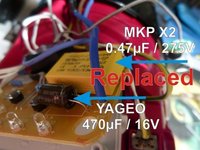
change the two marked capacitors by unsoldering the old ones
-
yellow 'MKP X2 0.47μF / 275V'
-
black '470μF / 16V' - check polarity: white stripe of the minus has to be located near the yellow capacitor!
Achtung, die Bezeichnung X2 ist hier essentiell wichtig ! Es handelt sich um sogenannte selbstheilende Kondensatoren mit spezieller Spezifikation.
Siehe auch https://www.elektronik-kompendium.de/new...
-
-
-
Assemble the kettle in reverse manner and check at the end that you don't have any parts over
-
ENJOY YOUR WORKING KETTLE!
-
Now it should heat up to 100°C and make 'beep' at the end again
My "Keep warm" button did not work, but this mostly to poor assembly :) anyway it is not used usually.
-


To reassemble your device, follow these instructions in reverse order.
To reassemble your device, follow these instructions in reverse order.
Annulation : je n'ai pas terminé ce tutoriel.
12 autres ont terminé cette réparation.
15 commentaires
Dear RG! You made me hero in the eyes of my wife and saved lots of money as I will never buy ordinary kettle without a temperature choice. THANKS FOR THE FANTASTIC GIUDE!
Two notes: (1) It should be mentioned that the MKP X2 0.47μF / 275V capacitor is usually the faulty one. The posts on the German site to which you linked reported that it looses capacity until the power is no longer enough to power the 80 degree LED when it comes on. In my case, similar to the reports from the German site, the remaining capacity had been lower than 0.14μF---clearly not enough. (2) One apparently does not have to use the 26.5 x 8.5 x 17 mm version that was part of the kettle initially, I had an old X2 capacitor from a broken power supply with the same parameters but with a size of 18 x 10 x 16 mm and that worked just fine after I had extended the short connecting wires.
A third note: this kettle is also known to leak after a while due to the deposits that collect from repeatedly heating up hard water (lots of minerals). Follow steps 1--4 of this guide, then push the heat plate out by gently pushing from the inside out, remove and clean the sealing ring, also clean the inside of the kettle, then put the seal back to where it came from, and push the whole heat plate assembly back into the device (orient it such that the cables on the bottom are in the right position). Then reassemble. This information is also from the linked German sites, and it worked like a charm!
Did the capacitor change year ago. Today it started leaking after first proper descaling (ever). Desassembled it, there is a seal between the metallic base plate and the round plastic sides. Could be that the seal has lost some of the flexibility during the years, but also cleaning might have done the trick. I had bought a new one already, but I’m sure this coud have been repaired still, either cleaning the seal or changing it. After disassembly I can say that this was a well engineered product.
Great. I fixed it. The 'MKP X2 0.47μF / 275V was demaged.
Meanwhile I had to throw away my kettle (at least donated some parts of it) thanks to another broken part - the transparent side plastic was cracked, it was very porous and had a hole. It was definitively the material itself, either because of the temperature or maybe some UV aging through the window? I dont know - but it could not be fixed unfortunately :-( Bad by design, Mr. Philips?!
I have a problem with the kettle. I already replaced the MKP X2 0.47μF / 275V capacitor but the problem remains. The kettle keeps shutting down and I must turn it on repeatedly until it reaches 60°C. After reaching that temperature, it works normally. Need help.
My e-mail is audacesfortunajuvat101@gmail.com
Thanks
And what is about replacing the 470μF / 16V as well as stated in the instructions? (Placing your e-mail here would probably only results in spam…)
Robert -
This named is “Philips HD 4686” in Europe.
Ivan Perepelkin - Réponse
Es handelt sich beim HD 4685 um 5 x T10 Schrauben.
Andreas - Réponse