Aller au contenu principal
Razer Barracuda X Motherboard Replacement

Razer Barracuda X Motherboard Replacement

Josiah Cassidy

Josiah Cassidy et 6 autres contributeurs

Dernière mise à jour le January 8, 2025

30 - 40 minutes
Modérée
Nécessite plus d'images
Étapes manquantes
Meilleure introduction

Ce dont vous avez besoin

Outils

  1. Razer Barracuda X Motherboard Replacement, Motherboard: étape 1, image 1 de 2 Razer Barracuda X Motherboard Replacement, Motherboard: étape 1, image 2 de 2
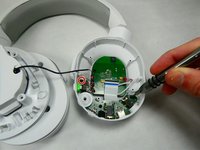
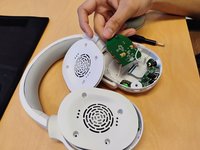
    • Remove the cushion by pulling it off from the edge and out from the grooves, Continue to pull the cushion away from the speaker until the cushion is fully separated.

  2. Razer Barracuda X Motherboard Replacement: étape 2, image 1 de 3 Razer Barracuda X Motherboard Replacement: étape 2, image 2 de 3 Razer Barracuda X Motherboard Replacement: étape 2, image 3 de 3
    • Using a Phillips #0 screwdriver to unscrew the four screws that attach the two pieces of the right speaker together.

    • Gently lift the plastic plate away from the housing, with care not to damage the connected wire.

  3. Razer Barracuda X Motherboard Replacement: étape 3, image 1 de 1
    • Using a Phillips #0 screwdriver, remove the single screw attaching the volume spinner to the motherboard.

    • Remove the spinner.

  4. Razer Barracuda X Motherboard Replacement: étape 4, image 1 de 1
    • Remove the Phillips #0 screws securing the I/O board from the bottom shell of the right speaker.

  5. Razer Barracuda X Motherboard Replacement: étape 5, image 1 de 2 Razer Barracuda X Motherboard Replacement: étape 5, image 2 de 2
    Outil utilisé dans cette étape :
    Tweezers
    $4.99
    • To fully remove the I/O board from the right speaker, use tweezers to unplug the ribbon cable attaching the I/O board to the main motherboard.

  6. Razer Barracuda X Motherboard Replacement: étape 6, image 1 de 1
    • Using the same Philips #0 screwdriver, remove the four screws attaching the motherboard to the plastic housing. Once those screws are removed, remove the main motherboard and replace it.

  7. Razer Barracuda X Motherboard Replacement: étape 7, image 1 de 3 Razer Barracuda X Motherboard Replacement: étape 7, image 2 de 3 Razer Barracuda X Motherboard Replacement: étape 7, image 3 de 3
    • Desolder all of the remaining motherboard connections.

    • Do not hold the iron by the barrel as depicted in the images.

    • Remove the motherboard.

Conclusion

To reassemble your device, follow the above steps in reverse order.
Take your e-waste to an R2 or e-Stewards certified recycler.
Repair didn’t go as planned? Try some basic troubleshooting or ask our Answers community for help.

2 autres ont terminé cette réparation.

Josiah Cassidy

Membre depuis le 10/26/22

241 Réputation

2 tutoriels rédigés

Équipe

UMass Dartmouth, Team 2-3, Petersen Fall 2022 Membre de l'équipe UMass Dartmouth, Team 2-3, Petersen Fall 2022

UMASSD-PETERSEN-F22S2G3

4 membres

10 tutoriels rédigés

3 commentaires

Now if I could just find somewhere to buy the I/O board. My volume slider is crackling and sometimes one cup is louder than the other.

Michael Nugent - Réponse

You ever find a replacement?

Gaelan Garrett -

@michaelnugent My volume wheel just broke too! Must be a weak point in the design.

Michael Shu - Réponse

Ajouter un commentaire

Nombre de vues :

Dernières 24 heures : 2

7 derniers jours : 49

30 derniers jours : 157

Total : 4,098