
Remplacement de l'écran de la Nintendo 2DS
Introduction
Passez à l'étape 1Ce tutoriel montre comment accéder à l'écran de la Nintendo 2DS afin de le réparer ou le nettoyer.
Ce dont vous avez besoin
Pièces

Outils


Afficher plus…
-
-
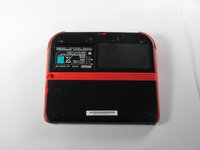
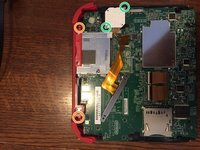
Retirez les 2 vis captives cruciformes qui fixent la coque arrière supérieure.
-
-
-
Retirez les dix vis cruciformes qui fixent le panneau arrière.
Can't take off the screw top left next to the battery. What type of screwdriver do I use and where can I find some?
I used a husky with changeable heads, you could probably find one on amazon
The screws are 6.2mm long
god I thought it was because I was repairing a sibling's ds that had something spilled on it (idk maybe that they didn't clean it good when it happened) but continued to struggle even with screws that looked fine... wish I had checked the comments sooner :/ Please like the above, update this guide! It sucks knowing that someone like me is also gonna probably miss this. I didn't get super far but well. I already stripped down some which sucks either way. Ironically, I noticed that using a size slightly smaller gets the job done better. Ironic in that you'd normally avoid that because it's more likely to strip with small bits scrapping the inside. But if you are real careful it can hang on and twist. I'd recommend just getting the JIS but maybe this might work for some- I also want to emphasize SLIGHTLY smaller phillips.
-
-
-
-
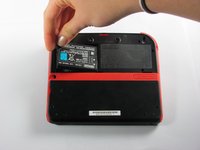
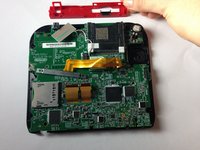
Tirez délicatement le panneau arrière de l'appareil vers le haut.
-
-
-
Retournez soigneusement le panneau arrière pour repérer la nappe qui y est connectée.
-
Retirez les deux vis cruciformes qui fixent la nappe au panneau arrière.
You can also detach the cable from the motherboard safely by flipping up the connector on the motherboard. Just don't forget to reattach. Some will find this tedious but may save time if you know what you're doing with said connectors.
I agree, this is what the guide i followed said to do and since I was disconnecting all the other ribbon cables it made perfect sense to do it that way.
Lin -
pay attention: my 2ds dropped it's lens covers at this step
Likewise, I used a tiny drop of glue to put the lens back in place. Take care not to dirty the lens.
The picture you have there has the camera lens ribbon installed upside down. The ribbon needs to be pointing down when you re-attach it not up.
Agreed, ribbon cable looks upside down in picture
-
-
-
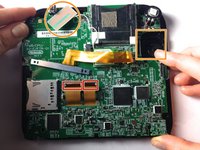
Tenez les panneaux latéraux du boîtier de l'appareil avec vos doigts et tirez vers l'extérieur pour les retirer.
When reattaching during reassembly, take great care to ensure volume slider piece is correctly aligned with potentiometer tab on motherboard, otherwise volume control cannot be changed.
The are two small metal pins in the bottom corners of the case, take care not to misplace them.
The (3?) small ribbon cables on the bottom of the motherboard appear to already have been unplugged in this step. unplug them while unplugging the two large screen ribbon cables in step 10
What are the three ribbon cable at the bottom are supposed to be. Pls
I have managed to remove the small ribbon cable in the centre but there are three others (the two shown here and then one by the joycon) that I need to unplug but I can't figure out how. The first one I did had the little black thing you slide away to release it but I can't figure out how to get the other three released
I actually figured it out. for anyone else wondering, they grey centre piece can be lifted up like the black strip on regular sized ribbon cables
-
-
-
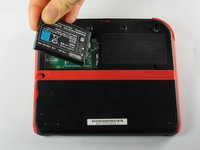
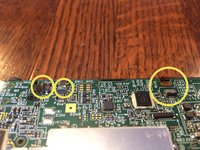
Retirez les 12 vis cruciformes de couleur laiton fixant la carte principale.
-
-
-
Il y a deux vis supplémentaires situées sur le rail supérieur. Retirez-les pour retirer complètement les boutons et le rail supérieur.
-
Il y a deux vis maintenant la base du joystick qui doivent être retirées. (Attention au câble plat, il reste connecté !)
-
Tenez le panneau supérieur avec vos doigts et retirez-le de l'appareil pour le retirer.
When reassembling, take care to ensure all buttons, and rubber button pads are located correctly BEFORE securing the motherboard.
Please double check what Elliot said. From experience: DON'T FORGET THE [SLEEP] SLIDER
-
-
-
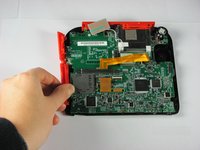
Détachez les 2 nappes en soulevant les connecteurs flip noirs qui les maintiennent.
-
Soulevez la planche rectangulaire assise dans le visage et soulevez le carré blanc qui est le moteur du joystick (cela demande un peu d'effort). Les deux restent attachés à la carte mère.
-
Sur certains modèles, vous devrez retirer trois autres petits câbles plats au bas de l'écran. Ils sont sécurisés par des connecteurs rabattables. SOYEZ PRUDENT!
-
En tenant la carte mère de chaque côté, soulevez-la pour la retirer.
Don't forget to disconnect the two tiny ribbon cables on the bottom of the motherboard that attach to the microphone and home button.
What happens if I can't get the ribbons to reattach? Is the board broke irreparably?
What about the top 2 wires
Briana the 3 wires on bottom of board are covered under screen 2 step 10.
y e e t y e e t m y d u d e s ! ! ! ! ! ! ! ! ! !!n ! ! ! ! ! ! ! ! ! !
The motherboard of my 2017(I think) 2DS is definitely laid out differently than in this guide, be careful.
Cosa succede se i connettori dei 3 piccoli cavi piatti si dovessero rompere??
How do I flip up the two ribbons ( need help desperately)
-
-
-
Saisissez fermement l'écran par un coin et soulevez-le du panneau avant de la Nintendo 2DS.
If one of the ribbon connectors breaks, can computer tape be used to secure it?
Do you have to buy a new screen? Or can I use my old screen
You can buy a new screen if your old one is broken and needs to be replaced. If your old screen still works fine, you can use it.
Nicholas -
-


Pour remonter votre appareil, suivez ces instructions dans l'ordre inverse.
Pour remonter votre appareil, suivez ces instructions dans l'ordre inverse.
Annulation : je n'ai pas terminé ce tutoriel.
79 autres ont terminé cette réparation.
Merci à ces traducteurs :
100%


Ces traducteurs nous aident réparer le monde ! Vous voulez contribuer ?
Commencez à traduire ›
Équipe

Cal Poly, Team 70-1, Forte Winter 2015 Membre de l'équipe Cal Poly, Team 70-1, Forte Winter 2015
CPSU-FORTE-W15S70G1
4 membres
35 tutoriels rédigés
30 commentaires de tutoriel
Camera ribbon cable is very brittle, be careful.
Thank you so much, Fina! You have done a fantastic job explaining each step incredibly well! I very much appreciate all of your efforts into skillfully describing the process of disassembling the 2DS. I was able to understand your instructions and thus was able to make a lucky kiddo super happy! Thanks again!
-Skye
what about a new screen?
Once you've removed your screen, what are you supposed to do with it to clean and/or repair?
You will have to buy a replacement. You cannot repair the screen if it isn’t working.
Anthony -
when you remove the old screen your supposed to put a new one thay cost 25$ on ebay
its just going to be a spare part that if posible you can repair
bip bip lechuga
i love these guides.
Can someone help, i have a scratched screen i want to replace the touchscreen works fine, can the cover be replaced on its own??
Which screen is it. If it’s the top just peel it off and get a new one. If it’s the bottom you’re gonna have to follow these steps to acess it to replace it because it is an actual component that makes the touch screen work
do u need the microphone cable to be attached for the 2DS to power on? I broke the connector when i was taking it apart. Now i only have the 2 large ribbon cables attached and the home cable attached but cannot power it on. When i power on, one light turns on then there is a delay and it shuts down. any ideas how i can attach the microphone cable without the connector?
I paid a little bit to much for the screen but this guide was definitely helpful I didn’t really need it but it was a great reference point, keep in mind that you need a 000 philips that’s not too pointy my biggest road block is that all the screwdrivers I had where way to pointy and wouldn’t grab the screw. And be mindful of not stripping the motherboard screws they are really soft and installed really tightly from the factory just apply constant down pressure and go slowly. When it comes to the ribbon cables be gingerly but your gonna need to bend the new ones up a tad to pass them through the mother board. Take your time on the small ones they will definitely be a challenge but it’s not impossible.
Question. When I reassembled and turned it on the top screen colors aren't clear but the bottom is fine?Do you think it's the quality of the screen or maybe 1 of the ribbons maybe not in right?
I need the screen where do i buy it
eBay easiest place
Thanks the instructions worked great! A bit of extra care is needed while reassembling. First time I put it back the volume slider wasn't seated correctly and the rubber backing for start/select had shifted. Had to take it all back apart to reset it so be warned!
I’m so glad I read your comment before I started my own repair, since both of these things would have happened to me. Add to these couple things the alignment of the joystick components being a little fickle. (And boy - those bottom ribbon cables are really small.)
Pedro -
does this reset any data on the 2DS itself?
No it does not delete the data
Like if I download a game prior to doing this will the game still be downloaded when I’m done fixing my 2DS?
Never mind. For anybody with the same question, the game will usually download to the SD card. As long as it isn’t damaged, your game should still be there.
My model of 2DS(2017?) is definitely laid out a little differently than pictured. Be careful not to miss any of the tiny ribbon cables at the bottom.