Il est possible que cette traduction ne reflète pas les dernières mises à jour du tutoriel source. Aidez à mettre à jour la traduction ou bien consultez le tutoriel source.
Introduction
Consultez ce tutoriel pour remplacer l'ensemble connecteur de charge Lightning de votre iPhone 8 Plus, ce qui peut résoudre plusieurs problèmes liés à la charge et à la connectivité.
Ce dont vous avez besoin
-
-
Éteignez votre iPhone avant de commencer le démontage.
-
Dévissez les deux vis Pentalobe de 3,5 mm sur le bord inférieur de l'iPhone.
-
-
-
Recouvrez l'écran de bandes de ruban adhésif, qui se chevauchent, jusqu'à ce que toute la surface soit couverte.
-
Si la ventouse n'adhère pas au cours des étapes suivantes, pliez un morceau de ruban adhésif épais (du ruban adhésif toilé p.e.) pour former une poignée et soulevez l'écran de cette façon.
-
-
-
Les trois étapes suivantes sont consacrées à la procédure avec l'Anti-Clamp, un outil facilitant les procédures d'ouverture. Si vous n'avez pas d'Anti-Clamp, passez à la procédure alternative trois étapes plus loin.
-
Tirez la poignée bleue vers l'arrière pour débloquer les bras de l'Anti-Clamp.
-
Insérez le côté droit ou gauche de votre iPhone entre les bras.
-
Positionnez les ventouses près du bord inférieur de l'iPhone, juste au-dessus du bouton home, une sur le dessus, l'autre en dessous.
-
Appuyez sur les deux ventouses pour qu'elles adhèrent bien à l'endroit voulu.
-
-
-
Tirez la poignée bleue vers l'avant pour bloquer les bras.
-
Tournez la poignée dans le sens horaire, de 360 degrés ou jusqu'à ce que les ventouses commencent à s'étirer.
-
Vérifiez que les ventouses restent bien alignées entre elles. Si elles commencent à se décaler, détachez-les pour les réaligner.
-
-
-
Chauffez un iOpener et faites-le passer à travers les bras de l'Anti-Clamp.
-
Pliez l'iOpener de façon qu'il repose sur le bord inférieur de l'iPhone.
-
Attendez une minute que l'adhésif se ramollisse et qu'un espace s'ouvre.
-
Insérez un médiator sous l'écran lorsque l'Anti-Clamp a créé un espace suffisamment grand.
-
Sautez les trois étapes suivantes.
-
-
-
Utilisez un sèche-cheveux ou préparez un iOpener. Posez celui-ci sur la partie inférieure de l'iPhone pendant environ 90 secondes afin de ramollir la couche d'adhésif en dessous.
6/14/23 I did this repair but used a heat gun on low for 60 seconds. This allowed me to open the case as the instructions say, but in the end the Home button failed. I probably over heated it. I used this "go around" for a virtual Home button. I don't care about touch ID:
-
-
-
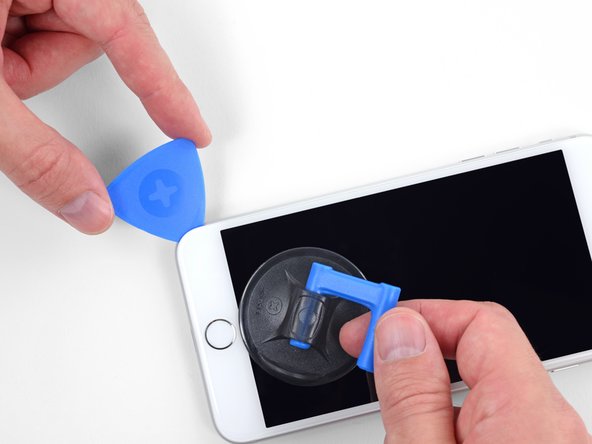
Posez une ventouse sur la partie inférieure de l'écran, juste au-dessus du bouton home.
Using just the single suction cup that is included in the battery replacement kit probably wouldn’t open the device. An iOpener and an iSlack should be the recommended method. However, you can get it open with just the single suction cup and iOpener, but does take a lot of time.
Get an iOpener and iSlack with the battery replacement kit.
I used a flat x-acto (#18) blade knife tool to gently pry back the screen enough to allow me to insert the pick near the bottom corner. I then worked the pick under the screen as mentioned in steps 5 & 6 below then. This worked really well for me.
I used the suction cup without heating the phone - the adhesive came away quite easily without applying any heat. Maybe due to age of phone (nearly 4 years old). Worth trying.
My screen was very shattered, and was quite hard to get suction, as my tape was very low quality. However, after pulling it up a little bit, I was able to insert a regular razor blade into the very small gap and used that as a lever.
Oh my goodness! Don't do that again. You can definitely damage something in the phone if you use a sharp metal razor blade..
cytur -
-
-
-
Tirez sur la ventouse de façon ferme et constante pour créer un petit interstice entre le panneau avant et la coque arrière.
-
Insérez un médiator ou tout autre outil de levier fin dans cet interstice sur quelques millimètres.
After multiple tries and using a very hot iOpener, it will not open.
In sheer frustration, I pulled out my trusty pocket knife and managed to lift the bottom of the screen slightly, but in the process, cracked the glass from the bottom to the home button. The case is open now.
-
-
-
Faites glisser votre médiator le long du côté gauche en commençant par le bord gauche puis en progressant vers les boutons de contrôle du volume et le bouton du silencieux, pour faire céder l'adhésif qui maintient l'écran.
-
Arrêtez-vous juste avant le coin supérieur gauche de l'écran.
Do not go over the top otherwise you can crack the screen. Sadly happened to me :(
The instruction should be:
“Stop near BUT BEFORE REACHING the top left corner of the display”
-
-
-
Réinsérez votre outil dans le coin inférieur droit de l'iPhone, faites-le glisser le long du coin, puis progressez vers le haut, le long du bord droit du téléphone, pour faire céder l'adhésif.
I had really good luck using a hairdryer on some of the more stubborn portions of adhesive.
-
-
-
Faites glisser un médiator sous l'écran, le long du bord supérieur du téléphone, pour faire céder le reste de l'adhésif.
Be very careful at this step. The glass at the top will break very easy when the display is lifted too much.
-
-
-
Ouvrez l'iPhone en faisant pivoter l'écran vers le haut en partant du côté gauche, comme s'il s'agissait de la couverture d'un livre.
-
Appuyez l'écran contre un objet afin qu'il reste bien calé pendant que vous travaillez sur les composants du téléphone.
Das “links” ist auf dem Foto rechts.
-
-
-
Dévissez les quatre vis cruciformes (JIS) fixant le cache de la nappe inférieure de l'écran à la carte mère :
-
Deux vis de 1,3 mm
-
Une vis de 1,4 mm
-
Une vis de 2,7 mm
The Phillips screwdriver bit is the PH000. The measurement refers to the screw length.
-
-
-
Avec la pointe d'une spatule (spudger), soulevez le connecteur de la batterie pour le débrancher de sa prise sur la carte mère.
-
Repliez légèrement la nappe du connecteur pour empêcher que celui-ci touche accidentellement la prise et que le téléphone soit alimenté pendant que vous réparez.
When I reassembled the iPhone 8 Plus, I had to plug it into a Lightning cable to wake it up (just pushing power button wasn’t sufficient).
-
-
-
Avec la pointe d'une spatule (spudger) ou un ongle, déconnectez le grand connecteur de l'écran inférieur en le soulevant tout droit hors de sa prise.
I got hold of a iPhone 8 Plus with cracked screen that I am planning to fix.
Here is my problem:
When I tried to take out the screen from my phone, (step 15-18) I was curious about the new screen, so I tried to connect it. It was completely dead! Then I tried the old cracked one, and suddenly that was dead to! This is a phone that some fool has been inside earlier and changed battery, but I suspect he has done some more really stupid things. The Taptic Engine is living its own life and vibrating every time I slightly touch the home button. (I have a new Taptic Engine) The phone is also full of dust and small particles that does not belong there. One tri-point Y000 screw (step 18) is even missing! Now the biggest problem is that both screens are black! I know the phone is on, because I hear voice command speak when I turn on the power. The screen worked before I tried to change it? And one last thing: My new LCD screen came with new flex cables. Is it possible to switch over, so I can use the old ones?
Hi,
Is your problem solved?
Be careful of damaging MOSFETs by the LH side of the large lower display cable. After replacing the battery and turning the device on, the phone showed low charge and didn't have a charging symbol even after plugging into multiple cables and chargers. Turns out I had damaged the logic board attempting to disconnect the connector.
-
-
-
Déconnectez le second connecteur de l'écran inférieur, qui se trouve juste derrière celui que vous venez de déconnecter.
I used the other end of the spudger on this connector and it seemed to work a little better for me. I came in from underneath the top-right edge instead of the bottom right.
-
-
-
Dévissez les deux vis Tri-point Y000, qui fixent le cache recouvrant le connecteur de l'ensemble capteur du panneau frontal.
-
Une vis de 1,0 mm
-
Une vis de 1,2 mm
una vite da 1mm e due viti da 1.2 mm???
Ciao Matteo! Grazie per l’osservazione. Ho appena modificato il testo :) La traduzione è aperta a tutti. Hai quindi la possibilità di fare le tue suggestione direttamente nel testo e sei il benvenuto se vuoi usare di questa possibilità nel futuro. Grazie ancora per la vigilanza! Saluti, Claire
The tool kit does include a 1.0 or1.2mm screwdriver! How am I supposed to remove those screws?
Bought the screwdriver that supposedly fits these screws and it still doesn’t work.
My bracket looks different. Can’t get these screws out.
kit came with wrong bit. i received 2x P02 (penta tips) and no tri point y000.
-
-
-
Avec la pointe d'une spatule (spudger) ou un ongle, débranchez le connecteur de l'ensemble capteur du panneau frontal.
-
-
-
Retirez l'ensemble écran.
Should there be a step somewhere in here to point out when to remove the blue plastic from the new iFixit screen?
-
-
-
Dévissez les deux vis Y000 fixant le cache du connecteur de la caméra arrière :
-
Une vis de 1,4 mm
-
Une vis de 1,4 mm (non ferreuse)
the standoff screw underneath the left screw came loose together and was impossible to detach from the screw. In a later step (49) it was possible to remove it together with the antenna flex cable
-
-
-
-
Dévissez les deux vis fixant le cache du module de la caméra arrière :
-
Une vis cruciforme de 1,8 mm
-
Une vis d'entretoise de 2,7 mm (non ferreuse)
Yeah, the flathead screw driver is not really a good option for the standoff screwdriver bit. I managed to remove the standoff screws easily enough, but replacing them with the flathead was laborious.
Does the second screw (nonferrous standoff 2.7mm) actually exist? My phone has not had any repairs before but did not have this screw, and the previous step says there's a Y000 screw (for the bracket) in what appears to be exactly the same location as this step says the standoff screw is.
-
-
-
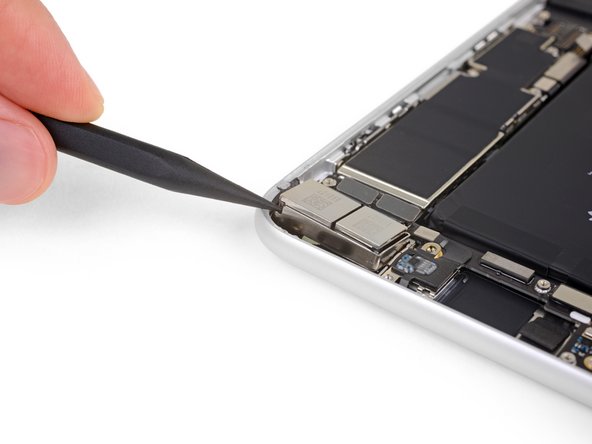
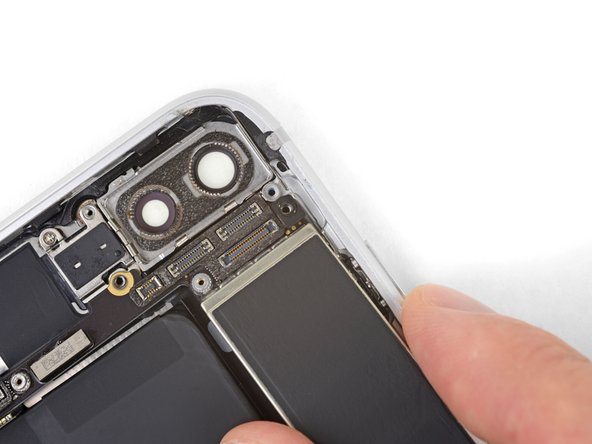
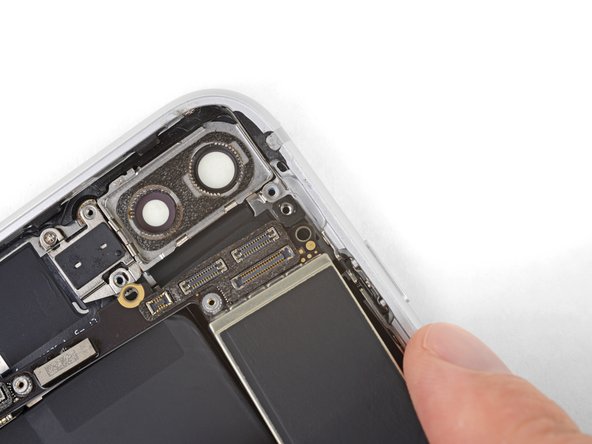
Retirez l'ensemble caméra arrière.
Using the small supplied none-conductive baggy you get in your parts repair kit, it is generally advised to put your camera sensor in said bag to protect it from dust or other debris as this will not come off the sensor and will mean another repair where one could have been avoided.
-
-
-
Dévissez les trois vis cruciformes fixant l'antenne supérieure gauche :
-
Deux vis de 1,3 mm
-
Une vis de 3,1 mm
-
-
-
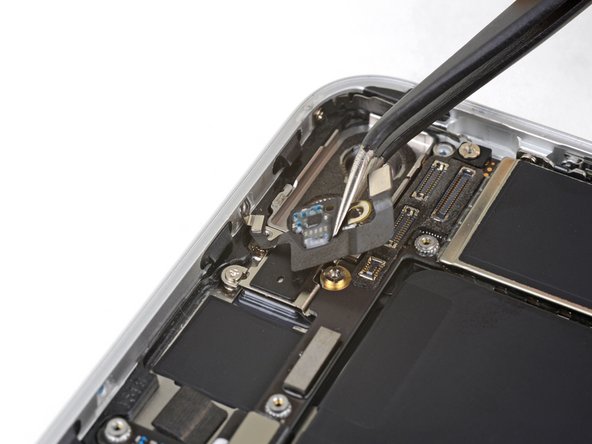
Dévissez la vis cruciforme de 1,3 mm fixant l'antenne au bord supérieur de la coque arrière.
This screw is stuck and will not come out. I'm using the same head I used for the previous one which is the same size. I've even tried them all. I can get any other screw fine but this one will not come out. Just wasted my time undoing everything up to then and this stupid screw is stopping me from finishing.
-
-
-
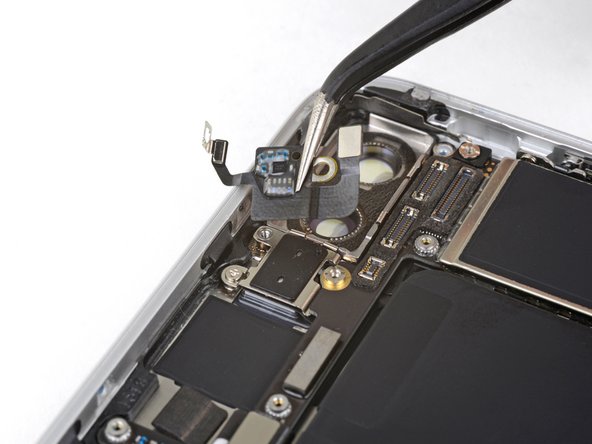
Inclinez l'antenne vers le haut de l'iPhone.
-
Faites glisser l'attache vers le bas et hors du creux.
I accidently ripped the screw boss of the antenna component. Is that very bad? Do I need to replace the antenna component, or could I try to solder it back on, or does it even matter? Thanks in advance.
-
-
-
Dévissez les trois vis fixant le cache en forme de L à côté du Taptic Engine :
-
Une vis Y000 de 1,3 mm
-
Une vis cruciforme de 2,6 mm
-
Une vis cruciforme de 3,5 mm
De Y000 schroef nam meteen ook de 2.4 mm standoff-schroef aan de achterzijde mee. Wat lastig om die uit elkaar te halen.
-
-
-
Servez-vous d'un médiator pour décoller délicatement la partie de la nappe de l'antenne qui adhère à la surface supérieure du haut-parleur.
-
-
-
Prenez la pointe de votre spatule pour soulever et débrancher l'autre extrémité de la nappe de l'antenne de sa prise à côté du port Lightning.
I was unable to plug this back in when re-assembling. My home button doesn’t work anymore. The connector it was supposed to plug into seems to spin around.
I had a similar experience during this repair. My problem was that the nib on the ribbon that actually connects in to the socket came off the ribbon cable when I initially detached the cable. I didn’t realize this until after the repair, but I also had to replace the Wifi Diversity cable entirely. A tell-tale sign is that you don’t receive good cell reception.
Lucas -
I did not notice until reassembly, but the antenna socket pulled off the board. I have no micro-soldering tools. The friction of the connector was greater than the solder holding it in place.
The little connector in the first picture ripped the component off the circuit board when trying to pry it up so be careful. I’m guessing it’s like a previous poster said and the socket is stronger than the glue/material that holds the component to the PCB. This was on a new board during disassembly trying to locate a potential problem. Phone still workings with WiFi and cellular normally but the cellular signal is down about 1/3 on average wherever I am.
Mine broke too and wifi still works fine
Does this have anything to donwith upper speaker connection?
-
-
-
Enlevez l'antenne de diversité Wi-Fi.
This had a little adhesive on the metal band. Couldn’t just pluck it out as shown. What I did worked but what I should’ve done is run my blue puck up and down the length.
I followed these steps to this point and maybe applied force in the wrong spot or too much force and it appears that when I loosened the wifi diversity antenna from the socket below the Taptic Engine module, it came up with the socket detached from the logic board. Did I just really screw up my iPhones WiFi capability?
-
-
-
Dévissez les trois vis fixant le Taptic Engine :
-
Deux vis cruciformes de 1,5 mm
-
Une vis d'entretoise de 2,4 mm
-
-
-
Insérez un outil éjecteur de carte SIM ou un trombone dans le petit trou du tiroir de carte SIM.
-
Appuyez fermement pour éjecter le tiroir.
-
-
-
Poussez le dispositif d'éjection de la carte SIM avec la pointe de votre spatule pour l'écarter de la carte mère.
-
-
-
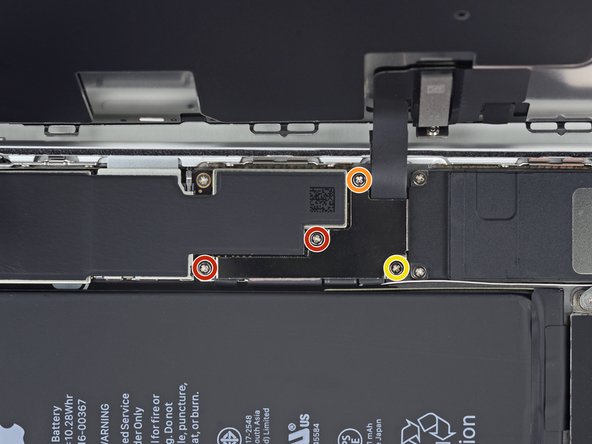
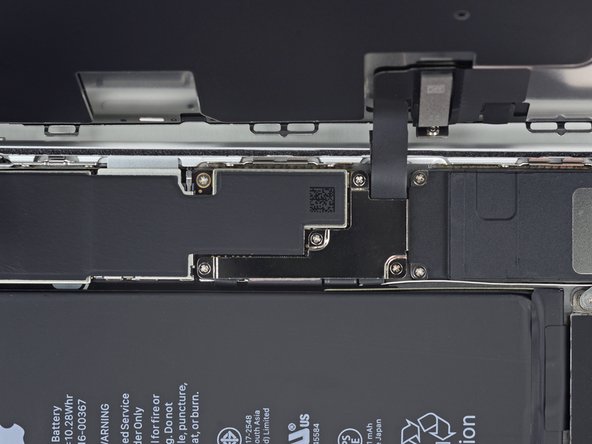
Dévissez les deux vis cruciformes fixant le cache du connecteur de la nappe supérieure :
-
Une vis de 3,1 mm
-
Une vis de 1,3 mm
Die rechte Schraube ( Orange) ist eine 1,3mm Kreuzschlitzschraube
Geändert! Danke für den Hinweis.
VauWeh -
-
-
-
Dévissez la vis cruciforme de 1,2 mm fixant la nappe de l'antenne dans le bord supérieur de la coque arrière de l'iPhone.
-
-
-
Avec la pointe de la spatule, soulevez et déconnectez la nappe de l'ensemble connecteur de charge Lightning de sa prise sur la carte mère.
I did this repair and I followed it too a T, but when I reassembled, the flex cable for the Lightning connector assembly keeps popping out. Ive replaced it twice and followed your guide exactly. No mistakes. But when I go to clip it back in, it always does that….
-
-
-
Dévissez les cinq vis fixant la carte mère :
-
Deux vis cruciformes de 1,8 mm
-
Une vis d'entretoise de 2,3 mm
-
Une vis d'entretoise de 2,4 mm
-
Une vis d'entretoise de 2,7 mm
My repair kit from iFixit included a standoff screwdriver bit. I do not recommend trying this without one.
-
-
-
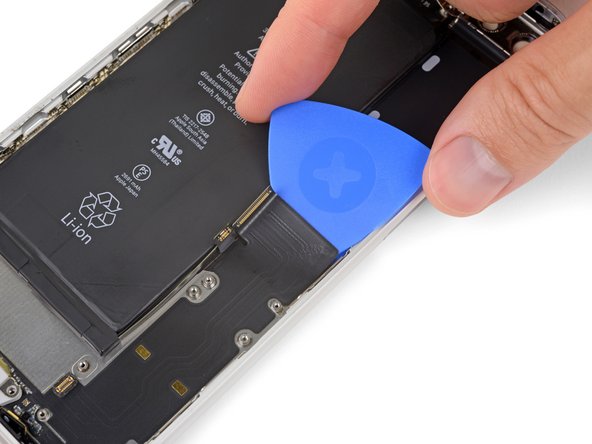
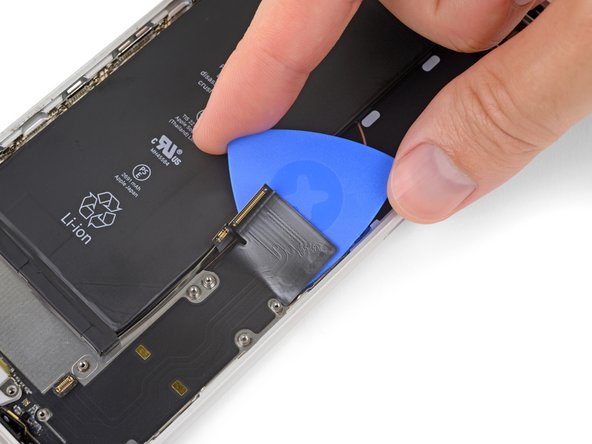
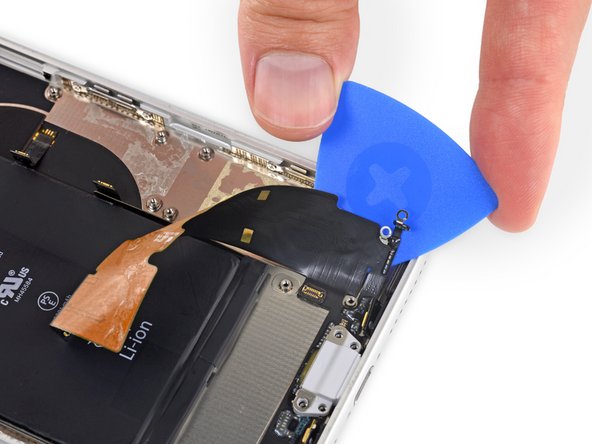
Faites glisser votre médiator sur toute la largeur de l'iPhone pour décoller de la coque arrière ce qui reste de l'ensemble connecteur de charge Lightning.
-
-
-
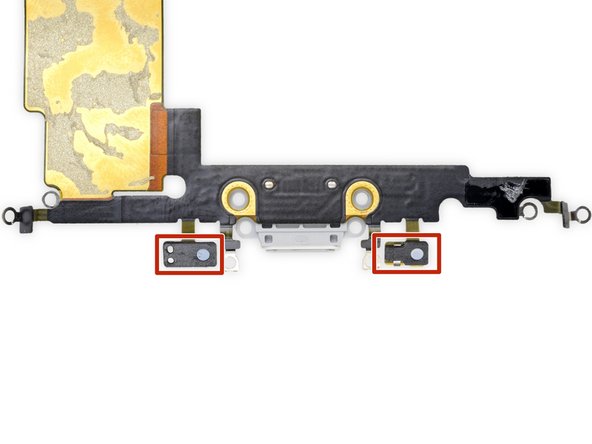
Ôtez l'ensemble connecteur de charge Lightning.
-
Enlevez tous les morceaux d'adhésif restants de la coque arrière.
-
Nettoyez soigneusement la surface de tout résidu d'adhésif avec de l'alcool isopropylique (d'une concentration égale ou supérieure à 90 %) et un chiffon non pelucheux. Essuyez dans une seule direction, sans mouvements de va-et-vient.
-
-
Dopo la sostituzione non funziona più il microfono, ma se non ho capito male i microfoni sono integrati nel gruppo connettore di ricarica giusto? Questo significa che è difettoso? Non mi pare sia possibile montarli male (dato che appunto in effetti non sono da montare). Potrebbe essere qualche impostazione nel sistema operativo per abilitare i nuovi microfoni?
Correctly positions the new Lightning connector assembly is very important! I found that event the slightest misalignment will prevent you from easily reconnecting the flex cable to the logic board. I had to remove the logic board and peel back some of the new adhesive on my replacement Lightning connector a few times in order to get the proper alignment. I found it useful to plug in the flex cable prior to mounting the logic board so that you have at some leeway when lining up the connectors.
Make sure to save the rubber gasket for the lightning connector as my kit did not come with a replacement. The kit also included replacement screens for the microphones but no instructions or labelled parts so you’ll have to use your best guess as to how to install them. Make sure to take pictures of the old screens before you pull them out and use those pics as reference.
Comparez votre pièce de remplacement neuve à l'originale. Il se peut que vous deviez transférer des composants manquants ou retirer les films adhésifs de la pièce neuve avant de l'installer.
Pour remonter votre appareil, suivez les instructions ci-dessus en sens inverse.
Amenez vos déchets électroniques à un recycleur R2 ou de déchets électroniques certifié.
La réparation ne s'est pas déroulée comme prévu ? Consultez notre communauté Réponses pour recevoir de l'aide au diagnostic.
Annulation : je n'ai pas terminé ce tutoriel.
75 autres ont terminé cette réparation.
Merci à ces traducteurs :
97%
Ces traducteurs nous aident réparer le monde ! Vous voulez contribuer ?
Commencez à traduire ›
17 commentaires
40 minutes seems crazy fast for this repair. If anyone can do this entire repair from beginning to end utilizing these steps in 40 minutes… they should spend a day or two practicing the Rubik’s cube and go smash the world record.
The guide helped me accomplish the repair. So, for that, thank you very much.
Very well done and easy to follow. Great piece of work and I appreciate the time spent putting it all together.
Have repaired 2 other iPhones, 6 and 6S, using the guides found here. When confronted with the iPhone 8 plus repair this is the site I came to.
Again, very well done indeed.
Kudos
Where dose one find a new gasket for the lighting cable?
You will not find a more comprehensive or thorough or accurate guide to dismantling and replacing the charging port on an iPhone 8 Plus than this. Awesome guide, thanks for your attention to detail and thoroughness! Bravo!
Thank you very much for the very detailed repair instructions. My microphone wasn’t working properly and I was able to get it fixed for just $12! (got the replacement from eBay)
Dopo la sostituzione non funziona più il microfono, ma se non ho capito male i microfoni sono integrati nel gruppo connettore di ricarica giusto? Questo significa che è difettoso? Non mi pare sia possibile montarli male (dato che appunto in effetti non sono da montare). Potrebbe essere qualche impostazione nel sistema operativo per abilitare i nuovi microfoni?
Mi correggo, ho problemi solo durante le chiamate, se uso l’app note vocali o whatsapp o faccio video con entrambe le fotocamere non ho problemi
Why is removing the camera and antenna necessary for replacing the lightning port?
nvrm i see why
Buon pomeriggio, devo fare i complimenti al sito per come e dettagliato ogni guida e riparazione. adesso ho finito di riparare un iphone 8 plus e va una bomba
Wish I had been told I would need a standoff screwdriver before I was halfway into taking the thing apart…
This was not a quick job. It took me far longer than expected because the sound did not work the first time that I re-assembled it. I took the phone back apart far enough to remove the speaker and clean the contacts. On re-assembly, it would not boot cleanly. It continuously rebooted until I had to restore to factory settings and reload from save.
Make sure you have a current save _before_ you do this repair.
I want to let everyone know that it is absolutely unnecessary to remove the entire logic board when doing this repair. You only need to remove the SIM holder and the the 2 (or 3 on XR) logic board screws (2 saddle screws and 1 Phillips on XR, 2 saddles on 7/8 series) that hold the logic board down. Once those are removed, you can gently lift the lower end of the logic board up enough to slide the portion of the dock flex that is under the logic board out from under the logic board. A few things to keep in mind when removing the existing port are that once all screws and brackets and such are taken off, you need to start the pulling up and removal of the old charging port flex starting from the very bottom first, I start with the with the 2 microphones and then the lightning port itself. As you free the existing port from the bottom upwards, when you peel up the flex where it is held down with adhesive nearing the logic board, it will then simply slide out from under the logic board.
Show less
Ran out of characters!..When you go to install the new port, you must START the process by sliding the new flex cable back up underneath the logic board first (you may need to hold the battery flex cable out of the way a bit and pre bend the new ports flex cable at the connector so that it will slide up easily) and then attach the new flex cable to the connector on the logic board FIRST before you do any other screw or adhesive installations. This way you don't end up struggling to try to get the connector to re-connect to the logic board at the end. If you don't do it this way and you start re-installing the new port from the bottom without pre-connecting it to the logic board, any slight misalignment may cause the connector to not line up properly when you go to connect it to the logic board. I feel on any iPhone component removal/replacement, the less extra parts and connectors you have to touch, pry on, disconnect and/or remove and then reconnect, the better. Good luck all! - Chad from GURUmicro.
Show less
This was a very helpful guide and the photos were really well done. A few pointers for newbies to iPhone repair like myself.
1) The base install (no mesh screen replacements near the microphones) is about 3 hours. Another 45 minutes or so for the mesh screens as there were no instructions.
2) There were no instructions on how to start the phone back up so here is what happened to me. After plugging everything back in (but the phone screen still physically separated from the phone body) I could not start the phone from the battery despite it having about a 30% charge. I ended up taking the phone apart 2 times checking all the connections but couldn’t find a faulty one. In this process I ended up snapping a part related to the antenna off of the PCB (Step 36, see comment above). What ended up working was plugging the phone into a fast charger and waiting about 5 minutes. I wasn’t able to start it after 1 minute and was worried, but after 5 minutes it booted up normally and everything is fine.
Does this remove any functionality with the phone? I know apple is very difficult with the “right to repair”. At least with replacing the home button and battery, fingerprint and battery health functionality is removed. Does something similar happen with this?
The microphone of my Iphone8 plus isn't working and the speaker isn't sounding nice, what should I do?....
As someone with very little to no experience repairing smartphones, I will say that 40min-2hrs is very generous. It took me almost 9 hours to replace both the lightning cable adapter and the battery at the same time, and most of that was just working through the adhesives of both the display and the battery. The second-most time-consuming part was just keeping each screw labeled and organized - I used some sticky tabs to keep the screws in the cardboard trays that the replacement parts came in. Aside from that, the repair process wasn't bad at all. I made some mistakes: I accidentally scraped off some of the black film (graphite?) that was on the logic board, and I placed the new adapter just slightly too far to the right, which made plugging it into the logic board later a bit difficult. If I had to do it again, I would definitely prefer to try the Anti-Clamp and the iOpener - I had neither for this repair, and I would bet having both would have made it much easier. It'd be nice if they came with the tools.


















what do I do about super stripped screws?
Ean Palacios - Réponse
I’m sorry, your comment slipped past my radar earlier. For future fixers that might see this and ask the same question, you can check out our stripped screw guide for some detailed advice.
Adam O'Camb -
Do you need a toolkit like the essential toolkit
Adam Palmer - Réponse
Hi Adam. Having a tool kit with all of the listed parts above is best. The screw heads are very small and each set of screws needs a very specific type of driver to remove them without stripping any of them.
Kyle Luksa -