Il est possible que cette traduction ne reflète pas les dernières mises à jour du tutoriel source. Aidez à mettre à jour la traduction ou bien consultez le tutoriel source.
Introduction
Votre batterie se décharge trop vite ? Vous êtes obligé de recharger votre S7 plusieurs fois par jour ? Ce tutoriel vous montrera comment retirer la vieille batterie de votre S7 et la remplacer par une nouvelle.
Le tutoriel vidéo recommande d'enlever la carte SIM. Cette étape n'est pas nécessaire, mais n'aura pas de conséquences négatives sur la procédure de réparation.
Avant de démonter votre téléphone, déchargez la batterie au-dessous de 25 %. Une batterie lithium-ion chargée peut prendre feu et/ou exploser si elle est accidentellement perforée.
Si votre batterie est gonflée, prenez des précautions appropriées. Dans ce cas, ne chauffez pas votre téléphone. Si nécessaire, vous pouvez utiliser une seringue ou un compte-gouttes pour déposer de l'alcool isopropylique (à 90 % ou plus) le long des angles à l'arrière du téléphone pour ramollir l’adhésif. Une batterie enflée peut être extrêmement dangereuse, portez des lunettes de protection et faites très attention, ou faites appel a un professionnel si vous n’êtes pas sûr de savoir comment procéder.
La vidéo d'introduction est sous-titrée en français.
Ce dont vous avez besoin
Vidéo d'introduction
-
-
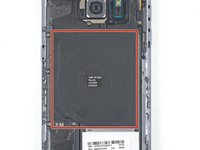
Posez un iOpener chauffé sur un bord long du téléphone pendant environ deux minutes.
-
-
-
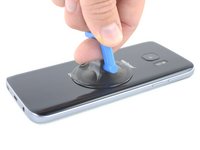
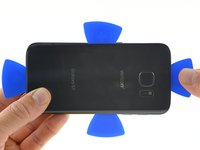
Quand la panneau arrière est chaud au toucher, posez une ventouse le plus près possible du bord chauffé du téléphone, tout en évitant le bord incurvé.
-
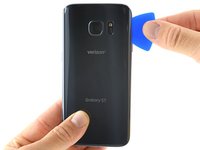
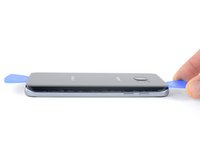
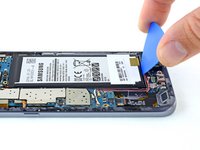
Soulevez la ventouse et insérez un médiator sous la vitre arrière.
Because of the metal lip around the phone the picks were to thick to get under the glass. Couldn’t get the glue loose enough with the iOpener or the glass lifted high enough with the suction cup despite using a lot of heat and stength on the suction. Ended up having to use a thin piece of metal to get the first separaration. After that the picks are ok to use.
This step is certainly giving me trouble. I don’t have enough hands to be able to both form the space and to insert the pick. In order to even form the space, I need to use the double-sided plastic scraper-thing.
Turns out that three hands was the answer. I had my dad insert the pick while I pried open a gap, and it was smooth sailing from there.
How do you pull on the suction cup? I.e. what's the right technique to pull up the suction cup? Just pulling up is going to lift the entire phone, unless I had some kind of double sided suction cup up keep the phone stuck to the table.
Thank you
I'm going to try it Jerry rig everythings technique. https://m.youtube.com/watch?v=kHzmFPoZbC... unfortunately every iFixit video seems to use the clamp which seems like an oversight for a tutorial. But it is not fair for me to be too annoyed since they have really good repair kits and the repair guides are nice.
A X -
-
-
-
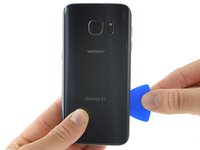
Une fois que le médiator est bien inséré sous la vitre, refaites chauffer l'iOpener et reposez-le sur la vitre pour faire ramollir l'adhésif.
Use a heat gun or hair dryer to soften the adhesive to remove the back cover. The Iopener that you heat up with the microwave takes a very long to accomplish the same task.
Keep the heat gun in motion at all times and check the surface temperature of the phone with your hand every few seconds to ensure it does not overheat the plastic and glass and electronics. Use several blue guitar picks to brake the seal of the cover once you have softened the adhesive and popped the seal initially with the suction cups.
-
-
-
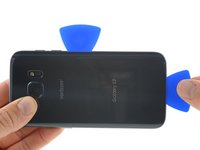
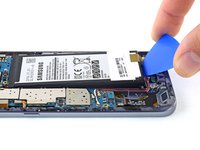
Répétez la procédure précédente pour les trois autres côtés du téléphone.
-
Laissez un médiator inséré de chaque côté quand vous continuez avec le suivant pour empêcher l'adhésif de recoller.
At about this stage, as I was working on the fourth side, the layer of black paint on the inside of the glass started to separate from the glass, near the edge. I may have overheated the phone (I used a heat gun). Most of the paint layer ended up left behind, attached to the body of the phone, as the glass came away - along with the lens covers of the camera and flash. I removed and discarded as much of the paint as I could using tweezers, a spudger, and cautious heating with the heat gun. I hope the back glass will work OK without it; a clear back cover will be a distinctive design feature! If not I’ll have to get a new one. (Note, some battery repair kits from other suppliers such as Amazon include a replacement back glass, which would help with this issue).
Hi Michael,
The glass back would definitely work without the black paint. In fact, there are tutorials online that instruct exactly how to do that in order to have a cool transparent glass back look!
antibodies when they come across antigens:
-
-
-
-
Si vous nettoyez la surface du châssis central avec de l'alcool isopropylique, veillez à ne pas mettre d'alcool sur la bobine de charge sans fil. Le revêtement de la bobine se décomposera s'il entre en contact avec de l'alcool.
Do not hold the glass as shown. I did that, and the glass cracked when I tried to pull the adhesive because the adhesive was on tight. Always keep the glass down on a flat surface so that you don’t apply any bending forces to it.
I'm sorry to hear that! That's a good suggestion—I'll modify the photo slightly to deter people from holding the glass in the air.
-
-
-
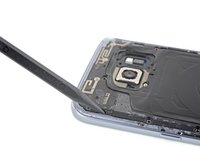
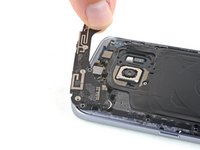
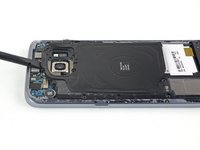
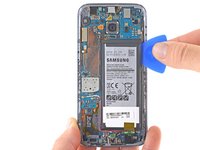
Utilisez l'extrémité plate d'une spatule pour soulever l'ensemble bobine de charge du téléphone.
The picture for Step 10 shows that no attempt was made to remove the residual adhesive from the phone side. I don’t think it is sufficient to only remove the old adhesive from the case back. For my disassembly, 50% stayed on the case back and 50% on the phone
I diligently removed all the adhesive on the phone side. Tedious but necessary.
As a final clean up step, when I rubbed a cotton swab dipped in alcohol near the flash and finger sensor, the black covering for the recharging coil dissolved before my eyes. There needs to be a warning in the instructions to avoid any alcohol or other solvent contacting the inductive charger coil. So far, it doesn’t appear this will interfere with the connector integrity at that dissolved spot,
Unfortunately I can’t post the picture here.
Hi William,
Thank you so much for your comment and tips! I’ll add your info into this guide.
-
-
-
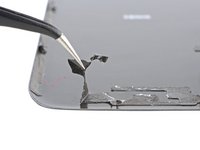
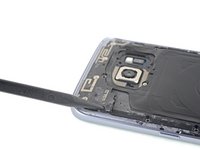
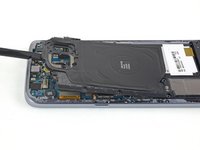
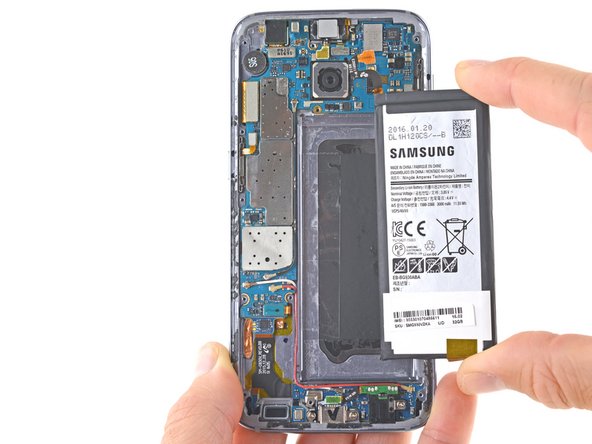
Avec l'extrémité plate d'une spatule (spudger), débranchez le connecteur de la batterie.
-
-
-
Déposez quelques gouttes d'alcool isopropylique (> 90 %) sous chaque coin de la batterie et laissez agir quelques minutes pour aider à ramollir l'adhésif.
-
Vous pouvez également préparer un iOpener et l'appliquer directement sur votre batterie.
-
Laissez l'iOpener agir pendant au moins une minute pour ramollir l'adhésif de la batterie.
-
-
-
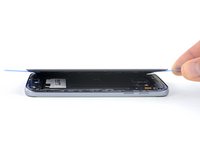
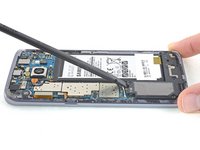
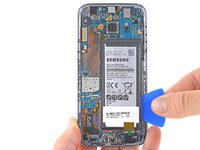
Servez-vous d'un médiator pour soulever la batterie par le bas.
What is that black cover under the battery? I scratched it but am unsure if that is important or not.
Wireless charging pad.
Back side of the screen.
Here, https://youtu.be/k8eoiVUxA0A?t=302
you can see the screen being removed from the frame, where the battery was removed.
I have replaced the screen in my S7, without replacing the battery. I have seen the battery from the other side of the frame.
@Weston Heisey: At this point the wireless charging coil is already removed, in step 10.
Eduard -
Please highlight this step more, my battery was bent and I believe there was a punctured because it was getting hot and started to smell.
@Sam Goldheart, I suggest: in “You will be prying against the case directly above the daughterboard and antenna cables. Pry carefully to avoid damaging either of these components.” replace “Pry” with “The battery is adhered along its sides to the frame. In between is part of the backside of the screen. See picture next step. Pry”, and “either” with “any”.
-
-
-
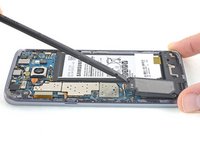
Faites glisser un médiator vers le haut, le long du côté de la batterie pour faire céder l'adhésif restant.
-
Soulevez la batterie hors de la coque.
The connector on the after market battery was a lot harder to press on than the stock one. I struggled to get it connected, so much so that for a moment I though it had the wrong battery connector.
Splendida e chiarissima demo grazie e bravi!
-


Pour remonter votre appareil, appliquez de l'adhésif sur la vitre arrière et suivez ces instructions dans l'ordre inverse.
Après avoir complété ce tutoriel,
Pour remonter votre appareil, appliquez de l'adhésif sur la vitre arrière et suivez ces instructions dans l'ordre inverse.
Après avoir complété ce tutoriel,
Annulation : je n'ai pas terminé ce tutoriel.
257 autres ont terminé cette réparation.
Merci à ces traducteurs :
40%


Ces traducteurs nous aident réparer le monde ! Vous voulez contribuer ?
Commencez à traduire ›


60 commentaires
After this is it still waterproof?
In theory, if you applied the replacement adhesive 100% correctly, it will retain its water resistant properties. However, I would never deliberately expose any device to water, as you can never be completely sure that all the seals are perfectly intact.
That is actually covered in the video. Did you actually watch it? If water resistant is important to you then what you would do is purchase new gasket material so that after you have opened up the phone and removed all the existing gasket you would apply the new gasket and then finish up and re-seal your phone. As to how water resistant it is after re-sealing the phone all depends on how careful you are and how exact your work is.
Sooooooooo why exactly did Samsung make it impossible to open the phone?
Because screws are unsightly :P… and repairing your old phone makes you not want to buy a new phone.
This was one of the most difficult repairs I have done, but it worked. First off I absolutely could not get anything except a tiny Flathead screwdriver wedged in to the glass to pry it up, which cracked the glass even more than it already was, but thankfully I was replacing the back glass as well. The battery was also glued in unbelievably well, and the battery ended up bending pretty bad when I pried it out, even with a lot of extra heat.
Overall a massive pain in the rear, but I got it all working properly now thanks to the video. I used a Wagner heat gun for this, I don’t think a hair dryer would be sufficient!
I was a bit concerned cause I was using a 300w heat gun instead of the big one in the video, but patience paid off. One tip for anyone else is to make sure the battery is at the TOP of the cutout for it, my connector almost didn’t reach. Nothing broke, phone is on and running, only concern is that I didn’t get all the old glue off, so it might not be water resistant anymore.
Note: Much harder with a screen protector, ended up needing to remove mine and now it’s got dust under it. Luckily, that’s an easy fix, just annoying.
I wish that tip was in the installation guide as I had the same problem. I used the spudger to slide the battery up a little. It took more force then I would of thought to get the connector back on.
I really wish she would show how to reassemble the phone. How hard is it to work with the new adhesive? I also wonder about the waterproofing after this is complete.
Working with new adhesive can be a bit tricky but there are good do-it-yourself videos that can give you some good tips on how to apply the new gasket before re-sealing the phone
Repair was relatively easy. The problem was with the ifixit-purchased battery which ended up swelling and cracking the rear glass. The battery purchased through them currently lasts 3 minutes off of the charger.
I accidentally jabbed the old battery rather hard, pierced it. And then that battery became amazingly very super hot. I’m up where winter is cold, and I put the battery out on my driveway lest it light something on fire. Was still hot as !&&* 20 minutes later. Now I understand why they say we should never put these things in the trash or a landfill cuz they could start a fire.
I replaced the battery ok and the phone worked ok. Plugging the charger in, the phone reports charging - but it isn’t and the charge decreased until the phone turned off. I put the old battery in, but it is in the same state - phone reports charging, but charge is decreasing. Any ideas on what is damaged or I should replace?
Try with new charger and cable
The guide was good but incomplete. It would have nice to have a little more info on removing the adhesive on the back panel and how to best reapply it. Since this was my own phone I was extra careful but found reapplying the back panel adhesive the hardest part. Not sure if the phone is pushing out in the top left corner or the adhesive is not doing its job. All parts and tools were purchased at iFixit.Com. I used a 800w heat gun and the iSlacks did not work. I cranked up the heat and opened case with my iPhone suction cups. Very cool to know that my apple tools can be used on an Samsung phone…lol…Wow that adhesive was strong. So what do you guys think, should I reheat new adhesive, get it soft then push down firm in that corner to get it to seat better???
Just did a successful battery replacement. The back is A LOT more fragile than she makes it look. I anticipated and bought a replacement back. Otherwise the instructions are spot on.
Just finished:
I didn’t use a suction cup when taking the back off. I used a flat metal spudger and three plastic hotel room key cards (like credit cards without the bumps). I used a hair dryer and heated the phone for a minute or so. Then, when I was able to stick the spudger in right where the charging port is, I put the card in the spudgers place. After that, I was able to work my way to the left and then inserted another card when I got to the corner. As I went through, I had a pick (shaped a bit less pointy than the tip of a dart) which I would use to “cut” through the adhesive. This worked very well.
I heated it up a bit with the hair dryer and used the spudger and card and got it out without any damage.
The hardest part of this BY FAR is attaching the new battery. The ribbon cable that is attached to the new battery is slightly too short. Therefore, you need to smush the top of the new battery and its really a pain to get it in. Make sure to attach the new battery before putting it into its spot.
My employer has about a dozen sales guys in the field, each with an S7. My supervisor agreed to sell me their trade-ins at carrier price. With this guide, I was successful in replacing the battery and can expect about a $150 profit. Thanks iFixit!!!
BTW, I used an iSclack, heat gun, and three picks to get the back off. Did NOT break the back glass!
An update:
The replacement battery provided to me by ifixit didn’t work. Returned it and tried another and it also didn’t work. Took it to an authorized repair shop (ubreakifix) and it worked. I would suggest that people just go to the repair shop. Saving the $20 just isn’t worth the hassle. Make sure you keep your original battery no matter what.
The battery I purchased from ifixit is worse than my original battery! My old battery at least shut off at 1%, this battery shuts off anywhere from 19%-49% !!!!! I didn't do the replacement myself, a friend that owns a shop that does this type of work did it. So I know he did the job right! I'm pretty upset with this battery!!!!!!
Hi Brady, sorry to hear about your battery! The battery has a one year warranty, so I suggest contacting customer support to get some help. Good luck with your repair!
Did you do a battery calibration? Your phone has no way of knowing what the true percentage is until this is completed.
Yeah the battery that ifixit makes needs to be improved. I highly recommend that you send your phones to samsung if you can deal with not having your phone for 2 weeks. If thats too much, just take them to an authorized repair shop.
These instructions were pretty thorough. I used a microwaveable rice bag as a warming source. Tried a guitar pick, but too soft and flexible to start the process. Used a carpet knife instead to start, cracked the back (ordered a new one). Then used the pick to slide along edges. To get the battery out I pried and used heat and alcohol. Once I got it lifted enough, I inserted the guitar pick and slid it around under the battery. I’m glad I bought 2 batteries over the Internet from China because 1 was too wide to fit into the phone’s battery frame. The other fit. I would recommend plugging in the connector 1st as I could not quite get it lined up to connect otherwise. Also, do not screw down the battery cover before aligning antenna piece as it has clips that need to align 1st.
Wow. I'm not feeling good about the battery kit I just bought and am still waiting to receive. I'm almost wondering if I should just forgo the failed new battery and send it back as soon as I get it?
Hi. The battery cycle counter (Phone Info) still shows over 500 cycles after the new OEM battery was installed. Is there any way to reset it?
Thank you
If I use the applying alcohol method to remove the battery instead of the heating method, could I reuse the battery in another frame?
IFixIt should thank Sam. Due to this guide I bought the Battery replacement kit and a full IFixIt pro kit.
Also, Thank you Sam.
Cheers
Hola buenos días, Si la batería es nueva prueba a agotar carga original e iniciar carga completa y probar se llega a 100, también prueba con otra cargador, asegure de utilizar recambio originales o compatible de alta calidad, Un saludo
Excellent walkthrough. Thank you
Very good guide. I used a heating pad on high and the iOpener to heat up the cover. Using the suction cup on its own is difficult. It’s best to order the iSlack along with the kit if you don’t already have one. It makes it a lot easier.
I did it with the iOpener, a hair dryer on level 2 and the other ifxit tools. It took about 5 attempts. Thank you.
My hand slipped when I was removing the old battery and I saw fire come out of it lol.
No hesitation I threw it all the way across the room like a grenade and was like oh %#*@ lol.
Luckily I was able to remove it without any damage and successfully install a new one/back glass.
Used a old crappy hair dryer lol
very good guide. It was very helpful and now I am confident to do it again on another device
I can’t seem to calibrate this new battery.
At first, I discharged it, and overnight it only charged to 24%.
Next, I discharged then it would only go to 75%.
Now it won’t charge past 82%.
Any ideas????
I spent so much time and money fixing this battery I want the thing to work!
Hi Ryan,
When you discharge, and recharge it, does it charge up to the maximum you listed really fast, or does it take a long time?
How long does it take to heat up before you can actually remove the back panel? I spent 15 minutes heating up the back with a blow dryer and had absolutely NO luck, even after the back cover was hot to the touch. It seems from watching videos that people had success with getting the back to budge open after just a couple of minutes with a blow dryer. The phone itself is getting hot, I’m applying the heat to the edges as recommended and it just seems nearly impossible. To top it off the back cover cracked when I did try to pry something underneath the cover. Any tips or suggestions would be greatly appreciated.
Hi Eugene,
The hardest part of this repair is the initial opening procedure, and the adhesive on these back covers can be very stubborn! I would suggest trying to focus the heat towards one of the long edges of the back. Once the edge is hot to the touch, apply the suction cup close to the center of the edge and pull with strong, steady force. You can try to loosen the adhesive by pulling on the suction cup repeatedly. Once you get an opening pick into the seam, proceed to heat the rest of the perimeter as you work. Good luck!
Nice work, good guide. A few more notes:
1) If using a a case, check to see if the back cover is cracked before ordering the battery. If so, it may be necessary to order a new back cover.
2) It doesn’t require all that much heat to get the cover off. I used a paring knife to start it, rather than the flimsy pick .
3) Taking off the speaker assembly is not strictly necessary to get the battery out, but I did so as not to risk damage to its board and enable prying out the battery with less difficulty. Then I did not glue the battery in at all when putting it back.
4) Take care to reconnect the battery, and temporarily power it up before putting the rest back together. The connector is tiny, and not easy to seat.
5) If you use protective case and want the adhesive to come off easier if you ever have to replace the battery again, wear gloves, tack around the adhesive strip with the gloves to make it a bit less sticky before putting the new adhesive on, and don’t use any heat during the reinstall.
Question: What is that black covering under the battery in the battery compartment area? I scratched it up somewhat when removing the adhesive from the battery (huge pain) and want to know if this will be a problem. Is there something I can do to repair the black covering if I need to?
Hey rayzor12!
The black covering is one of the layers that protects the display panel. It also helps dissipate heat from the phone through the display. If your display works and the surface facing the battery is relatively smooth, you should be fine.
How important is it to glue/adhere the battery again when replacing it? I swapped out the battery and closed it up before considering that I should have used adhesives. Will this be a problem and should I go back in and open the phone again to secure the battery?
If the battery is completely loose in the phone, I would strongly suggest opening it up and affixing it in place. You do not want the battery to move around during daily use, as the edges will wear down and cause potential fire hazards.
Oh how thrilling it was to get this new battery installed!
And how disappointed I was to realize once I’d glued it back together that the loudspeaker doesn’t work anymore. :(
Is there a simple solution to this or do I really have to pry off the back and get a whole new back coating glue and possibly a new loudspeaker? Cursed adhesive!
Hi Peter!
I’m glad to hear that the repair went mostly well! Unfortunately, it sounds like you may have to pry the back off again. The loudspeaker connects to the motherboard via two spring contacts. I would double-check to make sure that the loudspeaker is properly seated, and that these contacts are clean and touching properly.
Just want to take battery out before throwing the phone away some place to recycle
Im Internet habe ich mir schon sehr viele Anleitungen angesehen und für mich brauchbare angewendet und sie getestet.
Diese Anleitung ist mit großem Abstand die Beste.
Als Absolvent der Ingenieurhochschule vor mehr als 50 Jahre, habe als Konstrukteur musste ich auch Bedienanweisungen für Großteil-Bearbeitungs-Werkzeugmaschinen verfassen.
Insofern bin ich durchaus dazu in der Lage, eine Anleitung zu beurteilen.
Awesome, thanks so much. Great video and easy to follow.
I followed the battery calibration procedure exactly, charging to 100% for 2 hours and then allowing the phone to shut off but after plugging in the charger, the phone is dead and does not indicate any charging. I’ve tried several different chargers but no charging indicated. Any ideas?
Ich bin ehr der Mann fürs grobe, habe mit fixit problemlos den Akku gewechselt. danke
The walkthrough doesn't mention anything about the camera glass piece. When we took the back glass off the phone, the camera glass covering was still on the inside of the phone, unlike in the pictures. We started prying it up, then realized it was still attached to something. We then just pried up the charging coil piece and it came out attached to it. In the walk through, that camera cover piece just miraculously disappears.
I did this repair successfully (managed to remove the back twice without heating or breaking), but after about a year of very light use the phone did some weird stuff which bricked it, and it will no longer power on. Connecting the phone to a USB charger has no effect, putting it on a wireless charger gives a light from the charger suggesting the phone may be accepting charge.
I've attempted a bunch of reset/recovery procedures, including taking the phone apart again and disconnecting the battery, but it is still dead. Noting the various issues reported above with the iFixit replacement battery, I'm trying to figure if a faulty dead battery is the issue or the phone is a goner.
Any ideas ? Replacement batteries seem pretty cheap off Amazon so going to give one a try.
Well, I got a replacement battery, and also stumbled across a "W209 Pro", which is a rather handy gadget which has a range of tiny proprietary battery connectors for various Android and Apple phones. It can test, charge, and jump-start-from-empty batteries outside the phone. With this I was able to determine the iFixit battery was fine, but empty as the phone was not charging it. Even with a full charge in both the iFixit and new battery, the phone remains dead. It seems this kind of failure is not unusual in aging S7s, so I think it's time to give up on this handset.
(FWIW, I just did a similar battery swap on a Google Pixel 5, and that was rather easier..)
My phone's back panel has been slowly loosening over time so I'd best get onto this ASAP. It's not bulging, just sort of coming off.
I used a heat gun and heated it a little too much. The color of the rear glass is just a sticker on a clear cover. Due to this I tore the sticker off. Now the back cover is see through, which isn’t a bad thing but the repair was for a customer.
Kevin Bishop - Réponse
When using the iOpener, you may need more than 30 seconds, especially in compact or low wattage microwaves. Take this slowly, though, and be extremely careful, as it is easy to overheat your iOpener. Remember, you can always heat it up a tad more, but you cannot undo overheating it.
Jacob Pratt - Réponse
I used an adjustable heat gun and set it to 400 degrees (F). That was enough to seperate the glass without having to worry about exposure times of the heat. The front of the phone was just fine. Just be ready to use a bunch of picks to slide in between because they will be needed this way.
Ryan Schumerth - Réponse
I went from the bottom center up, using one ifixit tools, one suction cup and one pick.
Pick just popped in with some minor pressure.
Laid heat pack along base of phone 2 mins first and worked up slowly, rotating picks as I went. Had to heat iopener over several 30 second bursts
Lauren Burt - Réponse
This is useless because the phone does not recognize the new battery and will behave like on the old one
Search for “battery count xda"
Albert Einstein - Réponse
That is an interesting discovery! Thanks for pointing it out—I’ll have to look into it.
Even if this is true, replacing the battery should still give restore a significant amount of life, since the max voltage affects a minor amount of the battery’s capacity. If you charge a worn battery and a new battery to the same lower max voltage, the worn battery’s voltage will dip more under use and will be depleted faster.
Arthur Shi -
Thanks for the guide! It helped me replace a friend's battery with no problems!
Darren Crook - Réponse
I will never replace a screen again, and don’t recommend it. Not for phones nowadays. Once upon a time everything was screwed together, and you might even get the same quality or better screen when buying from eBay. And having the phone repaired was nearly the cost of the phone. Now, it’s the reverse. Removing the glued back and screen and cleaning off all the glue for a clean re-seal is an ordeal that takes multiple hours, AND, often the screen you buy on eBay is NOT OLED, but an LCD, and a blurry one at that. And the local phone repair store will replace the screen with an OLED, reliably, same day turn around, for not much more than the cost of an actual OLED screen, because they have the parts in bulk, and the tools and experience to do it quickly. Never again!
domarius - Réponse
have you ever had one that just wont open at all? i can not get mine to open to replace the battery i have heated with a heat gun and attached suction cup and it will not lift at all
Carla James - Réponse
Hi Carla,
I've definitely had that experience before. The adhesive is very strong, and the curved back makes getting the initial seam very difficult. I'd suggest focusing on one small area on the edge. Apply steady force when you pull, and repeat a few times to loosen the adhesive. Eventually it will give and present a small gap.
Arthur Shi -