Il est possible que cette traduction ne reflète pas les dernières mises à jour du tutoriel source. Aidez à mettre à jour la traduction ou bien consultez le tutoriel source.
Introduction
Consultez ce tutoriel pour retirer et remplacer le module de la caméra frontale (c.à.d. la camera selfie) d'un iPhone 12. Remarquez que si vous remplacez cette pièce, Face ID ne marchera plus. Cette réparation vous rendra votre caméra selfie, mais seul Apple ou un technicien "agréé" par Apple pourra restaurer Face ID.
Ce dont vous avez besoin
-
-
Éteignez votre iPhone avant de commencer le démontage.
-
Retirez les deux vis Pentalobe P2 de 6,75 mm de long sur le bord inférieur de l'iPhone.
-
-
-
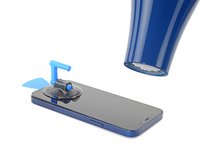
Mesurez 3 mm à partir de la pointe et tracez une ligne sur le médiator avec un marqueur permanent.
Got to step 2 and realized the fix kit doesn't include an opening pick! Looks like a guitar pick, and I have those lying around. Is that expected? Looks like the pick is used in many steps below. There's a little blue crowbar that isn't mentioned in the instructions. Perhaps that replaces the opening pick?
Hi! I can't see which guide you were using when writing this comment. Can you reply here with which guide and fix kit you used?
I see you posted this in Meta. I hope it's resolved soon! In the meantime, a guitar pick may work well enough for your repair.
what fix kit?
My fix kit didn't include an opening pick either
My AliExpress refurbished screen came with a pick that has a coin-like circle that pops out, so no modification was necessary
It's not an Ifixit KIT if it doesn't include everything. You'll need to order the opening pic separately. Or head to Walmart like myself and look for guitar pics. Hopefully, this will work just as well.
No pick in mine as well. It’s really not clear that you have to order this separately when ordering an IPhone SE 202/2022 screen repair kit. Is this the case?
Frustrated, I ordered a compact package where everything was encapsulated. Useless suction tools could not separate the screen. If it is unable to decouple the screen, then why sucking suction tools you have provided.
For my kit the triangle pick was stuck inside the box with the screen not with the other tools maybe it's also there for you
Y’all are getting far, FAR too detailed with some of this stuff…. Measuring and marking the pick that you won’t actually use to open the device?!? lol that’s kinda funny. Just heat it up, grab a spudger, and the back just pops right off! The iFixit tech need to stick to the KISS method more often, you know KEEP IT SIMPLE STUPID!!! Like l, for reals, I’ve been doing this stuff for YEARS and using iFixit guides regularly and this is just ridiculous at this point!
Will the phone still work if the sensor assembly on the back of the screen is damaged?
-
-
-
Recouvrez l'écran de bandes de ruban adhésif, qui se chevauchent, jusqu'à ce que toute la surface soit couverte.
-
Si la ventouse n'adhère pas au cours des étapes suivantes, pliez un morceau de ruban adhésif épais (du ruban adhésif toilé p.e.) pour former une poignée et soulevez l'écran de cette façon.
-
-
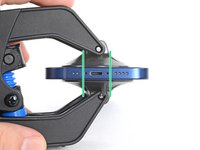
Outil utilisé dans cette étape :Clampy - Anti-Clamp$24.95
-
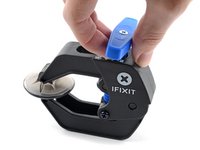
Tirez la poignée bleue vers la charnière pour débloquer les bras de l'Anti-Clamp.
-
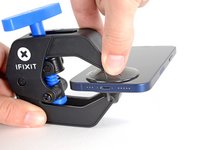
Insérez le côté droit ou gauche de votre iPhone entre les bras.
-
Positionnez les ventouses en bas de l’écran de l'iPhone : une dessus et l'autre dessous.
-
Appuyez sur les ventouses afin d'ouvrir votre iPhone à l'endroit désiré.
-
-
-
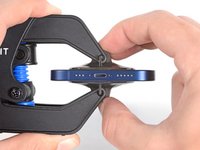
Poussez la poignée bleue vers l'avant pour bloquer les bras de l'Anti-Clamp.
-
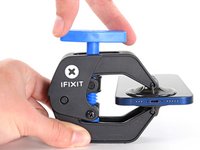
Tournez la poignée dans le sens horaire de 360 degrés ou jusqu’à voir les ventouses s'étirer.
-
Vérifiez que les ventouses restent bien alignées entre elles. Si elles commencent à se décaler, détachez-les pour les réaligner.
-
-
-
Posez votre iPhone sur quelque chose de solide comme un livre à couverture rigide, pour qu'il tienne tout seul à l'horizontale. Ainsi, il sera plus facile de procéder aux étapes suivantes.
-
Servez-vous d'un sèche-cheveux pour faire chauffer le bord inférieur de l'iPhone. L'écran doit être légèrement trop chaud au toucher.
-
Attendez une minute pour donner à l'adhésif le temps de se détendre et d'ouvrir un interstice.
-
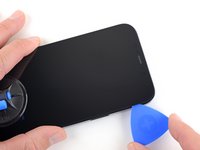
Insérez un médiator sous le joint en plastique de l'écran, dès que l'Anti-Clamp a ouvert un interstice suffisant.
-
Passez les trois étapes suivantes.
-
-
Also: 3D Printer's heated bed set to 70-80 degrees Celcius for a few minutes does the job, as it basically works the same way heating mats used in professional repair shops do.
-
-
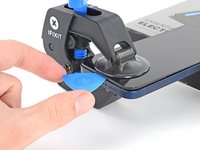
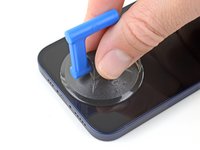
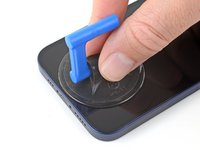
Si vous utilisez une simple ventouse, posez-la sur la section inférieure du téléphone, en évitant de trop vous approcher du bord.
-
-
-
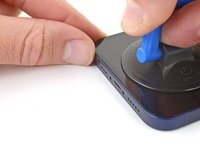
Tirez fermement et constamment sur la ventouse pour ouvrir un léger espace entre l'écran et le châssis.
-
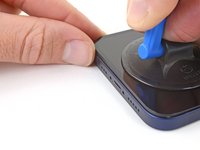
Insérez un médiator dans l'espace sous le joint en plastique de l'écran.
This seems impossible. I've been trying for an hour with heat and rocking, and the screen doesn't budge. :(
Don’t give up! Use more heat and a tad more force. I know you may fear breaking it more, but as long as you don’t stick the prying tool too far or tug too hard, you can do it! I have faith that you can do it!
I'm in the same boat, this isn't coming off. I've tried the hair dryer as well as the heating pad from ifixit. Any other ideas?
The suction cup comes off before the screen will
Is there a better tool for this? Just saw a video on YouTube where a kid pryed it open with no heating/etc. in 5 seconds.
I've changed the batteries in probably a half dozen iphones of different models. But 25 minutes of heating and pulling had no effect on iPhone 12
Welp. I finally ended up breaking the screen attempting this. DO NOT ATTEMPT THIS REPAIR! Not worth the broken screen and losing the cost of shipping both ways when you return the battery.
thx, I ll go to an apple repair center
Back (and bad...) experience ! Even if you heat a lot, the screen is hardly sticked. Take care, before sliding the mediator under the screen, this one should be moved up, at least 2 mm. On my side i have slided around 1 mm and .... inserted the mediator between the glass screen and the screen structure ring.... result : glass break and screen to change (my initial exercise was the battery removal !). I feel that next time i will visit a repair center...
Pro tip for anyone having trouble with this. You have to use multiple rounds of heat and pulling. Use a hair dryer and not the iOpener that comes with the fix kit and get it just too hot to touch then quickly start pulling and wiggling it up and down. Once it cools down grab the hair dryer again and repeat it a couple times until you start to get a big enough gap.
I just did this yesterday and it took around 5 rounds of heating and pulling to get it to seperate enough from the body.It's important to insert the pick under the bezel. I just delaminated my screen. The screen was probably fine, but it was glitching, so I wanted to check for a bad connection. Anyway, now I get a new screen.
Under the bezel, eh.
After reading this almost a year later to the day I last commented on it, I now know that the best way I have found to remove a screen, from pretty much any phone, not just this one, is heat (I use a heating pad on 80 degrees celsius) and before putting the phone on the heating pad, I use 91% isopropyl alcohol around the edges that you will be sliding your pry tools in, and I leave it on for 10 min. I then take it off, add more alcohol, and then put it back on the pad for another 5 min. Also, while I am sliding my tools around the screen, I continuously add more alcohol, and if it takes a really long time, then more heat as well. Heat, alcohol, and patience, lots of patience, and you should be good. Hope this helps, good luck!
Can confirm, this does indeed work. Just keep warming it up, lifting up and down, and repeat when phone goes cold. After around 10 rounds it would move enough to where I could see inside the phone when lifted. You can then insert pick
Tip: You can also try to apply heat and lift the other corner, just enough to make it move slightly. This will ease pressure needed to separate the glue on the other side as-well.
No worries guys! it’s completely doable! You just need to be patient and keep trying multiple times
I don't doubt that you folks eventually got this open, but how on earth do you not lose your mind with the suction cup popping off every 5 seconds? Agree with Ryan above, have replaced batteries on several other iPhone generations with nowhere near this much effort. Still working on it going on 1 hr, about 10 rounds of hair dryer heat. Did Apple use a stronger adhesive for the 12?
Success. iOpener doesn't get the phone nearly hot enough. Multiple rounds of hair dryer + isopropyl alcohol dribbled in b/w case and screen while pulling up on suction cup. For me, the bottom left hand corner (volume rocker side) seemed to lift up first, so I moved the suction cup to that corner while doing the heat + alcohol.
When I changed the battery on a 7+ instead of the suction cup/heat method I used an Cacto blade inserted horizontally along the bottom edge to break the seal. Would this work on the 12?
I struggled with this step, but eventually got it. Use LOTS of isopropyl alcohol, and soak the entire perimeter. Let it sit for 30 seconds after application, then heat it up, then pull with the clamp and rock back and forth. Reapply the alcohol and repeat until it works. Took me about 30 mins, but I eventually got it up just enough for the first pick. The iOpener is completely useless, I just used a shrink wrap gun and made sure to hold it 8-12 inches from the phone on the lowest heat setting.
iOpener along the bottom edge, the Anti-Clamp, and three tries about 5 minutes each worked for me. Never popped off, just needed lots of patience and 1.5 screw turns on the clamp. Bottom left corner was first, like another commenter.
-
-
-
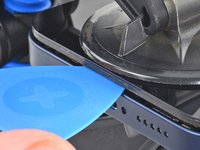
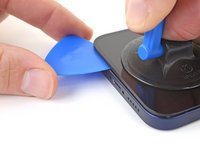
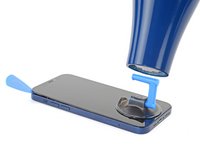
Utilisez un sèche-cheveux pour chauffer le bord droit de l'iPhone (celui avec le bouton de marche) pendant 90 secondes ou jusqu'à ce que l'écran soit légèrement trop chaud au toucher.
-
-
-
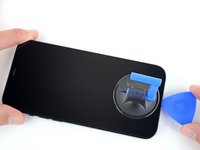
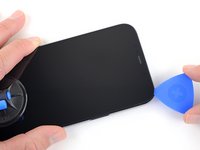
Faites glisser le médiator autour du coin inférieur droit de l'iPhone afin de décoller l'adhésif.
-
Parcourez ensuite le bord droit de l'iPhone, jusqu'au coin supérieur droit.
-
Laissez le médiator dans le coin supérieur droit avant de continuer.
There is a spot on this side where a slight ridge in the iPhone frame makes the pick stick. Eventually I used two, one twisting a bit to open a path for the other. But if you're not expecting it you feel like you're going to break something.
-
-
-
-
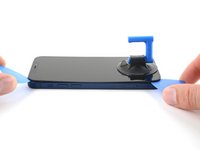
Utilisez un sèche-cheveux pour chauffer le bord supérieur de l'iPhone pendant 90 secondes ou jusqu'à ce que l'écran soit légèrement trop chaud au toucher.
-
-
-
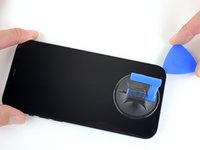
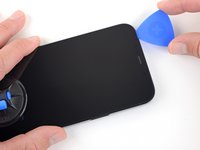
Faites glisser le médiator autour du coin supérieur droit de votre iPhone pour décoller le bord supérieur.
-
Laissez le médiator dans le coin supérieur gauche avant de continuer.
-
-
-
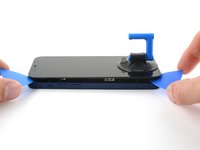
Utilisez un sèche-cheveux pour chauffer le bord gauche de l'iPhone pendant 90 secondes ou jusqu'à ce que l'écran soit légèrement trop chaud au toucher.
Also: 3D Printer's heated bed set to 70-80 degrees Celcius does the job - it basically works the same way professional heated mats that are used in phone repair shops.
-
-
I kinda forgot about this step when I opened my first iPhone 12.
For the next one, I'm going to mark that edge of the phone with blue tape roughly where each cable is to help me remember.Also FWIW, I got the 70 cent adhesive cutting tool from Apple with my genuine battery and used that for all my display prying needs after getting the first opening propped with a guitar pick.
It worked great and did not damage anything so no need to sweat inserting something too far and causing damage.
Could you PLEASE move this to step 13?? I tore the front sensor cable. 😭
-
-
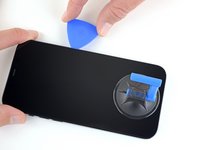
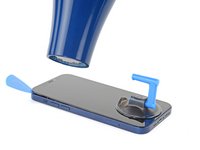
Insérez un second médiator dans le coin inférieur gauche de l'iPhone.
-
Faites pivoter les deux médiators en même temps, jusqu'à ce que les clips du bord gauche se détachent.
-
-
-
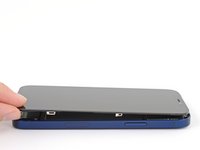
Tournez votre iPhone de façon que son bord droit est en face de vous.
-
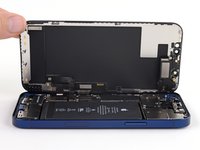
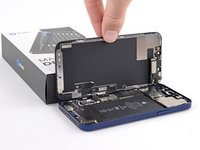
Ouvrez l'iPhone en soulevant le côté droit de l'écran comme on ouvre la couverture avant d'un livre.
-
Calez l'écran contre un objet pour qu'il reste ouvert pendant que vous travaillez sur votre téléphone.
i did this and the shroud with the earpiece speaker still stuck with the phone so its just wedged in there i cant get it out
-
-
Outil utilisé dans cette étape :Magnetic Project Mat$19.95
-
Ôtez les deux vis Y000 de 1,1 mm qui fixent le cache des connecteurs de la batterie et de l'écran.
Ouch, I see a broken flat here…
Can I use a y 0.6 if I don’t have y000
Yep! The measurements for Y000 are 0.6 mm.
-
-
-
Enlevez le cache.
Hi
On my original display on an iPhone 12, there is no metal hinge as shown here and therefore no place for it when closing the phone. Have double-checked model and the original display - and it is just not there. Is there another model based on serial number?
Hinge marked: https://www.dropbox.com/scl/fi/asztgi60g...
Best regards,
Carsten
-
-
-
Prenez une spatule (spudger) ou un ongle propre pour soulever le connecteur de la batterie de sa prise sur la carte mère.
-
Repliez légèrement le connecteur par rapport à la carte mère pour l'empêcher de faire accidentellement contact avec la prise et d'alimenter le téléphone pendant que vous effectuez votre réparation.
-
-
-
Servez-vous d'une spatule ou d'un ongle pour débrancher le connecteur de la nappe de l'écran.
-
-
-
Servez-vous d'une spatule ou d'un ongle pour débrancher le connecteur de la nappe de la vitre tactile.
-
-
-
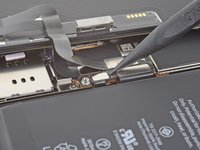
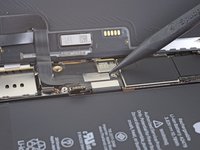
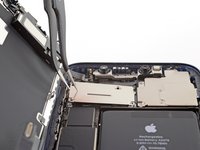
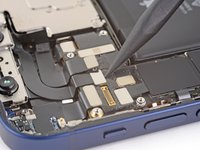
Utilisez un tournevis Y000 pour dévisser les quatre vis qui fixent le cache du connecteur de l'ensemble capteurs frontaux :
-
Trois vis de 1,1 mm
-
Une vis de 1,4 mm
-
-
-
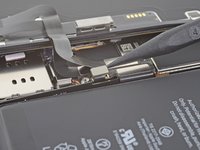
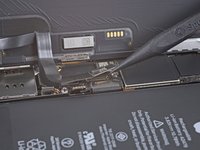
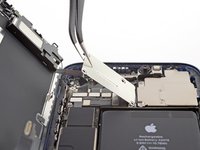
Faites pivoter le bord gauche du cache vers le haut jusqu'à ce que le petit clip sur la droite se détache.
-
Enlevez le cache.
-
-
-
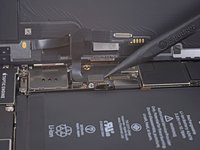
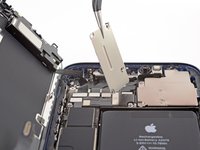
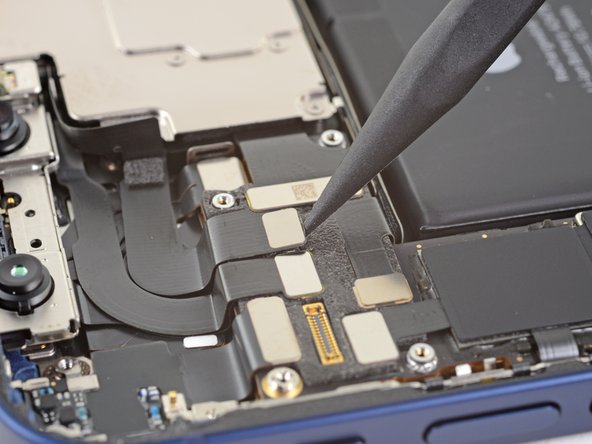
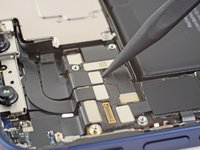
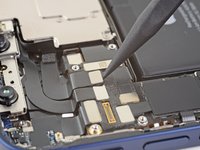
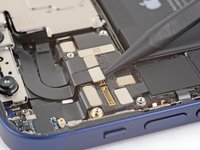
Prenez la pointe d'une spatule ou un ongle propre pour débrancher la nappe de l'ensemble capteurs frontaux.
-
-
-
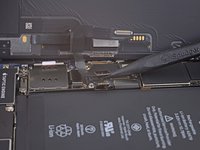
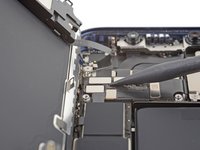
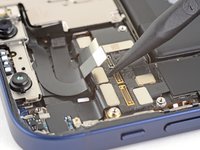
Avec un tournevis Y000, dévissez la vis de 1 mm qui fixe le module caméras frontales.
-
-
-
Soulevez et retirez le cache du module caméras frontales.
-
-
-
Utilisez une spatule ou un ongle pour débrancher la nappe de l'illuminateur Face ID de sa prise sur la carte mère.
-


Comparez votre nouvelle pièce de rechange à la pièce d'origine, il se peut que vous ayez besoin de transférer des composants restants ou de retirer des films adhésifs de la nouvelle pièce avant de commencer le remontage.
Pour remonter votre appareil, suivez les étapes ci-dessus dans l'ordre inverse.
Déposez vos déchets électroniques dans un centre de recyclage certifié.
La réparation ne s'est pas déroulée comme prévu ? Consultez nos conseils basiques de diagnostic ou la section iPhone 12 de notre Forum pour obtenir de l'aide.
Annulation : je n'ai pas terminé ce tutoriel.
14 autres ont terminé cette réparation.
Merci à ces traducteurs :
85%


Ces traducteurs nous aident réparer le monde ! Vous voulez contribuer ?
Commencez à traduire ›

Un commentaire
Tausch hat gut funktioniert, nur muss Face ID von Apple noch konfiguriert werden, das machen sie aber nicht wenn sie die frontkamera nicht selbst ausgetauscht haben. War das letzte applegerät.
Do you sell the waterproof seals separately or are they included in the kit?
Heather Furnas - Réponse
Do you sell the waterproof seals separately or are they included in the kit? (I would like to know this as well.)
CaliforniaGunner - Réponse
I just got my Fix Kit and it includes the seals. Not sure if a "part only" version would, though.
Neal Sofge - Réponse