Il est possible que cette traduction ne reflète pas les dernières mises à jour du tutoriel source. Aidez à mettre à jour la traduction ou bien consultez le tutoriel source.

Remplacement du ventilateur sur Dell XPS 13 9350
Introduction
Passez à l'étape 1Utiliser ce guide pour remplacer le ventilateur sur le Dell XPS 13 9350
Ce dont vous avez besoin


-
-
Utilisez un outil d'ouverture plastique pour ouvrir la trappe 'XPS' au milieu.
No flap or screw on the XPS 9370, just a press-fit latch at the centre of the cover. This can be gently prised off.
-
-
-
-
Utilisez des médiators ou un outil en plastique pour faire levier pour détacher les clips du boîtier en commençant par le bord arrière.
It’s not that easy to lift actually, cause there are latches. Had t release them gently all around beforehand.
Also there’s one additional screw under that plate on the bottom!
Maybe the later models are different, since it should be from the front: https://www.youtube.com/watch?v=xFIE2SKs...
Very difficult step, Proceed very carefull
If you are replacing the battery of a 9360 or latter (2016 onward) make sure to do the FRONT first. There are latches on the back that you may break if you try to force it open that way. After prying up the front and the sides, just lift up the front like you would open a hinged box. You shouldn’t feel that much resistance as the back hinges off towards you after you’ve lifted it around 30-40 degrees.
-
-
-
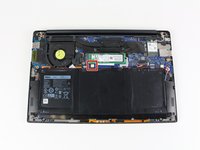
Retirez le couvercle inférieur.
good evening, is there a site that sells the back part because it's broken
good evening, is there a site that sells the
back part because it's broken
-
-
-
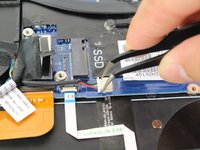
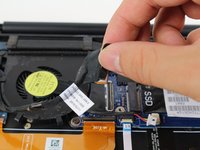
Utiliser une pincette pour retirer le petit connecteur blanc en le tirant vers l'extérieur et en l'éloignant de sa prise.
-
-
-
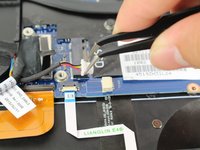
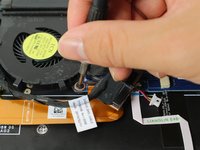
Retirer le connecteur plat standard noir en soulevant la languette vers le haut avec la main.
-
-
-
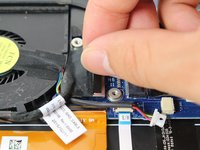
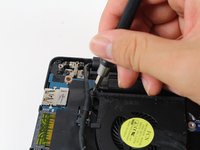
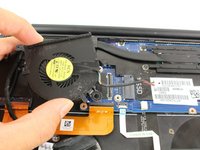
Utiliser votre main droite pour soulever la plus grande section de la carte-mère, la plus proche du ventilateur.
-
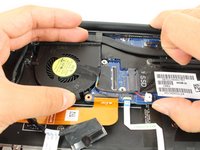
Utiliser votre main gauche pour tirer le ventilateur à un angle de 30 degrés du dessous de la carte-mère.
-


Pour remonter votre appareil, suivez ces instructions dans l'ordre inverse.
Pour remonter votre appareil, suivez ces instructions dans l'ordre inverse.
Annulation : je n'ai pas terminé ce tutoriel.
6 autres ont terminé cette réparation.
Merci à ces traducteurs :
62%

Schwarzer nous aide à réparer le monde ! Vous voulez contribuer ?
Commencez à traduire ›
Équipe

Cal Poly, Team S21-G6, Livingston Spring 2017 Membre de l'équipe Cal Poly, Team S21-G6, Livingston Spring 2017
CPSU-LIVINGSTON-S17S21G6
5 membres
30 tutoriels rédigés
3 commentaires de tutoriel
Great guide! The two hardest parts were getting the back cover off, and lifting the motherboard to remove the fan. Took me about 30 minutes in total.
It would be really easier if you remove the battery screws first… there are some steps that were not clear…
This repair took me about 45 min for a complete novice. “Walking out” the battery connector was only way I could unplug it. There was a retaining bracket overlaying the flat connector (step 8) that I needed to unscrew (2 screws, phillips) before it could be removed. Take care to replace the wire in the wire guides along the fan’s housing prior to reinsertion of the replacement fan. It cannot be done afterwards and the back panel will not be flush. Otherwise, this was an excellent guide and an easy repair.
Missing a step about removing the tiny Phillips head screw under the XPS flip up cover in the middle. Also, there are hooks all the way around the cover so it doesn’t simply lift off.
curtis_p_brown - Réponse
What about step 3???
Peter Hecht -
Please dont hurry , take your Time to follow this procedure. It takes 20 min (not 5) and step 4 requires half of this Time. Good luck.
Peter Hecht - Réponse
+1 Peter Hecht is right - getting the little clips the back is snapped on with is time consuming and a bit fiddly for people not used to “spudging” off covers. Starting from the back is the key those come loose much easier and help with the rest
Doug Steinschneider - Réponse
Great guide. It took me 20 minutes and there were no surprises. Battery installed. :)
dhenniga - Réponse