Aller au contenu principal
Repairing a Tear in a Tent

Repairing a Tear in a Tent

Brittany McCrigler

Brittany McCrigler et 3 autres contributeurs

Dernière mise à jour le May 16, 2023

5 - 10 minutes
Facile
Patagonia

Even a small tear can grow into a big problem when you are out in the wild and exposed to the elements. Fortunately, repairing a tear is simple. A few stitches can have your tent, or just about anything else with a tear, ship-shape in no time.

Ce dont vous avez besoin

iFixit touche une commission lorsque vous achetez par l'intermédiaire de ces liens.
  1. Repairing a Tear in a Tent, Sew a Ladder Stitch: étape 1, image 1 de 3 Repairing a Tear in a Tent, Sew a Ladder Stitch: étape 1, image 2 de 3 Repairing a Tear in a Tent, Sew a Ladder Stitch: étape 1, image 3 de 3
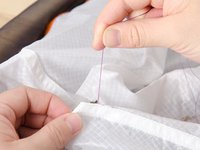
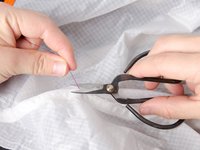
    • Thread your needle and tie a knot in the end.

    • We're using contrasting thread for visibility, but when it comes time for your repair, you'll want to use matching thread.

    • Drive the needle from the back of the material, just before where the tear starts.

    • Pull the thread taut.

  2. Repairing a Tear in a Tent: étape 2, image 1 de 2 Repairing a Tear in a Tent: étape 2, image 2 de 2
    • Take a small stitch, going in and out of the material, on one side of the tear only.

    • Pull the thread taut.

  3. Repairing a Tear in a Tent: étape 3, image 1 de 2 Repairing a Tear in a Tent: étape 3, image 2 de 2
    • Take a small stitch, going in and out of the material, on the other side of the tear, directly opposite of the stitch you just took.

    • Pull the thread taut. This should cinch the material together.

    • If your material bunches, try taking smaller stitches, while ensuring that you line up the stitches on either side of the material.

  4. Repairing a Tear in a Tent: étape 4, image 1 de 2 Repairing a Tear in a Tent: étape 4, image 2 de 2
    • Continue stitching, switching from side to side as described in step 2 and 3 of this guide, pulling the thread taut after each stitch.

    • Stitch until you come to the end of the tear.

  5. Repairing a Tear in a Tent: étape 5, image 1 de 3 Repairing a Tear in a Tent: étape 5, image 2 de 3 Repairing a Tear in a Tent: étape 5, image 3 de 3
    • One the last stitch, drive the needle through both sides of the fabric, taking as small of a stitch as possible.

    • Slowly pull the thread. As you pull, a loop will form. Draw the needle through this loop, and pull the thread taut.

    • Repeat this step, taking a tiny stitch, drawing the needle through the loop, and pulling taut.

    • Ensure that the stitches are tight, and cut any excess threads.

Ligne d'arrivée

Une autre personne a terminé cette réparation.

Brittany McCrigler

Membre depuis le 03/05/12

89 977 Réputation

142 tutoriels rédigés

Équipe

iFixit Membre de l'équipe iFixit

Staff

121 membres

19 996 tutoriels rédigés

1 commentaire de tutoriel

Have you seen this product? "fixmytear". It's a repair tape which sticks very well to vinyl, canvas, rubber, leather and most other surfaces. Absolutely life saving tape.

https://www.amazon.com/Fixmytear-Magic-R...

https://www.amazon.com/fixmytear-Magic-R...

bobhunter50023 - Réponse

Ajouter un commentaire

Nombre de vues :

Dernières 24 heures : 3

7 derniers jours : 50

30 derniers jours : 136

Total : 10,246