Aller au contenu principal
Toshiba Satellite R15-S829 Hard Drive Replacement

Toshiba Satellite R15-S829 Hard Drive Replacement

Mike Strother

Mike Strother et 2 autres contributeurs

Dernière mise à jour le December 20, 2016

5 minutes
Facile

This is a guide to replace the hard drive. You may need to replace the hard drive if your laptop wont turn on. This guide is also useful if you want to upgrade your laptop to have more hard drive space.

Ce dont vous avez besoin

Outils

  1. Toshiba Satellite R15-S829 Hard Drive Replacement, Battery Replacement: étape 1, image 1 de 1
    • Unplug the charging cable from the laptop.

    • Turn off the laptop.

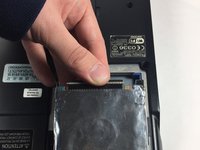
    • Turn the laptop over and locate the battery.

  2. Toshiba Satellite R15-S829 Hard Drive Replacement: étape 2, image 1 de 3 Toshiba Satellite R15-S829 Hard Drive Replacement: étape 2, image 2 de 3 Toshiba Satellite R15-S829 Hard Drive Replacement: étape 2, image 3 de 3
    • Push the small switch near the corner of the laptop to the unlocked position.

    • Push the bigger switch in the direction of the icon and pull the battery away from the laptop.

  3. Toshiba Satellite R15-S829 Hard Drive Replacement, Hard Drive Replacement: étape 3, image 1 de 1
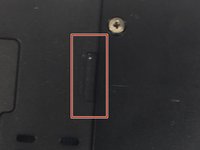
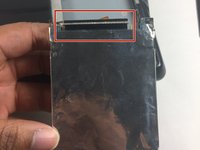
    • First, begin by locating the spot of the cover of the hard drive located on the bottom of the laptop.

  4. Toshiba Satellite R15-S829 Hard Drive Replacement: étape 4, image 1 de 1
    • Remove the screw of the cover.

  5. Toshiba Satellite R15-S829 Hard Drive Replacement: étape 5, image 1 de 2 Toshiba Satellite R15-S829 Hard Drive Replacement: étape 5, image 2 de 2
    • Locate the indent where the hard drive can be removed. Remove the cover.

  6. Toshiba Satellite R15-S829 Hard Drive Replacement: étape 6, image 1 de 2 Toshiba Satellite R15-S829 Hard Drive Replacement: étape 6, image 2 de 2
    • Remove the hard drive using your hand.

  7. Toshiba Satellite R15-S829 Hard Drive Replacement: étape 7, image 1 de 3 Toshiba Satellite R15-S829 Hard Drive Replacement: étape 7, image 2 de 3 Toshiba Satellite R15-S829 Hard Drive Replacement: étape 7, image 3 de 3
    • Now remove the power ribbon from the hard drive.

  8. Toshiba Satellite R15-S829 Hard Drive Replacement: étape 8, image 1 de 1
    • Locate the screws on each side of the encasing of the hard drive.

  9. Toshiba Satellite R15-S829 Hard Drive Replacement: étape 9, image 1 de 2 Toshiba Satellite R15-S829 Hard Drive Replacement: étape 9, image 2 de 2
    • Use your Phillips screwdriver to remove the screws and be careful not to lose the screws.

  10. Toshiba Satellite R15-S829 Hard Drive Replacement: étape 10, image 1 de 1
    • Remove the encasing from the hard drive.

Conclusion

To reassemble your device, follow these instructions in reverse order.

Mike Strother

Membre depuis le 10/20/16

299 Réputation

2 tutoriels rédigés

Équipe

UMass Dartmouth, Team 5-8, Martin Fall 2016 Membre de l'équipe UMass Dartmouth, Team 5-8, Martin Fall 2016

UMASSD-MARTIN-F16S5G8

3 membres

5 tutoriels rédigés

Un commentaire

cual es el numero de parte del flex porfa

Alex De santiago - Réponse

Ajouter un commentaire

Nombre de vues :

Dernières 24 heures : 0

7 derniers jours : 0

30 derniers jours : 0

Total : 447