Aller au contenu principal
Xbox One Elite Controller (Model 1698) Motherboard Replacement

Xbox One Elite Controller (Model 1698) Motherboard Replacement

EasyAsABC123

EasyAsABC123 et 4 autres contributeurs

Dernière mise à jour le March 13, 2025

50 minutes
Difficile
Tutoriel réalisé par la communauté

Ce dont vous avez besoin

Outils

Afficher plus…

  1. Xbox One Elite Controller (Model 1698) Motherboard Replacement, Show me the Screws!: étape 1, image 1 de 2 Xbox One Elite Controller (Model 1698) Motherboard Replacement, Show me the Screws!: étape 1, image 2 de 2
    • You can remove the side panels with a pry tool.

    • You don't need to remove the rubber. The rubber on this controller was already bad.

  2. Xbox One Elite Controller (Model 1698) Motherboard Replacement, Removing the back panel screws: étape 2, image 1 de 1
    • Remove the 5 Torx Security Bit (TR9) screws.

  3. Xbox One Elite Controller (Model 1698) Motherboard Replacement, Popping that back panel off: étape 3, image 1 de 3 Xbox One Elite Controller (Model 1698) Motherboard Replacement, Popping that back panel off: étape 3, image 2 de 3 Xbox One Elite Controller (Model 1698) Motherboard Replacement, Popping that back panel off: étape 3, image 3 de 3
    • Pry the panel next to the 3.5mm port.

    • Be careful to not rip the ribbon shown in the next step.

  4. Xbox One Elite Controller (Model 1698) Motherboard Replacement, Warning Carefully remove the ribbon: étape 4, image 1 de 2 Xbox One Elite Controller (Model 1698) Motherboard Replacement, Warning Carefully remove the ribbon: étape 4, image 2 de 2
    • Be careful to not rip the ribbon cable.

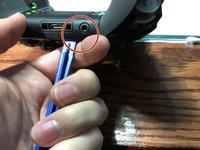
    • You can pop the connector up to remove the ribbon easily.

    • Ribbon Cable

  5. Xbox One Elite Controller (Model 1698) Motherboard Replacement, Screws on controller motherboard: étape 5, image 1 de 1
    • Remove the 2 Torx (T6) screws.

  6. Xbox One Elite Controller (Model 1698) Motherboard Replacement, Desolder wires from motherboard: étape 6, image 1 de 2 Xbox One Elite Controller (Model 1698) Motherboard Replacement, Desolder wires from motherboard: étape 6, image 2 de 2
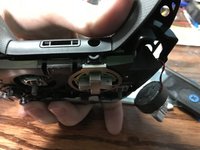
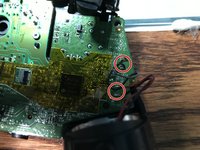
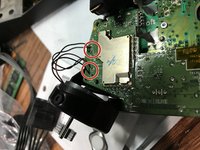
    • Desolder the 4 wires on each side, these control the vibrations and the RT LT.

  7. Xbox One Elite Controller (Model 1698) Motherboard Replacement, Remove the motherboard: étape 7, image 1 de 2 Xbox One Elite Controller (Model 1698) Motherboard Replacement, Remove the motherboard: étape 7, image 2 de 2
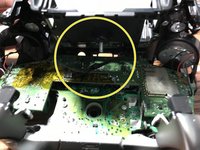
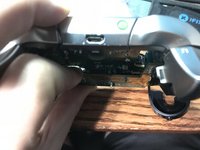
    • Pull up from the "top" side of the controller on the daughterboard.

Conclusion

To reassemble your device, follow these instructions in reverse order.

9 autres ont terminé cette réparation.

EasyAsABC123

Membre depuis le 01/22/10

2 449 Réputation

5 tutoriels rédigés

1 commentaire de tutoriel

50 minutes? half of that tops

glenn.fowell - Réponse

Ajouter un commentaire

Nombre de vues :

Dernières 24 heures : 1

7 derniers jours : 22

30 derniers jours : 92

Total : 17,566