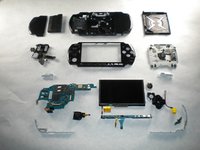
Aller au contenu principal

Ce dont vous avez besoin

Cette vue éclatée n'est pas un tutoriel de réparation. Pour réparer votre PSP 300x, utilisez notre manuel de réparation.

  1. PSP 300x Teardown, PSP 300x Teardown: étape 1, image 1 de 2 PSP 300x Teardown, PSP 300x Teardown: étape 1, image 2 de 2
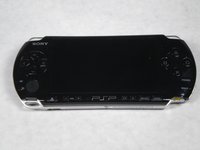
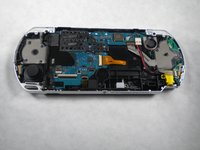
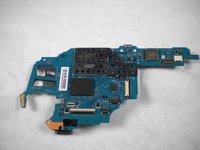
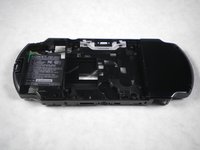
    • The first picture is a view of the front of the PSP-3000. The second picture is of the back.

  2. PSP 300x Teardown: étape 2, image 1 de 2 PSP 300x Teardown: étape 2, image 2 de 2
    • Lift the covering from the left side on the back of the PSP to reveal the battery.

    • Pull up on the top at the top of the battery with your fingernail and remove it.

  3. PSP 300x Teardown: étape 3, image 1 de 3 PSP 300x Teardown: étape 3, image 2 de 3 PSP 300x Teardown: étape 3, image 3 de 3
    Outil utilisé dans cette étape :
    Metal Spudger Set
    $7.99
    J'achète
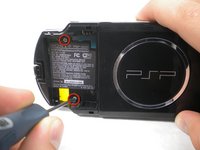
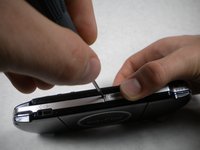
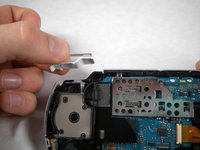
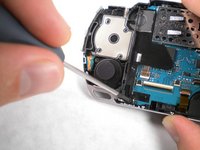
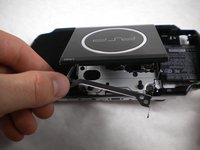
    • Using a spudger or fingernail (spudger set available at iFixit) Metal Spudger Set peel back the warranty sticker that was behind the battery.

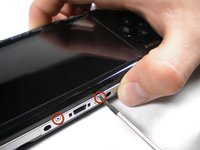
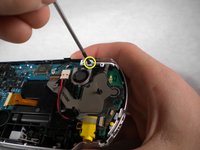
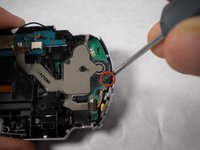
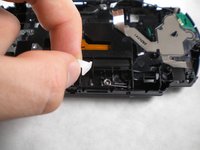
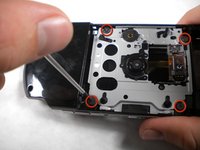
    • Using a Phillips #0 screwdriver (screwdriver available at iFixit http://www.ifixit.com/Tools#0-Phillips), Unscrew all four screws from the back of the PSP.

    • Two from behind the battery.

    • And two on the right side of the PSP.

  4. PSP 300x Teardown: étape 4, image 1 de 2 PSP 300x Teardown: étape 4, image 2 de 2
    • Unscrew two screws from the top of the PSP.

    • Turn the PSP around, and unscrew a single screw from the bottom edge.

  5. PSP 300x Teardown: étape 5, image 1 de 2 PSP 300x Teardown: étape 5, image 2 de 2
    • Starting from the 'R' trigger, slide the spudger in between the outer casing the the PSP, and gently pry off the casing.

    • Remove the outer casing completely.

  6. PSP 300x Teardown: étape 6, image 1 de 3 PSP 300x Teardown: étape 6, image 2 de 3 PSP 300x Teardown: étape 6, image 3 de 3
    • Push the homebar to the right to release the tab on the right side of the LCD screen.

    • DO NOT completely remove the homebar, as it is still connected by ribbon cables.

    • Slowly begin to lift the LCD screen off the PSP from the top edge.

    • Again, the LCD screen is attached by ribbon cables, so do not remove it completely.

  7. PSP 300x Teardown: étape 7, image 1 de 3 PSP 300x Teardown: étape 7, image 2 de 3 PSP 300x Teardown: étape 7, image 3 de 3
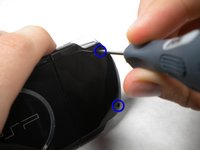
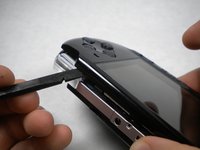
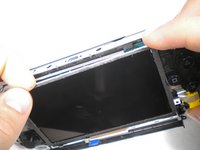
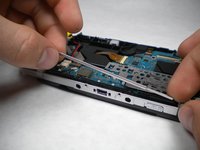
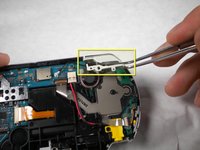
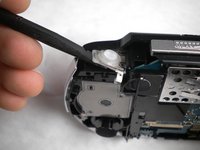
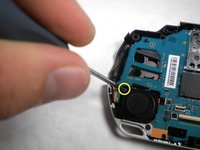
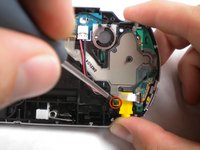
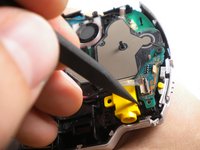
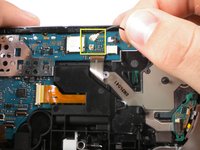
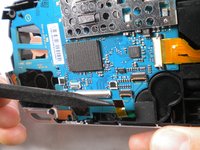
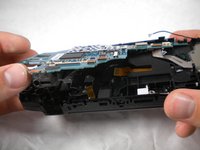
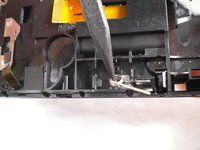
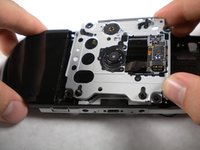
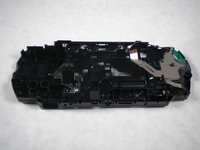
    • Using a spudger or fingernail, flip the small brown locks on the four ribbon cable connectors up.

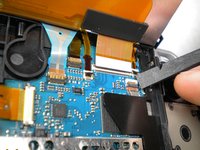
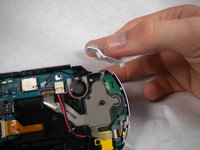
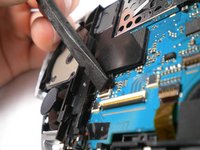
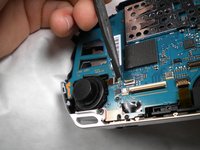
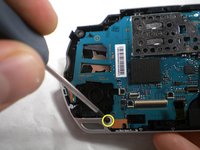
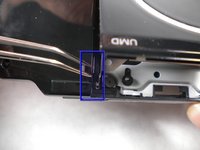
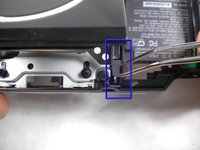
    • WARNING! Be carefull removing the small ribbion from the LCD connector, it is very delicate. Using a spudger lift the black plastic up, NOT the white part on the connector!

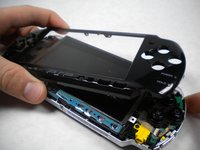
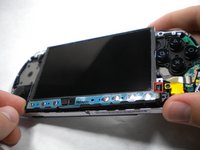
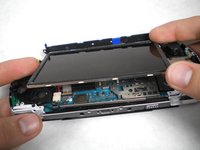
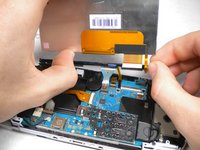
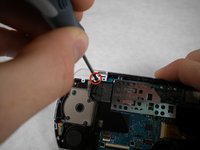
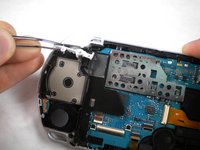
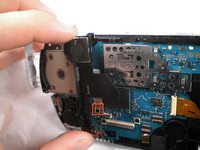
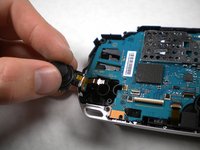
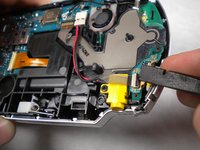
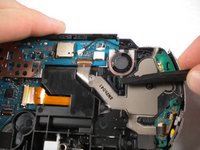
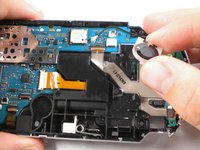
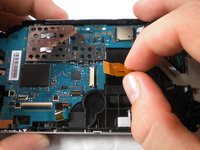
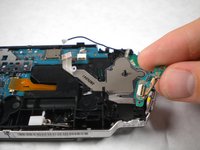
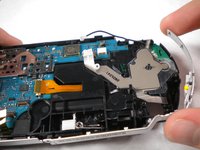
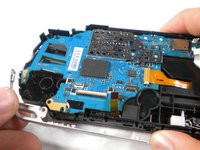
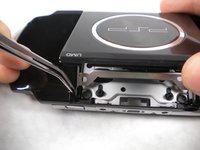
    • Pull all four ribbon cables out, and remove the LCD screen and homebar from the PSP.

  8. PSP 300x Teardown: étape 8, image 1 de 3 PSP 300x Teardown: étape 8, image 2 de 3 PSP 300x Teardown: étape 8, image 3 de 3
    • Remove the small metal bar from the top edge of the PSP. (This was helping to hold the LCD screen in place)

    • Remove the button pad from the PSP.

  9. PSP 300x Teardown: étape 9, image 1 de 3 PSP 300x Teardown: étape 9, image 2 de 3 PSP 300x Teardown: étape 9, image 3 de 3
    • Unscrew the the screw securing 'L' trigger.

    • Remove the white plastic piece that holds the 'L' trigger in place.

    • Remove the 'L' trigger from the PSP.

  10. PSP 300x Teardown: étape 10, image 1 de 3 PSP 300x Teardown: étape 10, image 2 de 3 PSP 300x Teardown: étape 10, image 3 de 3
    • Unscrew the 'R' trigger and remove both pieces. (Refer to step nine by applying the procedures to this, the right, side)

  11. PSP 300x Teardown: étape 11, image 1 de 2 PSP 300x Teardown: étape 11, image 2 de 2
    • Remove the screw from the bottom left edge.

    • Being careful not to break the ribbon cable, use the spudger, to carefully peel the adhesive button from below the 'L' trigger.

  12. PSP 300x Teardown: étape 12, image 1 de 3 PSP 300x Teardown: étape 12, image 2 de 3 PSP 300x Teardown: étape 12, image 3 de 3
    • Using the spudger or fingernail, flip up the brown lock on the ribbon cable.

    • Remove the cable from the connector and remove the entire black piece from the PSP.

    • Remove the screw from the analog stick.

  13. PSP 300x Teardown: étape 13, image 1 de 3 PSP 300x Teardown: étape 13, image 2 de 3 PSP 300x Teardown: étape 13, image 3 de 3
    • Unlock and remove the ribbon cable connection the analog stick to the main board.

    • Remove the analog stick from the PSP.

  14. PSP 300x Teardown: étape 14, image 1 de 3 PSP 300x Teardown: étape 14, image 2 de 3 PSP 300x Teardown: étape 14, image 3 de 3
    • Unlock and remove the ribbon cable from the power switch on the right side of the PSP.

    • Unscrew and remove the screw from the yellow power jack.

    • Carefully bend back the black tab holding the power jack in place and start pulling the plug up to release it from this clip.

  15. PSP 300x Teardown: étape 15, image 1 de 1
    • Pull the plug connecting the power jack to the motherboard.

    • Remove the power jack.

  16. PSP 300x Teardown: étape 16, image 1 de 2 PSP 300x Teardown: étape 16, image 2 de 2
    • Push the black tab at the bottom of the speaker over.

    • The speaker should pop out of place, and you should be able to remove it easily.

  17. PSP 300x Teardown: étape 17, image 1 de 3 PSP 300x Teardown: étape 17, image 2 de 3 PSP 300x Teardown: étape 17, image 3 de 3
    • Pull the wireless antenna cable from its plug.

    • Unlock and remove both ribbon cables from the mother board.

  18. PSP 300x Teardown: étape 18, image 1 de 2 PSP 300x Teardown: étape 18, image 2 de 2
    • Remove the screw from the power switch board.

    • Remove the power switch assembly/board.

  19. PSP 300x Teardown: étape 19, image 1 de 2 PSP 300x Teardown: étape 19, image 2 de 2
    • Unlock and remove one last ribbon cable from the bottom edge of the PSP.

    • Remove the screw from the bottom left corner of the PSP.

  20. PSP 300x Teardown: étape 20, image 1 de 2 PSP 300x Teardown: étape 20, image 2 de 2
    • Lift the silver rim on the right side of the PSP up and off.

    • Lift the silver rim on the left side of the PSP up and off.

  21. PSP 300x Teardown: étape 21, image 1 de 3 PSP 300x Teardown: étape 21, image 2 de 3 PSP 300x Teardown: étape 21, image 3 de 3
    • Lift the motherboard up slowly starting from the bottom of the PSP, being careful not to damage the port on top.

    • Pull the motherboard out and remove it from the PSP.

    • The specific motherboard model of this PSP-3000 is TA-090

  22. PSP 300x Teardown: étape 22, image 1 de 2 PSP 300x Teardown: étape 22, image 2 de 2
    • On the top of the back of the PSP, pull the white plastic piece out.

    • Pull the spring out and remove it from the PSP.

  23. PSP 300x Teardown: étape 23, image 1 de 3 PSP 300x Teardown: étape 23, image 2 de 3 PSP 300x Teardown: étape 23, image 3 de 3
    • Open the UMD (disk drive) and locate the two small black rubber squares wedged in the space between the casing and the metal drive hinge on either side.

    • Pull these out using a pair of tweezers.

  24. PSP 300x Teardown: étape 24, image 1 de 2 PSP 300x Teardown: étape 24, image 2 de 2
    • Remove the metal piece from the drive.

    • Grabbing the PSP with both hands, gently pinch the UMD lid towards the right side (the side without the battery).

    • Pull up and the the left side carefully to remove the lid from the PSP. (The casing may have to flex a little bit to allow this)

  25. PSP 300x Teardown: étape 25, image 1 de 2 PSP 300x Teardown: étape 25, image 2 de 2
    • Remove the four screw from the UMD drive.

    • Remove the drive.

  26. PSP 300x Teardown: étape 26, image 1 de 3 PSP 300x Teardown: étape 26, image 2 de 3 PSP 300x Teardown: étape 26, image 3 de 3
    • Enjoy the eye-candy.

mbnewsom

Membre depuis le 10/28/09

3 103 Réputation

11 tutoriels rédigés

9 commentaires

Can you get me in pdf

Aayush - Réponse

Does a PSP have any bearings inside of it?

Brooke Payne - Réponse

No ball bearings. Thumbsticks are probably just Lubed plastics rubbing against eachother

mahonen -

Thank you very much for the guide.

C. JONES - Réponse

This has inspired me to build my own PSP. I had one as a child, and want one now for the nostalgia. Thanks!

Sheenyl Hassan - Réponse

Ajouter un commentaire

Nombre de vues :

Dernières 24 heures : 23

7 derniers jours : 192

30 derniers jours : 884

Total : 88,139