Introduction
Consultez ce tutoriel pour retirer et changer votre batterie MacBook 12" avec écran Retina. La meilleure façon de procéder est d'utiliser un kit de changement batterie iFixit ; le dissolvant contenu dans le kit dissoudra l'adhésif qui fixe la batterie MacBook, ce qui vous permettra de la retirer facilement.
Le dissolvant pour adhésif iFixit étant inflammable, effectuez cette procédure dans un endroit bien ventilé. Ne fumez pas et ne travaillez pas à proximité d'une flamme pendant cette procédure.
Pour votre sécurité, videz votre batterie MacBook avant de vous lancer. Une batterie lithium-ion chargée peut provoquer un incendie dangereux et incontrôlable en cas de perforation accidentelle.
Les contacts de la batterie MacBook sont situés sous la carte mère, que ce tutoriel recommande d'enlever complètement pour remplacer la batterie. Bien qu'il soit possible de juste retirer les vis de la carte mère et incliner légèrement la carte vers le haut pour retirer la batterie, il est très difficile d'installer correctement une nouvelle batterie avec la carte mère toujours en place.
Remarque : le dissolvant utilisé pour dissoudre l'adhésif de la batterie MacBook Retina 2016 peut endommager et/ou décolorer certains plastiques. Faites bien attention là où vous appliquez le dissolvant.
Ce dont vous avez besoin
-
-
Allumez votre Mac et lancez Terminal.
-
Copiez-collez ou tapez la commande suivante dans Terminal :
-
sudo nvram AutoBoot=%00
-
Cliquez sur la touche [return]. Si nécessaire, saisissez votre mot de passe d'admin et cliquez sur la touche [return]. Remarque : il est possible que cette touche porte le symbole ⏎ ou l'inscription "enter".
-
sudo nvram AutoBoot=%03
-
-
Outil utilisé dans cette étape :Magnetic Project Mat$19.95
-
Retirez les huit vis suivantes maintenant le boîtier inférieur :
-
2 vis Pentalobe P5 1,8 mm
-
4 vis Pentalobe P5 2,9 mm
-
2 vis Pentalobe P5 2,1 mm
IMPORTANT. You’re not removing the bottom, yet. This step is solely to separate the panel from its clips, permitting inside access.
The screws go in tangent to the curve of the case. If you aren’t used to handling small hardware try turning the screw counterclockwise while you feel for the hole until you feel it drop, that means the threads have aligned. It takes only light finger torque when they are threaded correctly
-
-
-
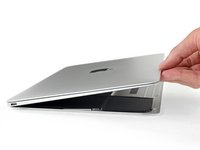
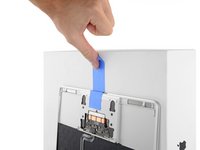
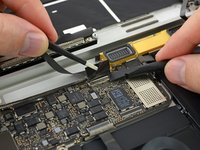
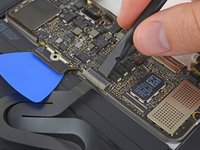
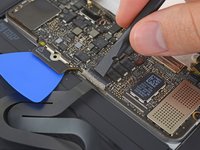
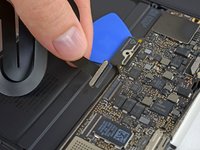
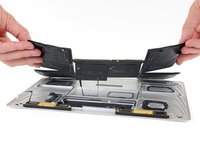
Soulevez le bord avant de l'ensemble boîtier supérieur et écran et levez le tout à un angle d'environ 45°.
This displays two black pics to prop up the MacBook, but the kit only includes one black pic.
-
-
-
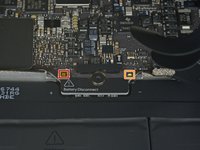
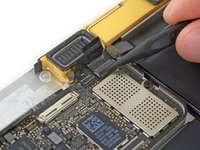
Utilisez la partie plate d'une spatule (spudger) pour appuyer et maintenir le bouton doré 'battery disconnect'.
-
Si le voyant LED de marche s'allume, maintenez encore le bouton jusqu'à ce qu'il s'éteigne, puis relâchez-le. Cette étape peut prendre jusqu'à 10 secondes.
-
Si la LED ne s'allume pas, relâchez le bouton après 5-10 secondes. Appuyez et maintenez-le encore pendant 5-10 secondes, puis relâchez-le. Enfin, appuyez une troisième fois pendant 5-10 secondes et relâchez-le.
cannot turn on the led after replacing the new screen, even after following the turn on instructions upper…
on reassembly, I had to plug my laptop in to reactivate the LED light
After reassembly I could not restart my MacBook using the power button or after SMC reset (shift-ctrl-option-pwr). I had to connect my MacBook to its charging cable to get the battery LED to re-illuminate. After that it was all normal.
mine doesnt turn on w anything, i forgot to click the buton to disconnect :_/
Same issue as above peeps. Followed ifixit directions verbatim and wasn't getting anything after screwing everything back in. Plugged in original 45W power block and waited, after few minutes battery LED came on and a min. or two after that, was able to get screen to turn on. Hope this helps somebody else.
May I ask how to get screen to turn on. I cannot get it work..
For those whose Mac won't turn on.
See step 16
To reconnect this cable, first line up the metal bracket over the screw holes, then "PRESS DOWN" on the middle of the bracket.
There is a connector under the bracket, which you can't see if you don't see under.
Not having it in mind, you will not PRESS DOWN the middle of the bracket and there is no connect.
hls2005 -
Thank you @Xiubo Zhang - This solved my problem! Please everyone check this connector if you have trouble turning your Macbook on after replacing the battery.
Miksu -
There needs to be mention of procedure for getting the repaired MacBook to power up again after the repair is completed.
I also am running into the issue described by others. MB will not come on again, even after being plugged into power and performing an SMC reset.
Kinda stuck….
Hi, I tried everything and my MacBook will not start up after replacing the bottom case with a battery installed. I decided to put back on the old case with the battery that needs servicing and it still will not power on. I am fairly experienced taking apart laptops I was an Apple service tech for 15 years. this has me baffalled. Any hints BTY the logic board does not show any power coming from the AC charger the power LED is not lit up
I had trouble with this as well. What worked for me is to plug in power using the stock 29W USB C power brick that originally came with this Macbook. Trying other, lower powered, power adapters did not work. Use this advice with caution as there are multiple (i.e substantiated) comments that indicate that first power up should only be with a 5W adapter! So perhaps try this strict sequence: try with a 5W adapter, then and only then try with the 29W adapter. Or even slightly better, if everything else has completely failed, only then try full power 29W adapter.
How long did you wait to get it power back on? I replaced my logic board and tried to connect the power charger but it doesnt still turn on.
Herb -
The easiest error to make when working on this motherboard if applying full voltage after re-assembly. According to the big A, the motherboard on these Macbooks need to be “woken up” with a 5 watt (phone size) charger. Applying the normal 29 watts may render your system unusable.
Hello Noah,
It seems your remark is only valid for the 2015 and not the 2016 edition.
While it’s true that the internal documentation specifies this for a 2015, after frying 2 motherboards with a normal charger, I spoke with the engineers and they told me that this also applies to 2016 and 2017 macbook main logic boards. I say- It can’t hurt to try to wake them up with a 5 watt charger first! Please take 5 minutes to save your motherboard.
I plugged in my charger and the LED came on. The computer gets warm but the screen is not turning on. The keyboards doesn’t seem to respond to recovery options. Any suggestions?
After reassembly I could not restart my MacBook using the power button or after SMC reset (shift-ctrl-option-pwr). I had to connect my MacBook to its charging cable to get the battery LED to re-illuminate. After that it was all normal.
I had basically this when doing a screen replacement (and the ZIF connector ribbon which basically crumbled to dust as I touched it). Including no sound, no light, no boot, no logos, I had a USB connected sound once when plugging it into my windows PC which i guess confirmed it wasnt totally fried, but I had left it plugged in to a few different chargers (not the 20w or whatever one since I read it could damage it if it was not powering normally. could be total BS) and had it sit from 15-30 minutes on each. all nearly no sign of life, though one re-disassembly showed the previously unlit power LED was on again. I went to let it sit on the officical charger overnight thinking it was dead, but it just randomly booted and is working fine now. TLDR be patient with apples BS.
-
-
-
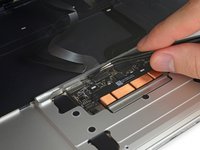
Utilisez une pincette pour décoller l'adhésif qui couvre le connecteur ZIF du pavé tactile.
Where can I find a replacement cable?
Just worked on one that was missing the tape from the factory, so yours may not have it either.
that cable got damaged, and now my macbook won't turn on anymore. Does this cable prevent the macbook from working?
I have the same issue. Th trackpad cable snapped while I was replacing the LCD screen. I have ordered a new cable from Amazon but I am not sure if that would cause the laptop to not power up (it's not power related)
-
-
-
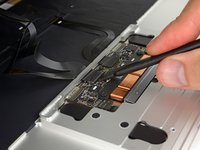
Utilisez une spatule pour minutieusement lever le clapet de retenue du connecteur ZIF du pavé tactile.
I flipped up the small retainer -- but when I tried to flip it down, it flew off. The tabs that mount the retainer are very small, and I couldn't get it back on. Left it out, taped down the cable.... and so far the computer, battery, and trackpad are working.
-
-
-
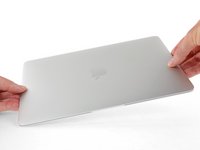
Fermez délicatement le MacBook et retournez-le encore une fois, pour que le logo Apple soit vers le haut.
-
Soulevez le bord avant de l'ensemble boîtier supérieur et écran à un angle d'environ 90° et posez-le contre un objet stable, pour que vous n'ayez pas à le tenir.
-
Ajoutez un morceau de ruban adhésif près du pavé tactile pour maintenir l'ensemble en place et éviter les mouvements accidentels.
-
-
-
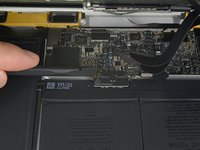
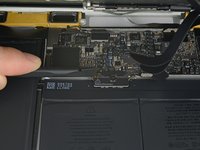
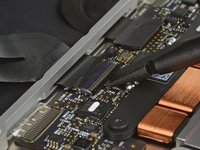
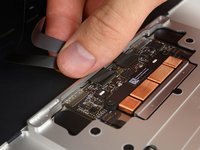
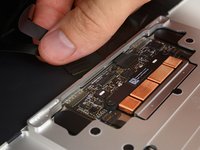
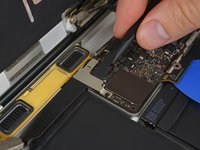
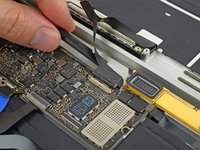
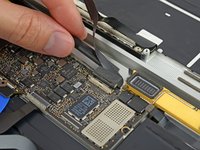
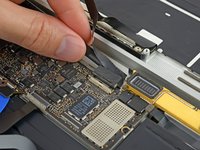
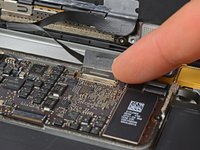
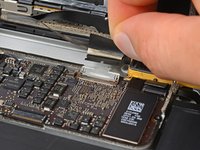
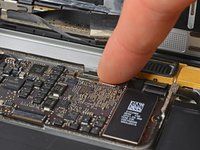
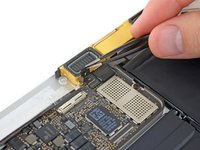
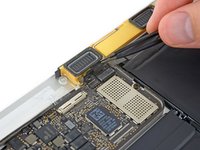
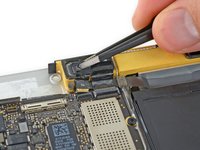
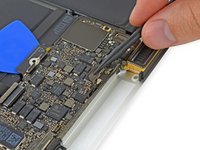
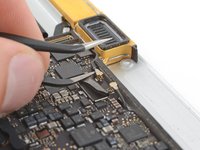
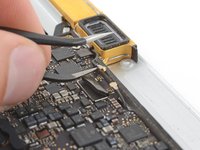
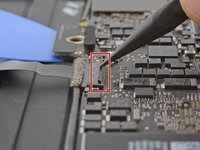
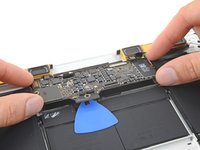
Retirez la seule vis Torx T5 2,9 mm fixant le connecteur de la batterie à la carte mère.
From my experience it’s important to carefully press and hold the small button above left of the Battery Discharge label. Use a plastic spudger or finger tip. The illuminated yellow LED to the right will go off. I believe this discharges remaining electricity from logic board protecting it during repair.
* I cannot find any documentation to support this, but I have damaged boards by not including this step.
I don't know what guide your on, but step 6 of the guide to replacing the USB-C cable has you press this button (3 times even).
What is with the all plastic end of this cable that appears to just be glued right on top of its connector?
Does the new one just stick back right on top?
(In this photo it is the bottom side of the cable below the white water indicator sticker)
-
-
-
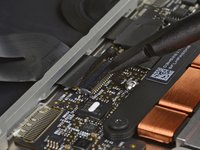
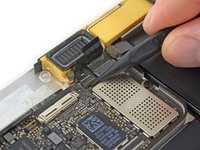
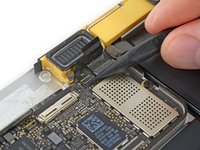
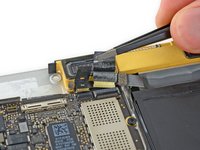
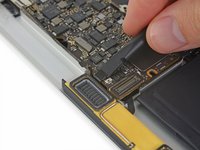
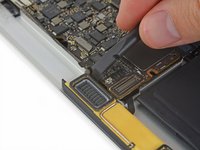
En guise de précaution supplémentaire, vous pouvez déconnecter la batterie physiquement en insérant un médiator pour isoler la batterie entre la carte mère et le connecteur de la batterie.
What happen if you don’t disconnect the battery? I didn’t and I saw smoke coming out when I connected the pad flex cable and the computer still started up
If you don’t disconnect the battery you might accidentally short something on the logic board since power is still running through everything while you’re working on it. You can complete the repair without disconnecting the battery, but you risk accidentally breaking your logic board. It’s much safer to keep the battery disconnected while you’re working.
-
-
-
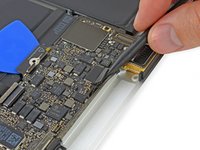
Retirez les deux vis qui fixent le cache de la nappe du port USB-C :
-
Une vis cruciforme #00 1,1 mm
-
Une vis Torx T5 3,5 mm
I’m at this point and the 1.1 mm Phillips #00 screw won’t budge and now I fear it could be stripped? Now what???
You could try to cover the tip of your screwdriver with a thin rubber glove to improve the grip on the screw while applying a little more downward force for the initial jolt. That might loosen the screw.
With my iFixit screwdriver kit, these were Philips #000, not #00.
I was at the 1.1 mm and couldn't get it open with the 00. I ordered the 000 but it still won't budge. I tried the glove idea and as much pressure as I'm comfortable giving. I'm pretty sure the screw is stripped. Any ideas or advice or am I in trouble?
Got stuck here too. Bought a Chinese laptop/phone servicing kit and guess what? No 1.1mm philips. The 1.2mm it does include doesn’t sit tightly enough. Had to order separately….
-
-
-
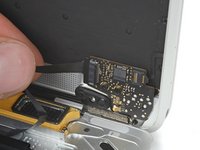
Utilisez la partie plate d'une spatule pour déconnecter le cache de la nappe du port USB-C, en faisant levier vers le haut à partir de la carte mère.
At re-assembling, when you reconnect this cable, pressing centre of metal plat is extremely important. You should feel tiny click when it connected properly. I encountered unrecognised external HDD and external monitor through USB-C even though charging in/out was OK, i.e failure of data transmission. I needed to re-open the back cover and pressed the metal plate again, then USB-C connection worked properly.
After this step, I flipped the Macbook over once more and opened it up 90 degrees, supported on the back. Proceeded directly to step 25. Seems safer, those fragile connectors and flimsy cables give me heebie jeebies.
I endorse maccentric's comment above. I think it's better to remove the battery (carefully) with the logic board in place. I did that and the computer works fine after reassembly.
In fact, I removed a couple more cables than this step, but got creeped out by the many delicate cables being moved, and user comments about failed disconnect and reconnect, so I skipped to step 25 lower down. -
-
-
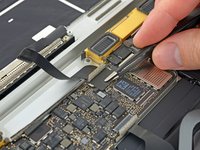
Déconnectez la nappe de la puce prise jack en la tirant tout droit hors du connecteur ZIF.
Make sure at reassembly that you insert the ribbon cable in to the jack board fully. It seems to take an extra push. The white line should disappear when it is seated properly. I didn’t get it in all the way by a fraction of a mm and had no sound (internal speakers weren’t even recognized). Went back and seated the cable fully and sound was back.
I had that same problem, too.
Had the same problem, (no audio after reassembly) it did have the startup chime though.
after re-seating the ribbon cable, it worked for a few days, but then nothing after waking up.
not even the startup chime.
Any body got pointers on how to check if i broke the cable or the board? (looks fine...) -
-
-
-
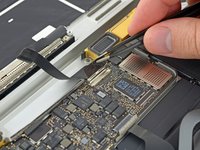
Utilisez une pincette pour décoller l'adhésif recouvrant le connecteur de l'écran.
I won’t have my daughter’s MacBook with its banana encrusted USB-C port until she returns home during spring break — just doing some homework before then. But if the case can lie flat after the audio board ZIF cable is detached, why do you need to detach the display cable connector (Steps 19-24)? It seems that you could jump straight to Step 25 to replace the USB-C port and avoid those steps.
Hi John, disconnecting the display cable is not necessary, but is recommended to avoid accidental damage to the cable during the rest of the procedure. If you feel confident in the safety of the cable then you can skip ahead. Good luck with the repair!
From here I only did step 34 and then 37 onwards, skipped all the other steps.
I did use tape to mate top&bottom to make sure the cables couldn't be torn. Saved me a lot of fiddly flat cable work.
Great howto. Glad I found it.
I thought replacing this battery would be like in my 2013 13" air. Remove the bottom, replace battery, done. No tape, no nothing. This macbook (my daughters) is a real pain. But this description made it possible to do anyway.
-
-
-
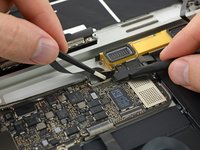
Utilisez la partie plate d'une spatule pour ouvrir le clapet de retenue du connecteur de l'écran.
-
Essayez de ne pas l'approcher de l'adhésif, ou il pourrait se recoller et compliquer le retrait de la nappe.
I found it helpful to stick one of the triangular picks in between the table and the retaining flap to keep them separated.
-
-
-
Faites glisser délicatement la partie plate d'une spatule sous la nappe de l'écran, pour la séparer de l'adhésif la collant au boîtier inférieur.
Great, another new fragile display cable to deal with. Thanks Apple.
Some of the black covering on the display cable came away. How much of an issue is that going to be?
-
-
-
Maintenez le clapet de retenue ouvert.
-
Déconnectez la nappe de l'écran en la tirant délicatement hors du connecteur.
I’m pretty sure I understand the instructions here, but I had to think about it a little longer because “… must remain closed when the cable is reinserted during reassembly …” was not clear to me right away. The retaining flap I discovered, is super delicate, and hence my paranoia, so I wanted to point this out in case anyone else felt like me: ''''Is it correct to assume that your instructions could be interpreted as:
“After disconnecting the cable, close the retaining flap for now to avoid damaging it. When reinstalling the cable, flip up the retaining flap once again, realign and slide the cable with gold contacts facing down.”
I bent the USB-C corner of the lower case from a short drop onto laminate flooring, so in I went to shape it so the edge wouldn’t snag or scratch things. I am typing on my MacBook that received the body work.
Thank you for your guidance!
For @seriouslyjohn and anyone else who might be wondering: “the flap must remain closed when the cable is reinserted” means keep it closed. Do not reopen the flap to insert the cable; just insert it carefully while leaving the flap closed. I know it probably runs counter to the procedure you’re used to, but Apple’s documentation is very clear on this, and I have to think it’s for a reason. My advice is to follow the instructions as written and don’t try to reinterpret them ;) Congrats on a successful repair!
Oops! I most definitely did NOT reinsert the cable into a closed connector. We can only wonder why Apple instructed this step to be counter-intuitive. I’ll pay closer attention to any weirdness that may arise, but the MacBook has been traveling and performing as it should; I’m going to avoid reopening the case, as easy as it is, until I have a good reason to do so. Thank you for replying and updating the guide!
I would argue that you should NOT close the retaining flap. I followed the directions to the letter, and when I started up the MacBook, the display did not register since the I wasn’t able to reseed the cable fully without worrying about tearing the cable. I did hear the computer charging and saw that the keyboard lit up, so I knew the MacBook was working besides the display. I looked up another video on Youtube that left the retaining flap open when reinstalling, so I took apart the Macbook again and tried it that way, and IT WORKED! The cable wasn’t fully reseated with the retainer open and I’m not sure if that was my fault or not, but with the retainer flap open, it was easier to see that. My 2 cents. Good luck everyone!
I initially tried inserting the cable with the retaining flap closed (as described), however after completing reassembly the MacBook could be heard to start but without any display action (no backlight, no graphics - also tried resetting the SMC). Being suspicious of this step based on the comments above, I tried re-inserting the cable with the retaining flap open before subsequently closing the flap. It may have just been my perception but insertion with the retaining flap open certainly appeared to result in a more robust mating of cable and connector. After reassembly and reset of the SMC I at least saw backlight action although no graphics still. A subsequent boot into to diagnostics mode resulted in the graphics coming to life.
Maybe my re-insertion while the retaining flap was closed was not quite correct (although I was certainly trying to be careful), but my experience was that success was achieved making the cable insertion while the retaining flap was open.
It is kind of nice that I don't have to worry about that. The screen cable is literally plug & play. Super easy.
-
-
Outil utilisé dans cette étape :Tweezers$4.99
-
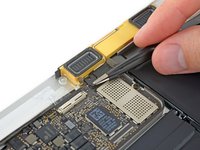
Avec une pincette, décollez le ruban adhésif qui couvre les deux connecteurs ZIF : un sur la nappe du haut-parleur droit, et l'autre sur la nappe audio jack.
Removing the logicboard must be safer way, but battery replacement can be accomplished if you skip here to step 32, and omit 36.
I'm not sure removing the logic board is safer, you have many more opportunities to break something. I left it connected but removed the screws so I could maneuver the battery underneath. Faster and safer imo.
I would strongly advise anyone tempted to follow this advice and skip to 36 to NOT DO THAT. The hardest part of this whole project is removing the old batteries and adhesive. You’re going to want to use the adhesive remover liberally. Getting that on your board, or accidentally gashing at it when you’re trying to wedge out the old battery, is going to ruin it. Trust me, you would hate to go through all this just to find out you fried your board because of this (admittedly tempting) comment. There are seemingly a lot of steps from here to 36, but they’re all pretty easy and fast. KEEP GOING! KEEP FOLLOWING THE INSTRUCTIONS. YOU WILL MAKE IT!
RDG -
-
-
-
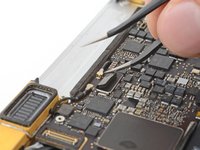
Insérez une pointe de votre pincette courbée sous le cou métallique du connecteur de la première antenne et faites levier dessus pour le déconnecter.
The supplied tweezer is no good. You need one with grooves as shown in the picture. When re-inserting the antenna connectors, make sure that they are seated properly before pushing down. If you have magnifying equipment, use that to get visual confirmation. I used tactile feedback from my fingers to discern proper alignment. Try not to force it.
I used the tweezers provided by iFixit. I struggled with both connectors and finally managed to disconnect both, but when I came back to reconnect them, I realized that both connectors on the logic board were loose. Long story short, it turns out that my little exciting adventure changing the battery cost me $530 to send it for repair at Apple Care. I am quite good at troubleshooting Mac and used to work for Apple for many years. This one step is more dangerous than it seems, because you can end up like me, without wifi on your mac. Honestly, for those who think they can do it, think twice. You can thank me later…
For me this step was the only point where I had a bit of trouble. The supplied tweezers were not the best for disconnecting the antenna connectors as Ki Park points out already. In my case the outer ring of one of the connectors on the logic board bended slightly. It bended back in place during assembly and the wifi works as normal again after the repair. It is very tricky though, really be careful in this step and use other tools as necessary.
BY FAR THE MOST DANGEROUS PART OF THE JOB!. I broked one connector and spent an hour with high powered magnifiers to try a repair. Wasted an hour on this. Id suggest leaving the logic board in place if possible
F. I broke one
I actually put one of the tweezer tines under the connector and used it as a lever gently to pop the antenna connector off the housing. Worked well, but I had to be super careful not to break anything.
These connectors are incredibly finicky to reinstall. Precise alignment is critical. You can sort of get a sense of when the connectors are properly aligned by trying to slide them side to side with your finger, but mostly it's a case of trial and error. Don't apply excessive force because you risk damaging the edges of the connectors. When properly aligned they don't exactly click, but you do feel them go in.
DO NOT REMOVE THESE. As others have stated these are fragile and finicky to remove and reinstall. Instead, leave them intact and lift up the logic board at a 70 to 80% angle. Use a piece of tape secured to the bottom edge of the computer and the top edge of the logic board to hold it up and out of the way. If you are diligent, you can remove the batteries without touching or messing with the logic board. Use caution, don't get too overzealous, take your time.
tough one - you guys scared me... SOLUTION: HOLD A SECOND TWEEZERS WITH STRAIGHTEDGE ON THE INSIDE EDGE WHILE GENTLY USING PROVIDED POINTY TWEEZER ON THE OPPOSITE SIDE TO PRY UP THE CONNECTOR. FLAT TWEEZER PROVIDES JUST A HINT OF BACK PRESSURE, KEEPS THINGS STRAIGHT WHILE YOU INSERT THE POINTED TIP AND PRY UP GENTLY. INSERT AND LEVER IT UP - I.E. AFTER INSERTION, TWIST THE POINTED END SO PRESSURE IS STRAIGHT UP, FROM UNDER THE MIDDLE OF THE CONNECTOR - DON'T INSERT AND PUSH AWAY FROM YOU. MINE POPPED RIGHT UP THIS WAY (after exploring all other options). IMPORTANT - THE POINTED TIP (PRY SIDE) COMES FROM OUTSIDE OF CASE , OPPOSITE SHOWN IN PICTURE (AS MENTIONED BY PRIOR COMMENTER.). I ACTUALLY NEED RELATIVELY LITTLE PRESSURE USING THIS METHOD TO GET THE CONNECTORS TO POP. INSERT POINTY TIP UNDER THE NARROW SPOT JUST AHEAD OF THE WIRE, BUT BEFORE THE SOCKET
-
-
-
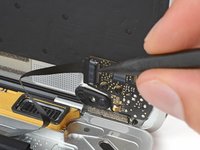
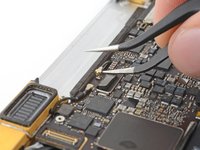
Faites levier sur le connecteur de la seconde antenne pour le déconnecter.
Broke a connector. Now what?
BEWARE - there are no instructions on how to reassemble this. It goes to step 52 - battery installed and that is it. Easy to pull out, almost impossible to put back in afterwards. So STUDY this to get an idea of how to reattach.
-
-
-
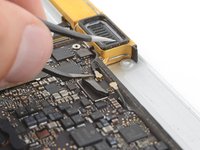
Avec une spatule, déconnectez le connecteur de la nappe du haut-parleur gauche en le soulevant de la carte mère.
Reassembling NOTE. The left speaker cable needs to be below the logic board when screwing in the right screw. Otherwise you will have to backtrack.
-
-
-
Déconnectez la nappe du pavé tactile de la carte mère, en la tirant délicatement hors de son connecteur.
-
Pendant le remontage, vérifiez que les clapets de vos connecteurs ZIF sont levés avant d'y réinsérer les nappes.
Once the logic board has been replaced, when following these instructions in the reverse order it should be pointed out that the all the flaps are flipped down. A distracted person might try to force in the flat connector before realising that he has to flip up the flap of the new logic board.
Ok, went decent but on reconnecting the trackpad cable which I had to replace, it isn't clear which side goes up and which side goes down. From the photos, it appears the copper coated side is down at least on the logic board. Is this the same on the trackpad connector?
I can't quite find a clear photo of the copper surface position on either end of the ZIF trackpad insertion.
HELP!
-
-
-
Retournez la partie frontale de la carte mère.
-
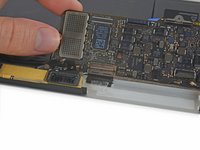
Soulevez et détachez le morceau de ruban anti-interférences électromagnétiques (EMI) qui fixe la carte mère au boîtier inférieur.
“Reattach the tape securely during reassembly.”
In my case the tape did not stick properly to the lower case anymore and also came a bit loose from the logic board. Nonetheless my macbook works fine after the repair, so I'm not sure how important the EMI tape is. If I experience problems in the future I might open the macbook up again and check the tape and perhaps reattach it better with some new glue. There is probably special glue needed, so I'll look into that when it becomes an issue.
-
-
-
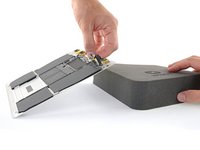
Retirez la carte mère.
If you are replacing the logic board once the machine has been rebuild the 2015 model has to have a 5W power adapter plugged into the machine first before the full 29W power supply otherwise there is a risk of damaging the logic board. Once the power is supplied the battery disconnect LED will switch on and once this has occurred you can remove the 5W and supply the machine with the full 29W power adapter.
While it’s true that the internal documentation specifies this for a 2015, after frying 2 motherboards with a normal charger, I spoke with the engineers and they told me that this also applies to 2016 and 2017 macbook main logic boards. I say- It can’t hurt to try to wake them up with a 5 watt charger first! Please take 5 minutes to save your motherboard.
Noah -
-
-
-
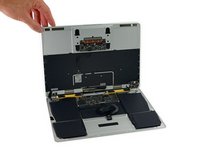
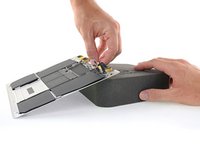
Soulevez la partie arrière du boîtier inférieur et surélevez-la en utilisant un support comme un livre ou un bloc de mousse par exemple.
-
-
-
Protégez vos yeux lorsque vous utilisez et appliquez le dissolvant pour adhésif. (Des lunettes de protection sont incluses dans votre kit.)
-
Ne portez pas de lentilles de contact sans protection des yeux.
-
Des gants de protection sont aussi inclus dans votre kit. Mettez-les dès maintenant si vous souhaitez vous protéger.
-
-
-
Enlevez le capuchon en caoutchouc du flacon de dissolvant pour adhésif.
-
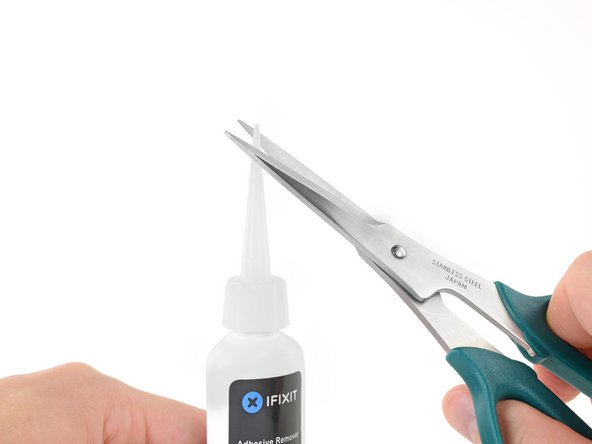
Utilisez des ciseaux pour couper le bout de la tige d'application.
My kit has black cap with added curved clear piece attachment
My kit has a screw-on black plastic cap, with an applicator with a pre-cut hole inside.
I am not sure why one should use this substance, since it turns out that isopropyl alcohol dissolves the glue, as the directions note below. -
-
-
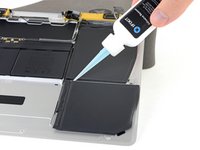
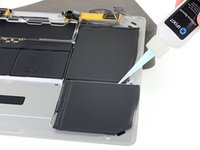
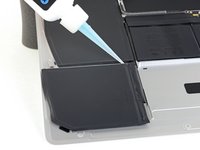
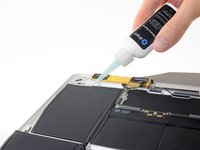
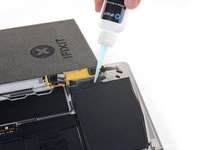
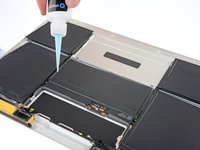
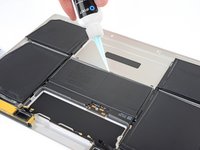
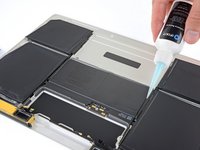
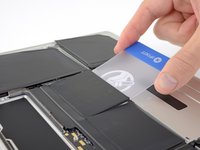
Appliquez quelques gouttes de dissolvant pour adhésif le long du bord supérieur de la cellule avant droite.
-
Attendez 2 à 3 minutes que le dissolvant pénètre sous la cellule de batterie, avant de passer à l'étape suivante.
Das ist nicht nötig. Ich habe mit einer schmalen Spachtel die Akkus sehr gut und vorsichtig vom Klebstoff getrennt.
Hat wunderbar geklappt.
Gruß aus München, Tom
The applicator on the new bottles of the adhesive remover are much bigger, which makes it harder to get the product under the battery.
-
-
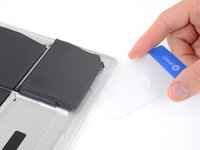
Outil utilisé dans cette étape :Plastic Cards$2.99
-
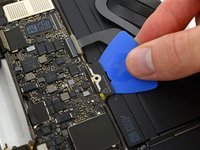
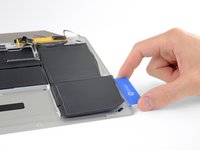
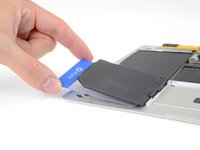
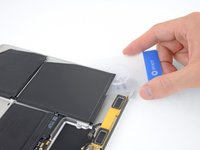
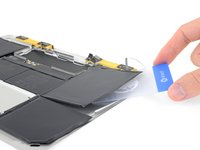
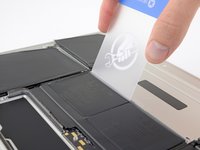
Après 2 à 3 minutes, glissez un coin d'une carte en plastique sous la batterie.
-
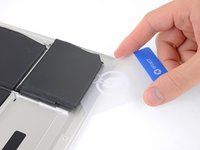
Faites glisser la carte plus loin sous la batterie pour la séparer de l'adhésif qui la fixe au boîtier.
-
-
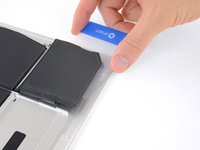
Outil utilisé dans cette étape :Tweezers$4.99
-
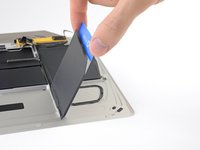
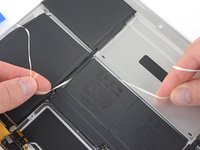
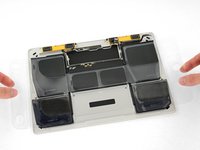
Retirez la batterie en l'éloignant de la zone du haut-parleur et de la carte mère.
-
Décollez les gros morceaux d'adhésif à l'aide d'une pincette ou de vos doigts gantés.
-
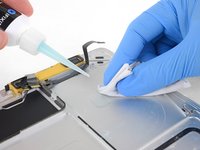
Grattez les restes d'adhésif avec un outil en plastique et nettoyez les zones sous-jacentes avec du dissolvant pour adhésif ou de l'alcool isopropylique. Essuyez dans une seule direction, sans mouvement de va-et-vient, jusqu'à ce que tous les résidus d'adhésif aient disparu.
Change the battery: 25 minutes
Remove the adhesive: 2:35 hours
I used citrus oil. It’s vegan. Mr Jobs would approve ;) Made it very easy - less than an hour. After removing battery with the method shown in this iFixit, apply oil to remaining adhesive (black stuff included). Wait five minutes. Scrape black stuff away with plastic card etc. Wipe glue residue from edges towards middle (of each cell) with cloth. I used an old face washer. The nap picks up the clumps of dissolved glue residue nicely. Finish with clean cloth and alcohol. Looks like new!
I applied some isopropyl alcohol to the adhesives then broke up one corner and lifted it up, then slowly pull it the same method to remove an iPhone’s battery’s adhesive. The old adhesives came off with ease and cleanly — less mess to wipe off afterwards.
Once the big, black adhesive strips are removed, cleaning up the remaining detritus can be time consuming. I found the best way to proceed was to continuously apply small quantities of the adhesive remover while wiping away the detritus immediately.
Didn't see these comments b4 removing the adhesive so spent 2 hours scraping it off. Next time I might use some Goo Gone or alcohol.
-
-
Outil utilisé dans cette étape :Tesa 61395 Tape$5.99
-
Testez soigneusement l'ajustement et l'alignement de votre nouvelle batterie avant de l'installer.
-
Votre batterie de remplacement peut être recouverte d'un film plastique épais pour aider à maintenir les différentes cellules en position lors de l'installation. N'enlevez pas ce film avant que la batterie ne soit installée.
-
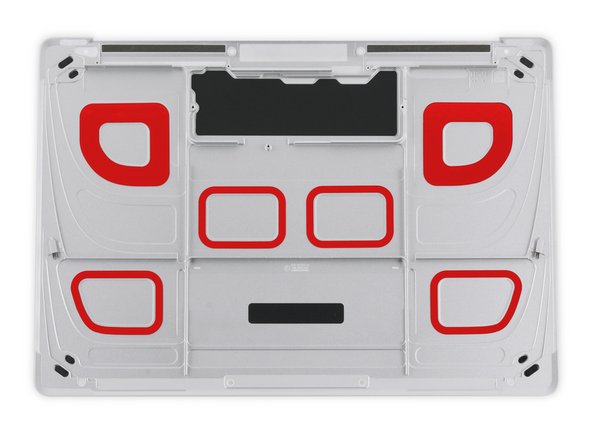
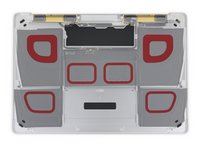
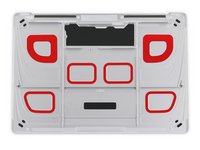
Si votre batterie est livrée avec une couche d'adhésif préinstallée en dessous, retirez le film plastique du bas. Si votre batterie est livrée sans adhésif, appliquez du ruban adhésif double-face fin, comme du Tesa 61395, sur le boîtier inférieur, dans les zones marquées en rouge.
-
Positionnez soigneusement la batterie et mettez-la en place. Appuyez et maintenez chaque cellule fermement pendant 5 à 10 secondes pour qu'elle adhère bien au boîtier. Ensuite, enlevez le film supérieur ainsi que tout rembourrage en mousse.
hola a todos, yo le he cambiado la batería a todos mis Macbook pero el cambio de esta batería fue verdaderamente aterrador, les recomiendo que si está en su posibilidad económica pagar a un agente autorizado o una macstore hagalo, el cambio de mi batería lo realice yo y fue satisfactorio, pero me faltaron muchas herramientas. el Macbook no encendido a la primera destapar revisar volver a cerrar. la batería tiene una pega extremadamente dura y me costo mucho sacarla Suerte
hello to all, I have changed the battery to all my Macbook but the change of this battery was truly terrifying, I recommend that if it is in your financial possibility to pay an authorized agent or a macstore do it, the change of my battery makes it me and it was satisfactory, but I lacked many tools. the Macbook not turned on the first uncover review close again. the battery has an extremely hard tack and it cost me a lot to take it out, luck
To remove the battery, I applied acetone on the edges of the battery. Kept it tilted fir a few minutes and started prying with a credit card. Reapply acetone to the edge of the card, pry again, wait a few minutes and pry again. I thought it would be harder than it was. Removing the battery and all adhesive probably cost 30 minutes work.
I found after reassembly I had no response from the display, although I could hear the boot up sequence and USB-C cable insertion audio. After reset of the SMC I at least began seeing the backlight on boot. Subsequently forcing entry to diagnostics mode caused the display itself (i.e. graphics) to also come to life. The diagnostics found no issues but did seem to trigger the display to start working... hopefully helpful to someone.
I managed to fit the battery with the help of this guide, but I have turned it on, and it does not recognise the pad or the keypad and yet it recognises the keypad button to turn it on and off.
The start screen shows, but I cannot put my password in because the keyboard doesn't work and yet it went into a mode telling me to use a Bluetooth mouse which I did that connected and the mouse cursor works but then tells me to attach a Bluetooth keyboard. So the keyboard and the mouse pad on my retina does not function. Has anybody got any suggestions? Are there any of the connectors inside that I took off that out the obvious ones to check the connection?
Lots of people lost keyboard + trackpad after this. Here is how I recovered it. Read through all the posts
Thanks for the guide. Could exchange the battery and the mainboard to breath in new live into an MB 2015. Now running perfectly under Sonoma with Open Core Legacy Patcher and Sonoma.
-


Pour des performances optimales, calibrez votre nouvelle batterie MacBook Retina 2016 après avoir terminé cette réparation.
Pour remonter votre appareil, suivez ces instructions dans l'ordre inverse.
Si vous remarquez un comportement inhabituel ou des problèmes après l'installation de votre nouvelle batterie, vous devrez peut-être réinitialiser le SMC de votre MacBook.
Déposez vos déchets électroniques dans un point de recyclage certifié.
La réparation MacBook ne s'est pas passée comme prévu ? Consultez notre Forum pour obtenir de l'aide en matière de diagnostic.
Annulation : je n'ai pas terminé ce tutoriel.
39 autres ont terminé cette réparation.
Merci à ces traducteurs :
100%

Claire Miesch nous aide à réparer le monde ! Vous voulez contribuer ?
Commencez à traduire ›


20 commentaires
Do you think you could do two things to make your remarkable step-by-step guides even better:
• Having the ability to click in check-boxes for each step, it would also trigger a color-scheme (done / to be done) and a completion percentage display.
• Having the ability to display the various steps of the reversed order instructions to re-assemble the device, (it would feel much more helpful and safe to be able to follow the instructions displayed this way).
Thanks for your consideration.
OK…. So Ill qualify this with saying I was an apple tech for an independent company for about two years, and I now do it independently for my own company..
Did this in 20 minutes with my 9 year old holding parts so I can skip 14-33 as mentioned on the 2015 repair guide. Used a metal splurgier I got from newer tech long ago and my wife hairdryer. Its not as bad as some comments make it seem. I had set aside 1-2 hours but now I can enjoy my Friday bonus time and use my laptop away from a power cable. Good luck.
Hi axl1972,
I installed, followed all directions but it’s not charging?
Same for me, LED on board is on, when on charger works fine but battery doesn’t charge.
Any advice or solution?
davor -
Thank you for the tuto. I just followed it and it works for now.
Eveything was very clear exept for 2 things:
-The fact that the new battery must have adhesive embedded on it(/you have to buy special tape) is not clear until you are doing it (and it’s, obviously, the last step: sticking the battery). I ended up using normal double side tape, and cutting the shapes needed directly on the metal back plate with a sharp knife cutter.
-I have a 2015 mac and all the thing with “charge it with a 5W charger before use” etc was not working. 5W charger was not doing much. I directly charged it with a genuine USB computer power brick
The 5W deal is only for a few minutes, it won’t do much to charge that battery. The 5W is more about warming the circuit so you don’t burn out the weak point in the conduit. It’s not for “Charging”… The fact that you did do it with the 5W for a while is what saved you.
Is the battery being discharged 5 hours past sleep/shut down necessary for the full range of charge being picked up by the SMC/OS? Does anyone know where the deep discharge threshold is; dead+days?
After battery replacement MacBook doesn’t see battery (no battery installed). I was able to turn on MacBook on power source (cable plugged in). Tried everything reset NVRAM, SMC, even 2-3 times but still ‘no battery’.
I’ve opened it once more, physically disconnect the battery by inserting a battery isolation pick between the logic board and the battery connector, and REPEAT STEP 5 of guide!!!!
After this everything works great with no problems.
* Sigh of relief * Just completed my second successful battery replacement. This 2016 Macbook went just as smooth as the first (MBP). Disassembly instructions were very accurate and clear, though the user comments for some of the steps helped a lot to add insight or clarification. Definitely check those out below each step. I do wish there was a bit of reassembly follow on instructions for a few of the reconnecting of ribbon cables that were extra fiddly to reinsert. (My MBP was easier in that stage.) Having reassembled everything, it started charging right away, with no extra troubleshooting thankfully. Thanks ifixit!! ( Jayz2Cents explosion sounds) Thanks to Jeff Suovanen and the other authors of this guide!!
I installed, followed all directions, a bit long (about 3 hours), was difficult to replug antenna cables but finally succeeded, and it works like a charm ! well done tutorial.
Fabulous guide. Easy to follow to get you in and out of this small space. I got through it and then found that the screen was blank despite having the computer power up. Figured that it might have to do with the screen cable. Opened the laptop again and after the third try of reinserting the screen cable had a fully functioning machine. This is a different connector from all of the others. There is already a note about having the metal connector closed when reinserting the cable. Obviously it is critical that the cable is placed fully into the connector, but it is difficult to tell when that has been accomplished, especially when you have to be very gentle in the handling of the cable. I hope that this is helpful for someone else.
Complimenti! Ho seguito ogni passo di questa guida e sono riuscito a sostituire la batteria esausta del mio MacBook. Pensavo fosse più difficile, invece grazie ai dettagli è stato molto semplice. La parte più lunga è stata rimuovere la colla ma, ma con il kit Riparazione + Batteria iFixit tutto più easy!
Thanks to this guide and the iFixit tool kit, I was able to breathe new life into my 2016 MacBook again. A couple tips:
- If you have bad eyes like I do, get yourself some magnifying glasses and a repositionable bright light so you can actually see what's what
- Before removing connectors, take picture(s) of them to know how far "in" they come from the factory. Helps to know what "done" looks like an hour later.
- I used the tweezers to pull the wifi antennae off, but when putting them back on, I used the tweezers only to position them and the spudger in my other hand to press down on the top/center
- My battery came with pre-attached adhesive with a peel off cover for each cell, so I didn't need to buy the tape separately. YMMV.
- Took about 2.5 hours where 1.5 of that was the removal of the old adhesive. I used nearly all the adhesive remover (acetone) and the scraper/cards and finished with a clean cotton rag (section of old t shirt).
I’ve been using TESA adhesive remover, I got all the glue away with my spudger in 10-15 minutes, after that I cleaned it with a 99.9% alcohol soaked toothbrush (new one).
For iPhones and more I’d recommend this too!
Jary vos -
installation was ez, bulb on motherboard working, but Macbook not turn on, do not recommend it...waste of $120.....last time do business wiht IFIXit((((((
Thank You. All is correct. Step by step. Ichaa.
Is this step necessary? I can’t perform this step as I am attempting to repair water damage and need to remove logic board & most likely replace the battery.
Macrepair SF - Réponse
@mac_medic You definitely don’t want the power coming on while the board is wet. In your case, I think powering on the machine to disable Auto Boot would do more damage than it prevents. I agree, skip this step and be prepared to disconnect the battery quickly if the laptop automatically powers on. Good luck!
Jeff Suovanen -
Thats right! You don't want power running while working on your logic board.
Dan -
This did not work when running High Sierra.
Kyle B - Réponse
Tried this on a 2018 MBP 13” Touchbar (there’s no iFixit guide for this model yet). Need to replace a broken screen.
Luckily I managed to connect to an external screen (Cmd-Down Brightness to switch displays) and enter above command. Seems to work, but there’s another problem with this model - it powers up as soon as any key is pressed……. ffs <gnashes teeth>
Cool_Breeze - Réponse
I unscrew the battery first and wrap electrical tape over the logic board battery connector before attempting any repairs to the board. Haven’t had any problems yet and I’ve worked on about 10 of these models already. Also when you open the bottom case use a suction cup at the bottom and pull up then run a plastic spudger along the edges to disconnect the clips. Also only use a plastic spudger on the board. Saw a youtube video from a repair shop and he did not disconnect the power and used all metal tools during the entire process of removing the board. His last step was to disconnect the battery terminal.
Brian - Réponse
Is this step necessary if my mac can turn on? Battery fully dead(
Nursat b - Réponse
BEFORE YOU START: The included torx head stripped off before I was done (and you might need an additional T4) so stop now and go buy a good one. Also they fail to warn you above to get some blue threadlocker ahead of time.
Jason Sherron - Réponse
This command did not work for me and I read that sometime in later 2020 Apple stopped this command from working…any ideas on a work around?
Patrick Machacek - Réponse
Not able to do that with damaged screen
richardjgreen - Réponse
If you have a damaged screen you can still use a converter from thunderbolt (USB 3) to HDMI and plug your Macbook Pro to your TV as monitor display. Just make sure to chose the right Source (HDMI IN) in your TV. I did it and to make it work I unplug and plug again in my Macbook and so I could disable the Auto boot
Roberto Sanchez Bustos -
Hi. This does not work on 2018 13” MacBook Pro with Touch Bar. I did exactly this to disable auto boot. But when I check by using nvram -p it says: auto-boot true. Am I doing something incorrectly? I did everything step by step. Copied and pasted the sudo command, pressed enter and then entered my password. I have Big Sur 11.1 installed. Is there any other way since I need to replace the screen. Thank you. Adrian
Adrian Vizik - Réponse
Hi everyone. This is also a little pointless if you can’t see anything on the screen, and you don’t have a display adapter to USB C to display it. I agree with Brian about removing the back and disconnecting the battery cable before you even think about opening the lid of the MacBook. Applying the insulation tape is also a handy little tip that just makes sure there is no way to discharge from either the board or battery.
Roberto Enrieu - Réponse
running `nvram -p | grep 'AutoBoot'` in terminal verifies that it was accepted
result: `AutoBoot %00`
Marek Polák - Réponse
Running Big Sur 11.6.7 on a 2019 16" MBP, it's "auto-boot". So it's:
nvram -p | grep 'auto-boot'to display the current state, the default istrue- and then to change it,sudo nvram auto-boot=falsewhich turns it off.Ed Mechem -
This step is completely unnecessary if you follow the guide to disconnect the battery properly. Just put some tape between the battery and logic board connection to prevent it from accidentally touching and therefore powering on the laptop.
Grant Ormsby - Réponse
It took me a few tries to make this command work, as I was able to copy and paste the command into Terminal, but could not type in my laptop’s password. I finally typed my password into a text document, copied it (command C), and then pasted it into Terminal and it worked.
tommy404 - Réponse
I didn’t do this. Mine never auto-booted before I replaced the battery. Now it does.
hatuxka - Réponse
BEFORE YOU DO ANYTHING - CHECK THE BATTERY!
I-fixit sent me a bad battery, which I didn’t realize until it was already install. They sent me a new one, but I wasted hours uninstalling and reinstalled.
Get a volt meter and measure the voltage on the output of the battery pack. If it reads 0 V, SEND IT BACK. It should read over 2 V.
bcardanha - Réponse
I've just received my replacement battery and it reads 0,042V between the two main connectors. Do you think it's dead?
peter sussex -
When I did this from Terminal.app within Recovery Mode, the “sudo” was not recognized but I could invoke it without the sudo part. It seems to have been accepted when looking at “nvram -p”
johann beda - Réponse
When in Recovery Mode, you already have superuser powers. So you don't need to prefix commands with the sudo command to invoke them with root privileges; you already have them. Do a
pwd(print working directory) after opening Terminal in Recovery Mode, and you'll see that you're in the root user's directory.Ed Mechem -
I received the battery kit for my 2018 MacBook Pro and as per the above comment from bcardanha - Oct 12, 2021, I checked the voltage on the pads marked + and - . It was zero volts so I panicked a bit.
I sent a message on the iFixiT Facebook page and I got no reply. I finally found the customer service email for Ifixit Europe and sent them an email voicing my concern as I was not keen to work for couple of hours just to discover that the battery is faulty. I had an almost instant reply on the email (kudos to them) and they adviced me to go ahead and install the new battery as the voltage measured when battery is not connected is not relevant.
I took a leap of faith and after two hours… the new battery showed 50% charge and everything seems to be working just fine. I am happy it worked.
Mircea Comanici - Réponse
After removing the old battery and installing the new battery I powered up the MBP before screwing the bottom on. I discovered the my keyboard would not function. It took a few hours of investigation and frustration that I discovered the track pad power ribbon had become partially dislodged from the trackpad. I was able to see that this through the little machined slot where the battery sat. I had to remove the trackpad to reinsert the power ribbon back into the connector in the trackpad. after reassembling and reinstalling the battery etc the keyboard worked. Just food for thought if your run into the keyboard issue.
Ed Mease - Réponse
This should be the default. IMO I tell you to power on - not the lid.
G Sena - Réponse
Est ce que cela fonctionne sur un macbook pro 2017 sans touchbar ?
maël muzelet - Réponse
Bonjour Maël, oui, ce tutoriel concerne "les MacBook Pro 2016 (et plus récents) et les MacBook Retina 12" 2017 (et plus récents)"
Claire Miesch -
Excellent instructions. I was able to follow and install the new screen. I recommend that you get a good set of tools before you begin. I started with an inexpensive repair kit bought online. The Penta and torx bits failed. I bought an IFIXIT kit with quality bits and I was able to do everything I needed.
Tom Markham - Réponse
If you're not running an admin account the sudo command won't work (which honestly, you should not be running admin). Rather than logging in to your admin amount via the OS, in the terminal type "login [admin username]," then the password and you'll be able to do the sudo command as described above. Once you're complete, type "logout [admin username]" and you'll be good to go. Obviously replace [admin username] with whatever the account name for your admin user is.
arichard2401 - Réponse
For those unable to complete this step because the screen is too damaged I recommend leaving your macbook on until the battery dies.
Nicholas R Licato - Réponse
Just replaced my 2018 15" MBP battery. Running Sonoma.
I found no way to disable AutoBoot (The status can be checked in the Power section of system report).
Anyway, i left my battery completely drain before opening the MBP, and had no issues during the process.
Cédric Bontems - Réponse
After sending this command in terminal when I checked what happens if I now open the lid, instead the screen lit slightly up (still black) then a battery symbol showing the charging state showed up.
Now, after replacement of the battery, this is all I get to see.
No reset of NVRAM nor PRAM helped.
Currently the new battery charges (58% atm) and it feels like it‘s mocking me.
webrockers - Réponse
I suspected the keyboard or TouchID sensor wouldn’t work, so I went on and checked every connector.
I missed connecting the left TouchID sensor from step 31.
webrockers -
Read the comments section at the bottom of the article before proceeding with the repair. It is unnecessary to remove the logic board. I actually removed the 45mm plastic bar to enable the cables to slip out then in. It is only there to frustrate repairers!
Jack - Réponse