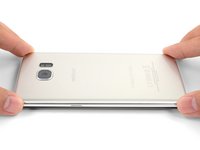
Introduction
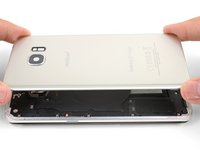
Les bandes adhésives dans votre kit de réparation vous laissent perplexe ? Vous êtes au bon endroit ! Ce tutoriel montre comment utiliser les adhésifs de votre kit pour téléphones Samsung avec vitre arrière (S7 et modèles plus récents). Ce tutoriel inclut également les instructions pour transférer divers composants à l'intérieur de la coque arrière, comme le joint arrière et le lecteur d'empreintes digitales.
Il se peut que vous n'ayez pas besoin de toutes les bandes adhésives inclues dans votre kit. Il vous faudra peut-être fixer le lecteur d'empreintes digitales avec du ruban adhésif double-face, de la marque Tesa par exemple.
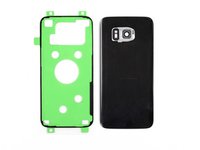
Voici la liste des bandes adhésives pour téléphones Galaxy S.
Quelques conseils d'ordre général pour poser des bandes adhésives comme celles-ci :
- En général les bandes adhésives disposent d'un côté coloré et d'un côté non coloré (papier ou plastique transparent). Le côté non coloré détermine la surface sur laquelle la bande adhésive doit être posée en premier.
- Pour faciliter la procédure, posez l'adhésif encore recouvert par le film de protection à sa place sur le téléphone, puis scotchez un bord pour la maintenir en place. Ainsi, vous pourrez décoller les films de protection sans décaler la feuille.
Ce dont vous avez besoin
-
-
Pour poser l'adhésif de la batterie, consultez ce tutoriel.
-
Pour transférer et installer le lecteur d'empreintes digitales et son joint, continuez à l'étape suivante.
-
Pour transférer et installer le joint arrière, allez à l'étape 5.
-
Pour poser l'adhésif du fond de la coque arrière, commencez à l'étape 9.
-
Pour coller le périmètre de la coque arrière, rendez-vous à l'étape 13.
-
-
-
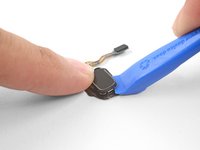
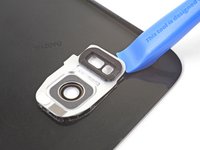
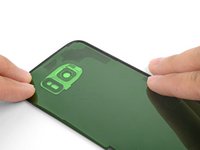
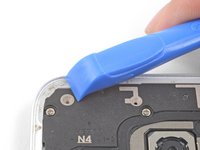
Faites chauffer un iOpener et posez-le sur le lecteur d'empreintes digitales pendant une minute.
-
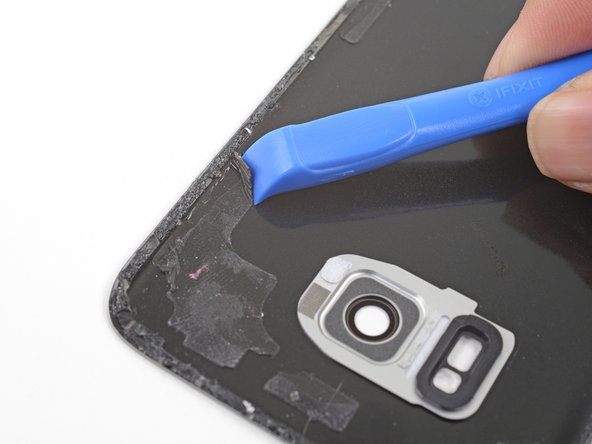
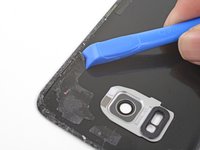
Posez un outil d'ouverture le long de la jointure inférieure du lecteur d'empreintes digitales, là où celui-ci adhère à la coque arrière, et faites délicatement levier.
-
Ne faites pas levier au niveau de la jointure supérieure, qui est en fait celle du joint du lecteur.
-
-
-
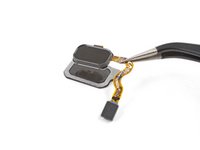
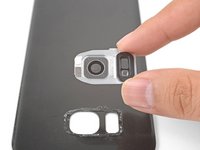
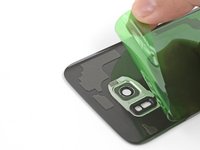
Prenez un outil d'ouverture pour décoller le lecteur d'empreintes digitales du joint.
-
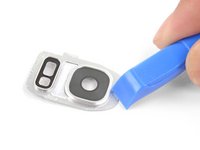
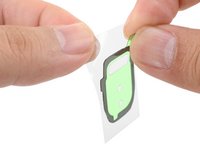
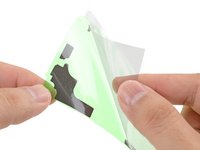
Enlevez le film en plastique de couleur qui recouvre l'adhésif du joint de remplacement.
-
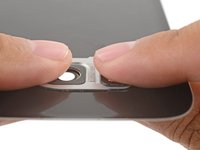
Alignez et posez soigneusement le lecteur d'empreintes digitales sur le côté collant du joint.
-
Appuyez ensuite fermement avec votre doigt pour faire adhérer l'adhésif.
-
-
-
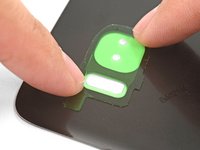
Fixez le lecteur d'empreintes digitales à la nouvelle coque arrière avec de l'adhésif prédécoupé ou bien garnissez le périmètre du lecteur avec du ruban adhésif double-face, de la marque Tesa par exemple.
-
Alignez le lecteur d'empreintes digitales à l'intérieur de l'encoche de la coque arrière et appuyez fermement avec votre doigt pour qu'il adhère correctement.
-
-
-
Faites chauffer un iOpener et posez-le sur la coque arrière pendant une minute.
-
Mettez votre doigt derrière le joint et poussez vers l'intérieur pour le détacher de son encoche.
-
Vous pouvez aussi faire levier autour du joint avec un outil d'ouverture, pour le détacher de la coque arrière.
-
-
-
-
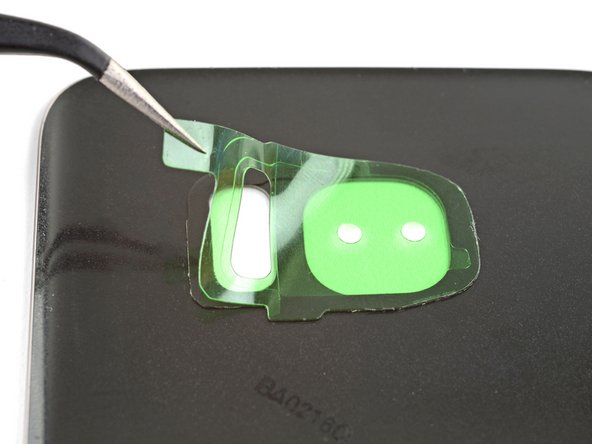
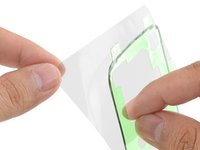
Décollez le film en plastique transparent qui recouvre la bande adhésive du joint.
-
Alignez soigneusement l'adhésif sur l'encoche de la coque arrière.
-
Appuyez ensuite sur l'adhésif avec votre doigt pour le faire adhérer.
-
Décollez le film en plastique de couleur qui recouvre encore la surface de l'adhésif.
-
-
-
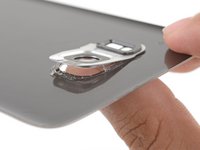
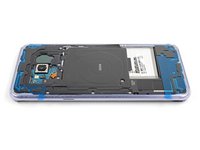
Repérez l'alignement de ces bandes adhésives en faisant correspondre leurs contours aux résidus d'adhésif et au châssis du téléphone.
-
Nettoyez les résidus d'adhésif du châssis du téléphone avec un outil d'ouverture et de l'alcool isopropylique à haute concentration.
-
Si vous réutilisez le coque arrière, enlevez également les résidus d'adhésif de la coque.
For my Galaxy S7, it appeared to me there were some minor placement inconsistencies (a millimeter or two) where the Back Cover Support adhesive pads (support strips) were on the backing sheet versus the actual phone. Difficult to know for sure since it is hard to tell where the original pads were after the back cover is pried off. I removed the clear backing to expose the strips and blocks, but placed the clear backing covering 80% of the phone as I transferred one portion of the unconnected adhesive strips at a time where they best appeared to be needed. This falls in the category of tweaking.
The adhesive sheet for the back cover was 100% accurate.
You should be very careful with isopropyl alcohol when removing the glue from the NFC antenna part. I did this on my Galaxy S9 and because the glue is very strong i put on a lot of IPA, and unfortunately it also dissolved the coating that is on top of the NFC antenna or whatever that trace is. So be careful to only get the IPA on the hard plastic and not on this trace with what looks like it's a black sticker on it or any other parts really.
-
-
-
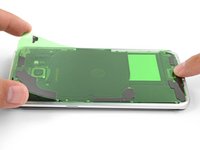
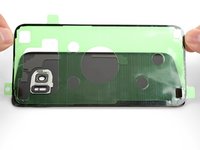
Décollez le film transparent de la bande adhésive du fond de la coque.
-
Posez soigneusement la bande sur le châssis du téléphone, côté collant vers le haut, en faisant attention de ne pas toucher à la colle.
-
Alignez la bande adhésive sur le châssis du téléphone de façon que les contours de l'adhésif correspondent à ceux du châssis.
-
Si vous avez deux petites bandes, répétez la procédure pour la seconde.
This process of putting the colored plastic with adhesive onto the phone and then sandwiching the back panel on top seemed counter-intuitive so I decided to remove the colored plastic and place the adhesive + clear plastic onto the back of the phone’s guts.
DON’T BE ME!
Follow the instructions and save yourself close to an hour of hassle. The adhesive loves the colored plastic way more than the clear.
It actually worked!!!
-
-
-
Abaissez soigneusement la coque arrière sur les bandes adhésives à découvert. L'adhésif adhèrera ainsi comme il faut à la coque arrière.
I found it easier to lower the back cover onto the support strips using a suction cup. I felt like this gave me more control over placement and my fingers didn't get in the way on the edges.
-
-
-
Prenez un outil d'ouverture et de l'alcool isopropylique à haute concentration pour ôter les résidus d'adhésif du châssis du téléphone.
-
Si vous réutilisez la coque arrière, nettoyez-en également les résidus d'adhésif.
Scrape and peel the adhesive, using goo gone only after systematically scraping the adhesive as much as possible. The goo gone should only be used to clean up residue once manual scraping has been completed, otherwise the adhesive will become tacky and only scrape off in microscopic layers at a time, which takes forever to remove.
-
-
-
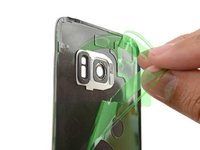
Décollez le film transparent qui recouvre la bande adhésive.
-
Saisissez la bande par les languettes et alignez soigneusement un bord long de l'adhésif avec un bord de la coque arrière.
-
Posez l'adhésif contre la coque arrière et appuyez dessus avec vos doigts.
-
Décollez le film de couleur de la bande du périmètre pour mettre l'adhésif à découvert.
(Galaxy S7 kit): I peeled away the clear liner (Step 1), aligned it to the cover edge (Step 2) and pressed it down (Step 3).
When I peeled off the tabbed "coloured" liner (Step 4), it turned out to be two layers: a clear, tabbed one that came away and a green one consisting of a central part and a thin, outer strip that still covered the adhesive.
This thin strip had been partially lifted by the removal of the clear tabbed layer, so I started to remove it all. As I slowly and carefully pulled it, it tried to lift the adhesive strip itself off the cover so I held that down with the tweezer points. That still left the main green part in the centre of the case, but that was easily removed.
However, when I turned the back cover over I saw that where the adhesive strip had lifted slightly it had detached some of the cover's coloured film, leaving it buckled and a bit of a mess.
When I tried to pull away the cover strip, the adhesive stuck to it. I also have no idea why the clear liner and green liner are attached to each other.
The pictures don’t match what is received for the Galaxy S8+. It’s also not clear where to attach the perimeter adhesive. On the lip of the back cover or just inside the well area. In addition, after exposing the adhesive (after removing the clear side), no matter how weel you pre-align the position, you can’t count on the adhesive to stick to whichever method questioned above, without some of it not releasing cleanly from the colored backing. Yes. firm pressure was applied before moving a little further down. At times the adhesive stuck so strongly to the colored backing, it stretched the adhesive out of shape.
I have repaired hundreds of laptops and all in ones, so I understand there are subtleties in a repair, and I found it quite confusing replacing the battery and fingerprint sensor and other necessary parts related to doing that repair with the either inaccurate, outdated, or lack of detail provided (but much needed) in this guide.
If you're like most people and the original back glass (S8) cracked upon removal, and you've ordered and received a plastic replacement from iFixit, remove the adhesive that comes on the replacement plastic back panel, and use the adhesive in this kit. The back panel adhesive in this kit is THICC and seems like it would create a much better seal than what comes preinstalled on the replacement back panel.
-
-
-
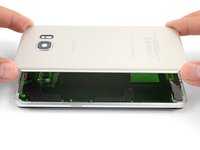
Pour sceller le téléphone, alignez et posez la coque arrière sur le châssis du téléphone.
-
Appuyez le long des bords du téléphone avec vos doigts.
-
Posez quelques livres sur la coque arrière pendant une demi-heure pour que l'adhésif adhère bien.
I kind of wonder if any of the adhesive is even necessary, depending on what kind of case you have. My case slides over the phone and holds everything in place very securely. Considering that I'll have to replace the battery again at some point, I'm not looking forward to dealing with the adhesive again.
-


Annulation : je n'ai pas terminé ce tutoriel.
135 autres ont terminé cette réparation.
Merci à ces traducteurs :
100%


Ces traducteurs nous aident réparer le monde ! Vous voulez contribuer ?
Commencez à traduire ›


16 commentaires
The flex cable for the fingerprint sensor is so short and delicate that it’s fiendishly difficult to locate and snap in. You only have a very narrow gap between the back cover and the phone, it wants to jump out of position if you misalign at all, and you can’t reach under there with normal size fingers. Not only that, it’s done with the rear cover adhesive in place so if that touches, it sticks.
I got it snapped on, and the flex cable broke at the same moment. So, no fingerprint sensor for me. Also, the new back cover arrived broken. If it was usable, the way to do it IMHO is to attach the flex cable first, then push the fingerprint sensor assembly on to the new back cover adhesive (it goes on from behind), then close the back cover.
Hey William,
If you bought the back cover from iFixit, please contact our support team here and we will get a replacement sorted out for you!
P.S. I got the battery and cover because the old cover was warped and separated, figured may as well replace the battery in a 2-year-old phone. Turns out, the battery was swollen and huge and it had pushed the back cover open. Not a good situation. So if your back cover is coming off, suspect that battery.
P.P.S. The fingerprint sensor flex cable connector probably could be manipulated into position with the tweezers from the tool kit and pressed down into place with the plastic screwdriver thingy, Just hover the back cover over it with your third hand (or a helper).
Will the phone still be water-resistant after this repair?
Hi Shai,
The phone won’t be as water resistant compared to when it is brand new. However, this is true even if you didn’t repair the phone—adhesive seals break down and lose water resistance over time.
There are also WATERPROOF phone covers you can buy. Why just settle for water resistant GLUE?
Ben -
Do you have custom-cut adhesive strips for Samsung galaxy s9+? Can’t find it in store.
Hi Michael,
We are currently in the process of sourcing the adhesive. Please check back in the future!
where i can buy the adhesive
It’s a little confusing going through the battery removal for the Samsung S10+ and then being sent to the Samsung S10 installation process instead of the Samsung S10+ install. Although moderately intuitive, it would be nice to have a specific article for a specific phone that identifies the actual process with the physical parts involved since The S10 and the S10+ are not the same back covers and the same parts involved.
Additionally, the inner wireless connector plate NEEDS to be connected to validate a connection otherwise the battery will not power the phone. This is a Requirement on the S10+.
I need to do the front gasket...is there an article for the front, I'm replacing my screen. Also, my child lost the earpiece mesh, is there something else I can use? Thanks
I got the S9 battery kit and all of the precut adhesive pieces had been cut backwards. The stiff green/blue plastic was on the wrong side. I had to remove the adhesive pieces entirely and try to use the clear plastic backing as the transfer agent instead of the stiffer, cut plastic pieces. I eventually did get it installed but it took a lot longer than planned.
Galaxy S7: I found the descriptions a bit confusing (for the different devices), but I got it right. I hope it holds now! :-)
The tip about the alcohol and the charging coil and that the alcohol is NOT compatible with the soft plastic parts is extremely important! In my case, some of it dissolved too, so I hope the phone wasn't damaged. Be sure to add it!