
Disque dur de la Xbox One S
Introduction
Passez à l'étape 1Si vous voulez remplacer le disque dur par un autre de plus grande capacité, ce tutoriel vous expliquera comment faire.
Ce dont vous avez besoin


-
-
Commencez par travailler sur l'arrière du boîtier, là où est situé le sticker de garantie. Insérez un outil d'ouverture en plastique dans l'espace entre le bas du boîtier et le côté supérieur avec la grille. Puis trouvez les clips entre les deux qui maintiennent le boîtier en place.
-
Avec l'outil d'ouverture en plastique, désenclenchez les clips. La meilleure méthode est de faire levier sur le boîtier noir, vers le haut.
Important!!
You've to start from the back corner where is the information label, because there is a main clip behind a warranty sticker
They should add this to the guide! I didnt know that, and did some minor damage to the bottom piece where that main clip is.
I dont mind because it's my own Xbox, but what if it belonged to a customer?
They should add this to the guide! I didnt know that, and did some minor damage to the bottom piece where that main clip is.
I dont mind because it's my own Xbox, but what if it belonged to a customer?
💯% same opinion!
I legitimately cannot open the case where the warranty sticker is, ive tried everything, im resorting to a fork to try and open this
-
-
-
-
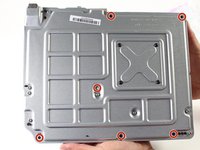
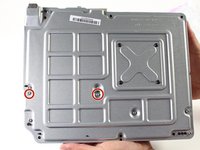
Avec un tournevis Torx T10, retirez les six vis vertes de 50 mm de long du boîtier métallique, numérotées de F1 à F6.
My F3 isn't coming out. The screwdriver isn't sitting tight like it is for the other ones. Any idea on how to fix that?
-
-
-
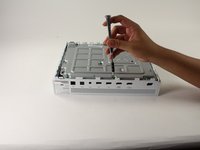
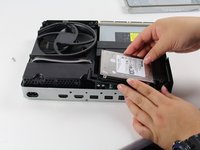
Séparez doucement le boîtier intérieur du boîtier blanc en utilisant la méthode appropriée.
-
Soulevez les côtés en plastique blanc à l'arrière en les écartant vers l'extérieur afin de les détacher du blindage E/S en plastique.
“appropriate method is not descriptive like Mr. Ross’s comment. The original poster should edit the description to ensure people do in fact remove the box from the case appropriately. I would also add arrows to the picture.
____________⬆️
↖️Yes! I see it the same way!↗️
⬅️Arrows are always a good thing!➡️
↙️Can't do anything wrong with them! ↘️
____________⬇️
😅😅
I didn't realize that metal ribbon was connecting the case to the console and I yanked it w out realizing it was there. How o I get a replacement?
-
-
-
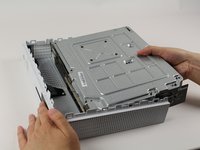
Retournez le boîtier intérieur pour que le ventilateur se retrouve au-dessus.
-
-
-
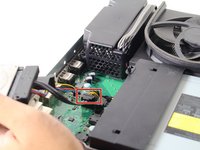
Pour remplacer le disque dur, retournez la console et retirez les deux vis torx T10 de 10 mm, numérotées C3 et C4, depuis l'arrière de la Xbox One S.
Some of my silver were gold screws, so just letting people know to look out for that!
The Torx screw circled on the left is actually C5
I found the same. On my Xbox One S, it's C3 and C5 that hold in the hard drive caddy. C4 holds in the optical disk caddy.
jamesr -
Funny thing on my console rev t t3 built feb 2018 it’s C4 and C5
-
-
-
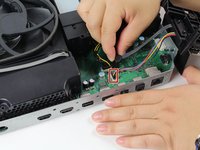
Déconnectez doucement le disque dur de la carte mère au niveau des deux connecteurs en plastique.
Do not remove the cable!!!! You can change while the cables are plugged. It took 2 hours trying to put mm precisely all the little pins because of the removal of the cables.
Please update the post, I could easily end up as the Aaron, breaking the XBOX completly.
Yes, this has also happened to me the connectors had broken and the pins bent and snapped off.
c3 and c5 are reversed in the pictures
-


Pour remonter votre appareil, suivez ces instructions dans l'ordre inverse.
Pour remonter votre appareil, suivez ces instructions dans l'ordre inverse.
Annulation : je n'ai pas terminé ce tutoriel.
15 autres ont terminé cette réparation.
Merci à ces traducteurs :
100%


Ces traducteurs nous aident réparer le monde ! Vous voulez contribuer ?
Commencez à traduire ›
Équipe

Cal Poly, Team S22-G3, Livingston Spring 2017 Membre de l'équipe Cal Poly, Team S22-G3, Livingston Spring 2017
CPSU-LIVINGSTON-S17S22G3
4 membres
59 tutoriels rédigés
1 commentaire de tutoriel
My F3 isn't coming out. The screwdriver isn't sitting tight like it is for the other ones. Any idea on how to fix that?