Aller au contenu principal
Lenovo ThinkPad T480s SSD Replacement

Lenovo ThinkPad T480s SSD Replacement

Sarah Westberg

Sarah Westberg et un autre contributeur

Dernière mise à jour le November 16, 2022

10 - 20 minutes
Modérée

Use this guide to replace the SSD in your Lenovo ThinkPad T480s laptop.

An SSD (short for “solid-state drive”) is a storage component in a computer. SSDs use flash memory, as opposed to the spinning disks and moveable parts used in an HDD (hard disk drive). As a result, SSDs are much quieter and operate more quickly than HDDs. Signs your SSD may be faulty include corrupted data, read-only errors, frequent crashes, or blue screen of death.

If you are able to recover any data saved to your SSD, be sure to back up your files before beginning this guide. Also, make sure to disable the internal battery, power down your device, and disconnect from any external power sources before you begin.


Ce dont vous avez besoin

Kits de réparation

Ces kits contiennent toutes les pièces et tous les outils nécessaires à la réalisation du tutoriel.

Pièces

Outils

Afficher plus…

  1. Lenovo ThinkPad T480s SSD Replacement, Bottom Cover: étape 1, image 1 de 2 Lenovo ThinkPad T480s SSD Replacement, Bottom Cover: étape 1, image 2 de 2
    • Disable the battery, power down the device, and unplug the power adapter from your device before proceeding/beginning the guide.

    • Loosen the six captive screws with a Phillips #1 screwdriver.

  2. Lenovo ThinkPad T480s SSD Replacement: étape 2, image 1 de 3 Lenovo ThinkPad T480s SSD Replacement: étape 2, image 2 de 3 Lenovo ThinkPad T480s SSD Replacement: étape 2, image 3 de 3
    • Remove the bottom cover with an opening tool.

    • Start from the top edge near the hinge and work your way along the edge until all of the clips are unsnapped.

  3. Lenovo ThinkPad T480s SSD Replacement: étape 3, image 1 de 2 Lenovo ThinkPad T480s SSD Replacement: étape 3, image 2 de 2
    • Lift the bottom cover off.

  4. Lenovo ThinkPad T480s SSD Replacement, Battery: étape 4, image 1 de 2 Lenovo ThinkPad T480s SSD Replacement, Battery: étape 4, image 2 de 2
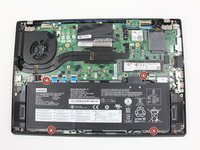
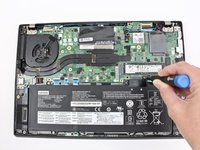
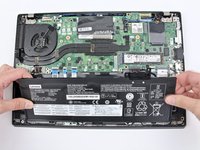
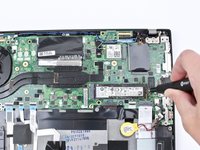
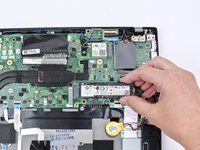
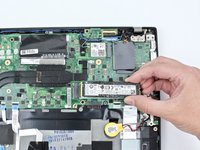
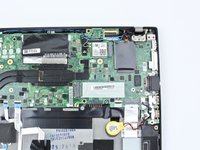
    • Use the Phillips #1 screwdriver to remove four 4.5mm screws that hold the battery down to the mid frame.

  5. Lenovo ThinkPad T480s SSD Replacement: étape 5, image 1 de 3 Lenovo ThinkPad T480s SSD Replacement: étape 5, image 2 de 3 Lenovo ThinkPad T480s SSD Replacement: étape 5, image 3 de 3
    • Lift the battery near the connector and remove it from the system.

  6. Lenovo ThinkPad T480s SSD Replacement, SSD: étape 6, image 1 de 2 Lenovo ThinkPad T480s SSD Replacement, SSD: étape 6, image 2 de 2
    • Use the Phillips #1 screwdriver to remove one 2.8 mm screw securing the SSD.

  7. Lenovo ThinkPad T480s SSD Replacement: étape 7, image 1 de 3 Lenovo ThinkPad T480s SSD Replacement: étape 7, image 2 de 3 Lenovo ThinkPad T480s SSD Replacement: étape 7, image 3 de 3
    • Pull the SSD out of the socket.

Conclusion

To reassemble your device, follow these instructions in reverse order.

Take your e-waste to an R2 or e-Stewards certified recycler.

Repair didn’t go as planned? Try some basic troubleshooting, or ask our Answers community for help.

Sarah Westberg

Membre depuis le 03/11/19

29 315 Réputation

71 tutoriels rédigés

Équipe

iFixit Membre de l'équipe iFixit

Staff

118 membres

19 433 tutoriels rédigés

2 commentaires

Is there a need to remove the battery?

Sanjay - Réponse

Hi Sanjay, we just want to make sure that there is no power to the system and the step to remove the battery is included as a precaution. Typically, you could detach the connector from the motherboard without removing the battery, and that would be sufficient. This connector is integrated into the battery case so we recommend battery removal. Thanks!

Sarah Westberg -

Ajouter un commentaire

Nombre de vues :

Dernières 24 heures : 4

7 derniers jours : 19

30 derniers jours : 72

Total : 3,341