Aller au contenu principal
Lenovo ThinkPad Yoga 11e (Gen 5) LCD Replacement

Lenovo ThinkPad Yoga 11e (Gen 5) LCD Replacement

Onel

Onel et un autre contributeur

Dernière mise à jour le June 27, 2024

20 - 25 minutes
Modérée
Photos d’action
A besoin de meilleures images
Nécessite plus d'images
Étapes manquantes

The display is a crucial component of any end user device. Without it, we couldn't use it to serve us. Unfortunately, the display can have issues and it can get disconnected or break and stop working. Luckily, it is not too hard to replace it if needed. In this guide, you will need iFixit Precision Bit Driver, T5 Torx Screwdriver Bit(1.4 mm), Anti-Static Wrist Strap, iopener heat applicator, and a jimmy knife pick.

Ce dont vous avez besoin

Outils

Afficher plus…

  1. Lenovo ThinkPad Yoga 11e (Gen 5) LCD Replacement, LCD: étape 1, image 1 de 1
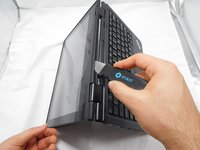
    • Start by putting on your anti static wrist strap and connecting it to a stationary and stable object, like a desk.

    • This safety strap serves as a precaution to prevent any electrical static you might have on your body from transferring to the laptop's internal components and damaging the hardware.

    • Reminder to have this safety strap on you at all times during the process

  2. Lenovo ThinkPad Yoga 11e (Gen 5) LCD Replacement: étape 2, image 1 de 2 Lenovo ThinkPad Yoga 11e (Gen 5) LCD Replacement: étape 2, image 2 de 2
    • Use a T5 screwdriver to remove the two 7.62 mm screws circled in red at the bottom of the front of the display.

  3. Lenovo ThinkPad Yoga 11e (Gen 5) LCD Replacement: étape 3, image 1 de 3 Lenovo ThinkPad Yoga 11e (Gen 5) LCD Replacement: étape 3, image 2 de 3 Lenovo ThinkPad Yoga 11e (Gen 5) LCD Replacement: étape 3, image 3 de 3
    • Heat up the iopener and apply it to all 4 edges of the display

    • Be cautious when handling the iopener as the contents are hot and follow the instructions written on the product.

    • You might need to heat up the iopener multiple times to melt the glue holding the dsoplay in place

  4. Lenovo ThinkPad Yoga 11e (Gen 5) LCD Replacement: étape 4, image 1 de 2 Lenovo ThinkPad Yoga 11e (Gen 5) LCD Replacement: étape 4, image 2 de 2
    • Use the Jimmy pick knife to pry the display open all around.

  5. Lenovo ThinkPad Yoga 11e (Gen 5) LCD Replacement: étape 5, image 1 de 3 Lenovo ThinkPad Yoga 11e (Gen 5) LCD Replacement: étape 5, image 2 de 3 Lenovo ThinkPad Yoga 11e (Gen 5) LCD Replacement: étape 5, image 3 de 3
    • Finally, unplug the 2 connection points of the display from the motherboard.

    • The big port will have a silver latch that needs to be flipped up for the port to come out.

    • You can now replace the old display with the new one.

Conclusion

To reassemble your device, follow these instructions in reverse order.

Onel

Membre depuis le 02/04/24

173 Réputation

1 tutoriel rédigé

Équipe

Gateway, Team 11-11, Gonzalez Spring 2024 Membre de l'équipe Gateway, Team 11-11, Gonzalez Spring 2024

GCC-GONZALEZ-S24S11G11

4 membres

4 tutoriels rédigés

0 commentaires de tutoriel

Ajouter un commentaire

Nombre de vues :

Dernières 24 heures : 0

7 derniers jours : 1

30 derniers jours : 10

Total : 140