Aller au contenu principal
Little Tikes Tobi 2 Interactive Karaoke Machine Speaker Replacement

Little Tikes Tobi 2 Interactive Karaoke Machine Speaker Replacement

Isaiah Eagle

Isaiah Eagle et 3 autres contributeurs

Dernière mise à jour le December 27, 2024

25 - 40 minutes
Modérée
Photos d’action
Nécessite plus d'images
Étapes manquantes

The speaker is a critical component of the Little Tikes Tobi 2 Interactive Karaoke Machine, as it is responsible for emitting music, audio cues, and other sounds necessary for proper operation and user experience. Without functioning speakers, the device cannot produce sound, which may significantly limit its usefulness, especially for audio-based features like music playback, notifications, or spoken instructions.

Follow this guide to replace the speaker of your Little Tikes Tobi 2 Interactive Karaoke Machine.

Before you begin the repair, make sure to turn off your device and remove the batteries. You may need to use a heat gun to loosen the adhesive that is holding the speaker to the device. Refer to the How to Use a Heat Gun to Soften Adhesive guide for tips on safely using this tool.

Ce dont vous avez besoin

Pièces

Outils

Afficher plus…

iFixit touche une commission lorsque vous achetez par l'intermédiaire de ces liens.
  1. Little Tikes Tobi 2 Interactive Karaoke Machine Speaker Replacement, Battery: étape 1, image 1 de 3 Little Tikes Tobi 2 Interactive Karaoke Machine Speaker Replacement, Battery: étape 1, image 2 de 3 Little Tikes Tobi 2 Interactive Karaoke Machine Speaker Replacement, Battery: étape 1, image 3 de 3
    • Use a Phillips screwdriver to remove the single screw that is holding the cover to the battery compartment.

    • If the screw doesn’t come out right away, use a spudger to gently lift the edge of the battery compartment in the recessed area while continuing to unscrew it with your other hand.

    • Use a spudger to carefully pry off the battery cover.

  2. Little Tikes Tobi 2 Interactive Karaoke Machine Speaker Replacement: étape 2, image 1 de 2 Little Tikes Tobi 2 Interactive Karaoke Machine Speaker Replacement: étape 2, image 2 de 2
    • To easily pop out a battery, use your thumb to push the battery from the flat side down toward the coil and pull the battery outward.

    • Remove all four batteries.

    • Take a new AA alkaline battery and position it in the correct orientation. Insert the flat side of the battery facing the coil first, then press the raised side down. Ensure this second battery is oriented in the opposite direction to the first. Continue replacing the batteries in an alternating pattern.

  3. Little Tikes Tobi 2 Interactive Karaoke Machine Speaker Replacement, Case: étape 3, image 1 de 1
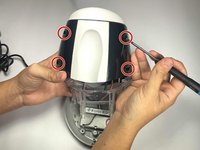
    • Use a Phillips screwdriver to remove four screws from the base of the device.

    • If the screws don't come out, you can gently lift them with the screwdriver tip or push them out from the other side once they're all loosened.

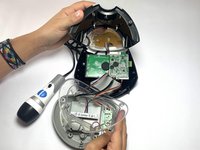
    • Remove the bottom of the karaoke machine.

    • Don't pull it apart roughly as it is attached to internal cables and they may be damaged in the process.

  4. Little Tikes Tobi 2 Interactive Karaoke Machine Speaker Replacement: étape 4, image 1 de 1
    • Use a Phillips screwdriver to remove the four screws from the interior of the white base.

  5. Little Tikes Tobi 2 Interactive Karaoke Machine Speaker Replacement: étape 5, image 1 de 2 Little Tikes Tobi 2 Interactive Karaoke Machine Speaker Replacement: étape 5, image 2 de 2
    • Use a Phillips screwdriver to remove the four screws from the exterior black plastic part of the case.

    • Use a spudger to disassemble the case.

  6. Little Tikes Tobi 2 Interactive Karaoke Machine Speaker Replacement, Speaker: étape 6, image 1 de 2 Little Tikes Tobi 2 Interactive Karaoke Machine Speaker Replacement, Speaker: étape 6, image 2 de 2
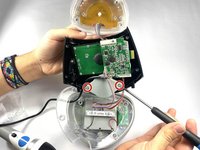
    • Use a Phillips #0 screwdriver to remove the two screws from the diamond-shaped gray plastic cover.

    • Remove the gray cover.

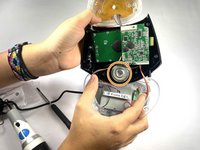
    • Use a hairdryer or heat gun to soften the adhesive securing the speaker.

    • Be careful to not melt the device when using the heat gun. Don't hold it over one area for too long.

    • Use a spudger to remove the speaker.

Conclusion

To reassemble your device, follow these instructions in reverse order. Take your e-waste to an R2 or e-Stewards certified recycler.

Isaiah Eagle

Membre depuis le 09/04/24

607 Réputation

5 tutoriels rédigés

Équipe

CSU Los Angeles, Team 5-4, Kershman Fall 2024 Membre de l'équipe CSU Los Angeles, Team 5-4, Kershman Fall 2024

CSULA-KERSHMAN-F24S5G4

4 membres

6 tutoriels rédigés

0 commentaires

Ajouter un commentaire

Nombre de vues :

Dernières 24 heures : 1

7 derniers jours : 26

30 derniers jours : 26

Total : 63