
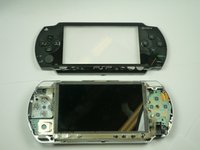
Remplacement écran LCD PSP 1000

Introduction
Passez à l'étape 1Ce guide vous aidera à remplacer l'écran LCD s'il est fissuré ou endommagé.
Ce dont vous avez besoin


-
-
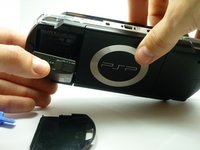
Repérez le bouton de déverrouillage du cache de la batterie sur le côté arrière gauche de la PSP.
-
Appuyez sur le bouton et enlevez le cache de la batterie.
You are dumbbb... BRO YOUR DUMB BC U DIDNT HAVE TO USE A TOOL TO OPEN THE DOOR. USE YOUR FINGER""
The battery door can be damaged dont use a tool
That also happend to me it got destroyed by screwdriver
-
-
-
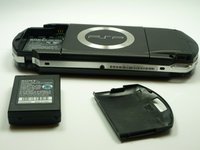
En utilisant votre doigt, soulevez la batterie vers le haut comme indiqué sur la photo.
The use of the opening tool is completely unnecessary. There is a finger actuated opening latch button that says “PUSH” on it. Simply press down with your thumb then slide your thumb down and away, dragining the battery door with it. It will then come off. Assuming the system still has its original plastics, they may have become brittle enough that the opening tool could damage the release button or the plastic cover.
-
-
-
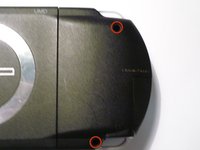
Dévissez les quatre vis sur la photo avec un tournevis cruciforme #00.
you need to peel back the warranty sticker in order to access both the lower left and lower left screws
This is a bit misleading, you should only remove the two black screws in the battery compartment. The silver ones can stay.
iFixit screwdriver bits aren't thin enough to reach the two screws on the right near the memory stick slot.
Can't edit previous comment so here's a new one:
Standard or older iFixit screwdriver bits aren't thin enough to reach the two screws on the right near the memory stick slot. You'll need precision bits that have longer tips to reach these deep screws.
-
-
-
-
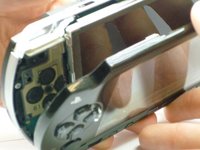
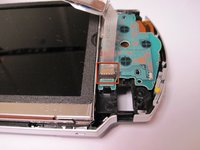
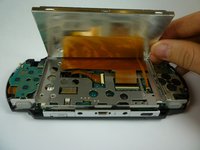
La carte des boutons, à la base de l'écran LCD, est maintenue par deux fixations.
-
Poussez ces clips sur les languettes à l'aide d'un outil d'ouverture PSP. Les clips seront ainsi libérés.
-
-
-
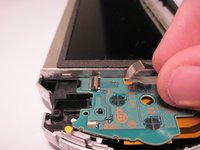
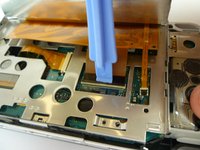
La fine nappe est fixée du côté opposé à l'entrée de la nappe. Ouvrez le loquet en direction de la nappe. Le loquet se soulève et libère la nappe. Placez votre outil derrière la partie noire, puis faites levier sur le morceau de plastique noir.
-
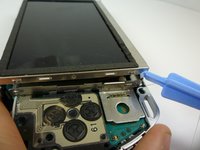
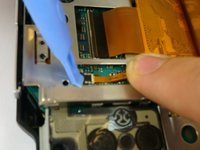
La large nappe se libère du même côté que la nappe, et s'ouvre à l'opposé du câble.
-
Ces deux loquets sont de couleur noire.
-
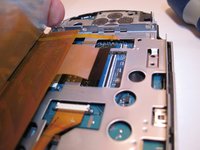
Tirez doucement sur les câbles en nappe pour les dégager des loquets. L'écran LCD peut maintenant être retiré.
-


Annulation : je n'ai pas terminé ce tutoriel.
74 autres ont terminé cette réparation.
Merci à ces traducteurs :
100%

Guillaume Malecha nous aide à réparer le monde ! Vous voulez contribuer ?
Commencez à traduire ›

Équipe

Cal Poly, Team 5-6, Forte Winter 2010 Membre de l'équipe Cal Poly, Team 5-6, Forte Winter 2010
CPSU-FORTE-W10S5G6
5 membres
34 tutoriels rédigés
8 commentaires de tutoriel
This is not easy...I tore up the outer casing trying to do this. I better see money in the mail for this
People!! If you weren't gifted in screws and bolts, then bring your console to a repair shop. Seriously blaming this for your Dick Fingers?
dick fingers!!
It needs to be mentioned that the power switch is very fragile. When reassembling the front cover you need to first make sure that the small black switch on the circuit board sits in the yellow part of the switch, otherwise when you apply pressure to click the cover back in place the black switch will break off.
Great tutorial, thanks to this I manage to fix the R button, it turns out the ribbon cable of the right section of buttons was dirty and a little bit off of place, and taking out the screen was necessary to get to that connector.
Totally helpful thank u so much, a little bit of patience and common sense job was done an I was play my psp portable the instant I put the battery cover back on it! U guys ROCK TNX AGIAN!!