Il est possible que cette traduction ne reflète pas les dernières mises à jour du tutoriel source. Aidez à mettre à jour la traduction ou bien consultez le tutoriel source.
Introduction
Si l'écran de votre iPhone 12 mini est fissuré, si le vitre tactile ne répond pas ou si rien ne s'affiche quand l'appareil est allumé, consultez ce tutoriel pour le remettre en état de marche avec un nouvel écran.
Le module haut-parleur interne + capteurs fixé au dos de l'écran est couplé individuellement en usine avec votre iPhone. Vous devrez donc suivre les instructions ci-dessous pour le transférer depuis votre ancien écran sur le nouveau à chaque fois que vous effectuez un remplacement. Cette pièce comprend l'illuminateur infrarouge qui fait partie partie intégrante de Face ID. S'il est endommagé ou remplacé, Face ID ne fonctionnera plus. Faites très attention à n'endommager aucun de ces capteurs durant la procédure. Sinon, seul Apple ou un technicien agréé par Apple pourra restaurer la fonctionnalité Face ID.
Note : la fonctionnalité True Tone est désactivée après un remplacement d'écran, même si on utilise un écran d'origine Apple. De plus, votre iPhone risque d'afficher temporairement un message d'avertissement concernant "l'authenticité" de l'écran.
Lors du remontage, vous aurez besoin d’adhésif de remplacement pour rattacher certains composants.
Ce dont vous avez besoin
-
-
Éteignez votre iPhone avant de commencer à le démonter.
-
Dévissez les deux vis Pentalobe de 6,7 mm en bas de l'iPhone.
-
-
-
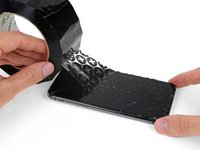
Recouvrez l'écran de bandes de ruban adhésif, qui se chevauchent, jusqu'à ce que toute la surface soit couverte.
-
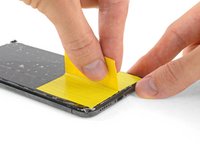
Si la ventouse n'adhère pas au cours des étapes suivantes, pliez un morceau de ruban adhésif épais (du ruban adhésif toilé p.e.) pour former une poignée et soulevez l'écran de cette façon.
-
-
Outil utilisé dans cette étape :Clampy - Anti-Clamp$24.95
-
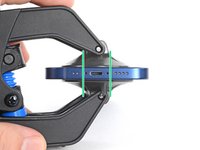
Tirez la poignée bleue vers l'arrière pour débloquer les bras de l'Anti-Clamp.
-
Insérez le côté droit ou gauche de votre iPhone entre les bras.
-
Positionnez les ventouses près du bas de l'écran iPhone : une devant, une derrière.
-
Appuyez sur les ventouses pour faire le vide à l'endroit désiré.
-
-
-
Tirez la poignée bleue vers l'avant pour bloquer les bras.
-
Tournez la poignée dans le sens horaire de 360 degrés ou bien jusqu'à voir les ventouses se tendre.
-
Vérifiez que les ventouses restent bien alignées entre elles. Si elles commencent à se décaler, détachez-les pour les réaligner.
-
-
-
Posez votre iPhone sur quelque chose de solide comme un livre à couverture rigide, pour qu'il tienne tout seul à l'horizontale. Ainsi, il sera plus facile de procéder aux étapes suivantes.
-
Servez-vous d'un sèche-cheveux pour faire chauffer le bord inférieur de l'iPhone. L'écran doit être légèrement trop chaud au toucher.
-
Attendez une minute pour donner à l'adhésif le temps de se détendre et d'ouvrir un interstice.
-
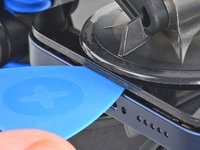
Insérez un médiator sous le joint en plastique de l'écran, dès que l'Anti-Clamp a ouvert un interstice suffisant.
-
Passez les trois étapes suivantes.
-
-
-
Utilisez un sèche-cheveux ou un pistolet thermique pour chauffer le bord de l'iPhone pendant 90 secondes ou jusqu'à ce que l'écran soit légèrement trop chaud au toucher.
you need to clarify that you're heating the metal frame, not the glass. I gently heated the glass front with a heat gun and proceeded to pull the display apart, destroying it. :-(
-
-
-
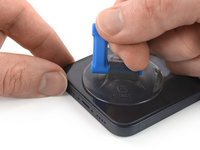
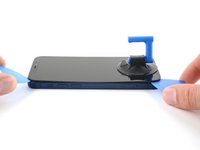
Si vous utilisez une simple ventouse, posez-la aussi près que possible du bord inférieur du téléphone.
-
Si votre écran est méchamment fissuré, recouvrez-le d'une couche de ruban adhésif d'emballage transparent pour aider la ventouse à adhérer. Ou bien servez-vous de ruban adhésif très épais à la place de la ventouse. Si aucune des deux astuces ne marchent, vous pouvez essayer de coller la ventouse à l'écran cassé avec de la superglue.
I would recommend starting with a bottom corner, not the bottom middle. If the adhesive isn't softened enough, you will pull the middle out but the sides will still be stuck on, causing extreme flex to the panel and damage to the panel down the middle (white bars down the middle in a worst case). I did this to my phone.
-
-
-
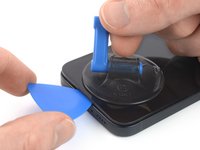
Tirez fermement et constamment sur la ventouse pour ouvrir un léger espace entre l'écran et le châssis métallique.
-
Insérez un médiator dans l'interstice sous le cadre en plastique de l'écran.
I ended up separating my screen rather than getting under the scren casing.. BE CAREFUL TO MAKE SURE YOU ARE UNDER THE PLASTIC PART - otherwise you just ruin your screen... No mention of this precaution here and as a result, my phone is more broken than when I started
The plastic frame should stay with the display.
Broke the screen. Too bad. I've done maybe 5 battery replacements before. But this one is very very tight. Got a new phone. :P
Same thing, I broke my screen too. I think the warning should be in all caps and show more clearly where is the right place to put the pick and where is not — without the need to click on the link.
Judging by amount of people who reported it here (and should also account for those who didn't bother to report), I'd say that there is a problem with instructions.
It is honestly not so hard if you know what does mistake looks like and that it is possible to separate the screen so easily from the frame. I repaired more than a dozen phones — screens and batteries — and this is the first time I made such a mistake that costs 100+euros.
-
-
-
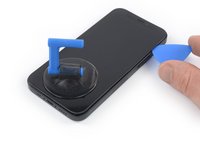
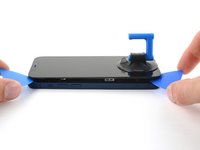
Utilisez un sèche-cheveux pour chauffer le bord droit de l'iPhone (celui avec le bouton de marche) pendant 90 secondes ou jusqu'à ce que l'écran soit légèrement trop chaud au toucher.
The pictures show the left side. I know that the left side is the correct one to heat, but for others it might be confusing. 😊
@dviosz You mean the right edge! The picture shows the left edge but the right edge is the correct one to heat. As described in the text next to it. Opening the phone from the left will damage it!
Yeah, sorry, you are right! (tried to make something less confusing and created more confusion by accident… 😃 )
THIS ONE HERE (lolz)
weebeast -
-
-
-
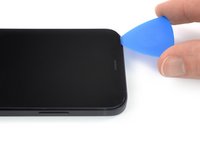
Faites glisser le médiator le long du coin inférieur droit et du bord droit de l'iPhone, en tranchant l'adhésif qui maintient l'écran en place.
Be very careful your tool does NOT go in between the screen and the screen frame but rather in between the screen frame and the phone frame. If not you will damage the screen and need a new one. This has happened to MANY people. The screen is attached to the screen frame with an adhesive that can also be accidentally pried apart if not done carefully. This is probably more likely if your tool is too thin, if you dont heat enough, or dont suction and pull enough to create a big enough separation between the screen frame and the phone frame.
Yes, this happens to me, too. It took a long time until I could remove the screen using a heat gun with a heat gun set to 120°C (after trying first with 90° and 100°). Now the right side of the display shows white stripes and the touch doesn't react. -> New display necessary...
-
-
-
Utilisez un sèche-cheveux pour chauffer le bord supérieur de l'iPhone pendant 90 secondes ou jusqu'à ce que l'écran soit légèrement trop chaud au toucher.
-
-
-
-
Utilisez un sèche-cheveux pour chauffer le bord gauche de l'iPhone pendant 90 secondes ou jusqu'à ce que l'écran soit légèrement trop chaud au toucher.
-
-
Welches Ersatzteil benötige ich, wenn die obere Verbindung gerissen ist?
I accidentally tore the cables off. What can I do?
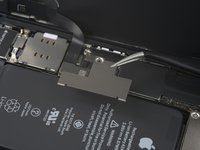
The display flexy is in the middle of the left side, please update the picture showing the flexy connected and highlight in red, so other users don't damage it as I did :(
Updated -- thank you! Does this look better?
-
-
Insérez un second médiator dans le coin inférieur gauche de l'iPhone.
-
Faites pivoter les deux médiators en même temps, jusqu'à ce que les clips du bord gauche se détachent.
Don't go from just one corner (like on the right side). I've done that (forgot this step) and broke my screen.
-
-
-
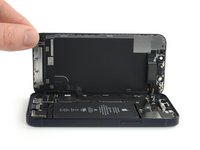
Tournez votre iPhone de façon que son bord droit est en face de vous.
-
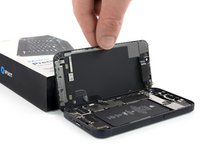
Ouvrez l'iPhone en soulevant le côté droit de l'écran comme on ouvre la couverture avant d'un livre.
-
Calez l'écran contre un objet pour qu'il reste ouvert pendant que vous travaillez sur votre téléphone.
-
-
Outil utilisé dans cette étape :Magnetic Project Mat$19.95
-
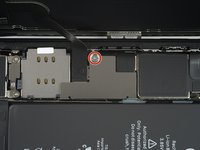
Ôtez la vis Y000 de 1,25 mm qui fixe le cache des connecteurs de la batterie et de l'écran.
hallo, ich sehe in Schritt 17 nur EINE markierte Schraube... (?)
This Shield is garbage and once it's taken out it's next to impossible to get back in. I'm not even going to put the shield back in I'm just going to put kapton tape over it and call it good.
-
-
Outil utilisé dans cette étape :Tweezers$4.99
-
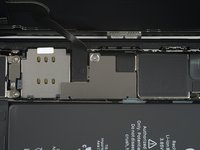
Prenez une pincette pour retirer le cache des connecteurs de la batterie et de l'écran.
-
-
-
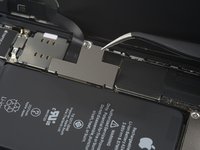
Prenez une spatule (spudger) ou un ongle propre pour soulever le connecteur de la batterie de sa prise sur la carte mère.
-
Repliez légèrement le connecteur par rapport à la carte mère pour l'empêcher de faire accidentellement contact avec la prise et d'alimenter le téléphone pendant que vous effectuez votre réparation.
-
-
-
Servez-vous d'une spatule ou d'un ongle pour débrancher le connecteur de la nappe du panneau OLED de sa prise sur la carte mère.
-
-
-
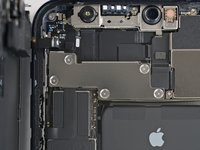
Enlevez les cinq vis Y000 de 1 mm qui fixent le cache de l'ensemble capteurs frontaux.
what 3 are the small ones? I don't know anymore
in case anyone else reads this, the 3 small ones screw directly onto the board. the two longer ones screw into standoffs (the two top screws, based on the picture above)
Skyejobs -
-
-
-
Prenez la pointe d'une spatule ou un ongle propre pour débrancher la nappe de l'ensemble capteurs frontaux.
-
-
-
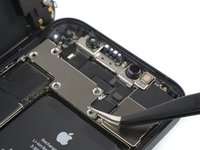
Dévissez la vis tri-point Y000 de 1,1 mm de long.
-
Dévissez la vis tri-point Y000 de 1,8 mm de long.
-
Dévissez les deux vis cruciformes #00 de 1,6 mm de long.
-
-
-
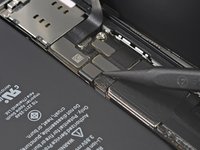
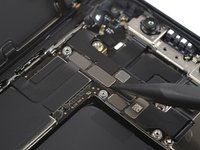
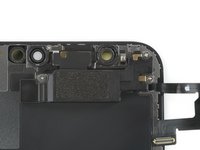
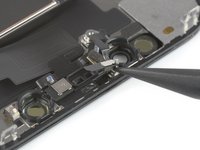
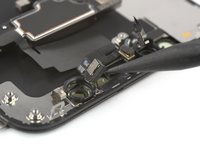
Servez-vous d'un sèche-cheveux ou d'un pistolet à air chaud, ou bien préparez un iOpener et posez-le sur le bord supérieur de l'écran pendant 1 à 2 minutes afin de ramollir l'adhésif qui fixe les capteurs.
-
-
-
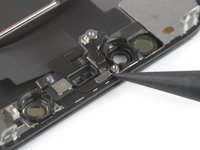
Servez-vous de la pointe d'une spatule pour soulever délicatement le capteur de proximité hors de son compartiment.
-
-
-
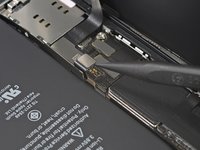
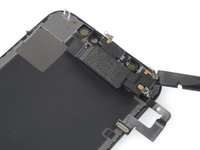
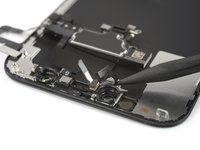
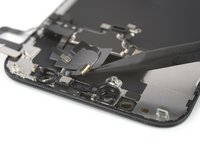
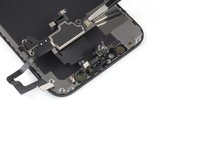
Prenez une spatule ou une pincette pour soulever l'illuminateur infrarouge hors de son compartiment.
-
-
-
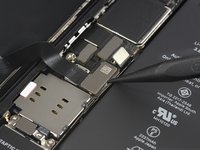
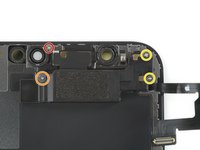
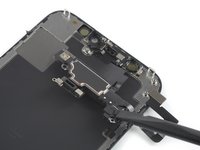
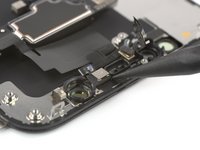
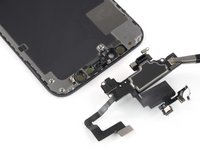
Enlevez le module haut-parleur interne et capteurs frontaux.
-
Illuminateur infrarouge
-
Capteur de proximité
-
Microphone
-


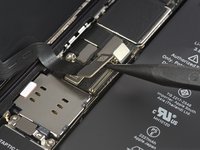


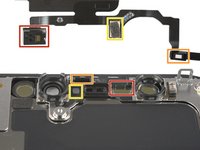
Comparez votre nouvelle pièce de rechange à la pièce d'origine, il se peut que vous ayez besoin de transférer des composants restants ou de retirer des films adhésifs de la nouvelle pièce avant l'installation.
Pour remonter votre appareil, suivez les étapes ci-dessus dans l'ordre inverse.
Déposez vos déchets électroniques dans un centre de recyclage certifié.
La réparation ne s'est pas déroulée comme prévu ? Consultez la section iPhone 12 mini de notre Forum pour obtenir de l'aide.
Annulation : je n'ai pas terminé ce tutoriel.
46 autres ont terminé cette réparation.
Merci à ces traducteurs :
50%


Ces traducteurs nous aident réparer le monde ! Vous voulez contribuer ?
Commencez à traduire ›


11 commentaires
The only way to pair the new sceen to the phone to retain Tue Tone is to buy a dedicated board that copy the data from the original screen to the new.
This guide was impeccable! The hardest part is definitely getting the screen glue off. Ended up separating the frame of the screen from the display itself. All worked out in the end though!
same! I was wondering why the inside of my phone looked different than the pictures before realizing the screen assembly has two layers and I accidentally removed only the top one instead of both.
Likewise, worked out for me anyhow.
macro -
The same thing happened to me. So a simple battery replacement turned into a display replacement :D
Should the phone turn ON and screen work with out speaker/sensor module?
Yes it will!
I wish they would include the way to put the water resistant gasket on, not all of us know what to do.
one of the steps above (in reverse order) links to a different guide for replacing the water resistant gasket
macro -
So I have an iPhone 12, just the basic model. When I removed the screen assemble, the camera/speaker/mic setup was not attached to the old screen. I thought maybe I broke a cable, but there doesn't appear to be any screw points for the camera assemble on the old screen. Also, the upper cable when you hinge the old screen open isn't attached to the screen. Finally, there do not appear to be any clips on the old screen, and the replacement screen does have clips, but they do not appear to go into anything in the iPhone 12 body. The replacement screen also has screw points for the camera assemble to attach to. Do I not have an iPhone 12?
This is the iPhone 12 MINI guide Remplacement de l'écran de l'iPhone 12 this is the iphone 12 guide
is it oem apple battery, because at some photo shows(Ifixit) and another shows (apple) ... wait your answer?
karim - Réponse
BEWARE! This screen isn’t the same as older iPhone models’ screens. The iPhone mini 12-screen comes with a thin plastic frame around the screen on its back. Thus, make sure you don’t insert the pick in between the screen and its plastic frame, as you’ll seperate the screen and leave the plastic frame still sitting in the phone’s metal housing (this cost me 100 dollars…). Carefully heat the sides of the metal housing and do not heat directly on the glass, as doing so will potentially loosen the glue from the plastic frame stuck to the screen. My suggestion is that you watch a video of this repair as this step-by-step-guide is undercooked.
Dan - Réponse
This is an excellent comment. Following this step-by-step guide to the letter will break your screen; it's by far the worst iFixit guide I've seen to date.
Dormouse -
Ive finished mine and Soooo absolutely dont do this yourself🙌🏽 unless your a mechanic because first of all they didnt send me all of the right tools🤗 and secondly the battery they gave me has an overly large component so it wont fit into my phone. And the absolute HASSEL i had to go through to even just get the package was insane it was a whole month of struggling just for the stuff to not even be right, in conclusion will NEVER order from here again..🤗
Chanell - Réponse