Il est possible que cette traduction ne reflète pas les dernières mises à jour du tutoriel source. Aidez à mettre à jour la traduction ou bien consultez le tutoriel source.

Remplacement de l'objectif du GoPro Hero4 Silver
Introduction
Passez à l'étape 1Dans ce guide, nous allons vous montrer comment remplacer l'objectif de la caméra de votre GoPro Hero4 Silver. L'objectif focalise la lumière avant qu'elle n'atteigne le capteur de la caméra. Avant de commencer, assurez-vous que la batterie est retirée de l'appareil et que vous disposez des outils nécessaires pour effectuer cette réparation.
Ce dont vous avez besoin


-
-
Commencez par retirer la face en plastique argentée de l'appareil photo à l'aide d'un outil d'ouverture en plastique. Insérez l'outil d'ouverture en plastique au milieu de chaque bord et soulevez les languettes qui maintiennent la face de la caméra allumée.
-
Les sept emplacements des languettes en plastique sont marqués en rouge.
-
-
-
Retirez les trois vis cruciformes #000 de 8 mm à chaque coin de la caméra.
-
Retirez la seule vis Phillips #000 de 4 mm dans le coin inférieur gauche de la caméra.
The screw heads are Philips #0 on my Hero 4 (and not #000 as described in the instructions).
Definitely a 000
Just want to point out that the screw in the top left corner is slightly placed beneath the LCD. Use caution when trying to unscrew.
Mine was as well, I’m glad I’m not the only one
and &&^&^$^ instructions waste my money
-
-
-
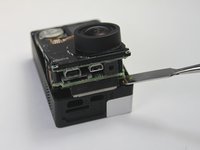
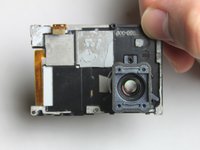
Pour retirer la carte mère du boîtier de la caméra, utilisez l'outil d'ouverture en plastique sur le côté objectif de la caméra pour retirer la carte mère du boîtier de la caméra.
-
Pour éviter de casser le plastique du côté objectif de l'appareil photo (voir photo), faites levier le long des bords près des coins.
-
-
-
-
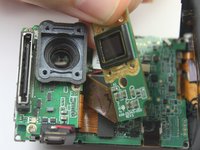
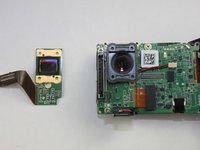
Pour retirer l'ensemble capteur, décollez simplement la lentille vers le câble plat attaché.
-
Le capteur a des câbles plats allant à la carte mère via un connecteur rectangulaire noir.
-
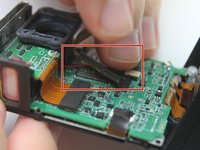
Pour retirer le capteur, utilisez la spatule pour faire levier de chaque côté, puis soulevez le connecteur vers le haut de sa prise.
-
Une fois l'ancien ensemble de capteur de caméra retiré, vous pouvez maintenant le remplacer par un nouveau capteur.
The thin copper tabs, visible on the far right screen of STEP 5, have pulled out (as it did with mine). How do you get these back in? They are very thin and when the 2 halves of the camera are put close together, there is no room to access this, or get leverage to force them back in the slots they came out of.
did you guys figure it out on how to put it together?
gens909 -
Same thing happened to me. Nightmare to put back in. The ribbon connectors are for the rear lcd and I think the side button. To re attach the cable you basically need to remove the motherboard from the front piece to get to the tabs where the ribbons go into. There is very little cable length to attach it and it comes off very easily while trying to re assemble.
@ keith
looks like you can't. Mine did the same thing and I think it's now trash. I should have just used the procedure to unscrew the lens without taking the camera apart.
I either damaged something or dislodged something because the colors on the LCD screen are washed out and the image is not clear, almost pixelated. The camera itself works and the image taken appears to fine. I'll live with it like this.
I bought the image sensor form ifixit, replaced it, and... 3/4 secs after turning the GoPro on, it still freezes :(. Now I do not even see the image in the display anymore -_-'
-
-
-
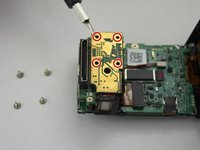
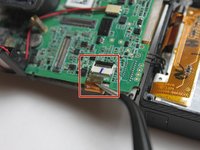
Retirez les trois vis cruciformes #000 de 8 mm fixant le port Hero à la carte mère.
The screw under the lense is unable to be removed as it hit the lense.
I went to step 9 and once the lense was seperated from the motherboard I had plenty of room.
I removed the screw in the top middle of the picture so the mother board would come loose. I then gently pried the motherboard up off the black plastic of the lens plate and the assembly moved enough that the third screw of the port assembly could finally be removed. When going back together, hook the port assembly cable up before screwing it down with the three screws. Its a bit easier.
I did this too, much easier
Thanks Rich. That's what worked for me.
WARNING: I almost broke my camera following this step. If you are following these instructions in order to replace your lens, stop now. These instructions are incomplete, and misleading; you don't need to remove this piece in order to complete a lens replacement. What you're looking for instead is this: https://www.youtube.com/watch?v=fLxQC_55...
-
-
-
Pour retirer le port libre, faites-le simplement glisser du côté gauche de la caméra. Il devrait sortir avec une légère coercition.
-
Cette pièce peut être remplacée, réparée ou mise de côté pour un démontage ultérieur de la GoPro.
-
Sur la photo de gauche, le port lorsqu'il est séparé de la carte mère.
-
-
-
Utilisez une pince à épiler pour déconnecter le câble plat du connecteur ZIF en relevant le rabat de retenue noir. Vous devriez alors pouvoir retirer le câble.
-
Une fois le câble plat déconnecté, vous pouvez retirer le support en plastique noir qui maintient l'objectif de la caméra.
skipped a very important photo seperating the board from the front plastic bracket
Very true...Darren did you figure that part out?
Another Philips screw has to be removed before trying to lift the board from the plastic bracket. It's located on the top of the board, about 10 mm right of the lens casing.
-
-
-
Retirez l'objectif de la caméra du panneau.
Just did all this and after reassembly the camera will not power on at all. Tried with two different full charged batteries and with it plugged into a power source. I re opened the camera back up to make sure all the cables were plugged in correctly and they are. Any ideas on what to do?
Any help is greatly appreciated.
-


Pour remonter votre appareil, suivez ces instructions dans l'ordre inverse.
Pour remonter votre appareil, suivez ces instructions dans l'ordre inverse.
Annulation : je n'ai pas terminé ce tutoriel.
20 autres ont terminé cette réparation.
Merci à ces traducteurs :
85%
[deleted] nous aide à réparer le monde ! Vous voulez contribuer ?
Commencez à traduire ›
Équipe

USF Tampa, Team 2-1, Blackwell Fall 2015 Membre de l'équipe USF Tampa, Team 2-1, Blackwell Fall 2015
USFT-BLACKWELL-F15S2G1
4 membres
20 tutoriels rédigés
6 commentaires de tutoriel
the 3 copper wires on the far right side came out and now my gopro doesnt work at all.
Mine too, these instructions leave out several crucial steps for making the repair. Step number 7 is not feasible and step number 9 is totally lacking in detail (it doesn't mention the removal of a crucial screw, and doesn't instruct you on how to ACTUALLY make the step). Garbage.... I'm not sure if my camera will ever work again
My 3 ribbon cables popped out too. I can't fathom how I could ever plug them back in.
By the way, they are also un-plugged on the tutorial photos.
I'm almost sure that this hardware went straight to the garbage can afterwards.
This is a great video tutorial for Hero4 lens R/R - very detailed.
ok, so i strongly suggest some edits.
First step 5 through 8 don’t need to be done. Step 4 should include removing the 5th screw in the main circuit board, and then on to step 9. Step 9 should also describe the black release lever to unlock the ribbon cable. then the whole front assembly with the lens will come out.
as for the three ribbon cables attached to the back case (for power and the buttons) if they do come out, while the black panel is detached, you need to pull the tape off, lift the three locking levers and very carefully reseat the ribbon cables, reapply the tape and continue with the reassembly
My ribbon cable popped out but with tweezers I was able to get it back in.
First step should be make sure you remove memory card first. I accidentally left mine and broke it trying to remove the assembly from the case.
Brad Hodgkinson - Réponse