Introduction
Ce tutoriel de réparation provient de l'équipe iFixit et n'a pas été soumis à l'approbation de Google. Pour en savoir plus sur nos tutoriels de réparation, c'est par ici.
Utilisez ce tutoriel pour retirer ou remplacer une batterie usée d'un Google Pixel 4 XL. Si votre batterie est gonflée, prenez les précaution appropriées.
Pour votre sécurité, déchargez votre batterie sous les 25 % avant de démonter votre téléphone. Cela réduit le risque d'un événement thermique dangereux si votre batterie est accidentellement percée pendant la réparation.
Note : certaines photos de ce tutoriel montrent le tiroir de carte SIM éjecté du téléphone. Il n'est pas nécessaire d'éjecter le tiroir de carte SIM pour cette procédure.
Attention : Google avertit que le démontage du module laser frontal peut vous exposer à des émissions laser infrarouges dangereuses. Lisez leurs avertissements de sécurité ici.
Ce dont vous avez besoin
-
-
Préparez un iOpener et appliquez-le sur le bord inférieur du panneau arrière pendant une minute.
-
-
-
Posez la ventouse sur le bord que vous avez chauffé en appuyant dessus pour créer un vide, aussi près du bord que possible.
-
-
-
Tirez sur la ventouse de manière ferme et constante pour ouvrir un interstice entre le panneau arrière et le cadre.
-
Insérez la pointe d'un médiator dans l'interstice créé.
-
-
-
Faites glisser le médiator le long du bas vers le coin gauche pour couper l'adhésif.
-
En laissant le médiator inséré, faites-le glisser du coin inférieur gauche au coin inférieur droit pour couper complètement l'adhésif du bas du téléphone.
-
Laissez le médiator en place dans le coin inférieur droit pour empêcher l'adhésif de recoller.
-
-
-
Préparez un iOpener et appliquez-le au côté gauche du téléphone pendant une minute.
-
-
-
Préparez un iOpener et appliquez-le au côté droit du téléphone pendant une minute.
-
-
-
-
Avec les deux autres médiators toujours en place, insérez-en un troisième en bas de la partie droite.
-
Faites glisser le médiator vers le haut du téléphone pour couper l'adhésif du côté droit.
-
Arrêtez-vous lorsque vous atteignez le coin supérieur droit, et laissez le médiator en place.
-
-
-
Faites glisser le troisième médiator autour du coin supérieur droit et le long du bord supérieur du téléphone, pour couper la dernière section d'adhésif.
-
-
-
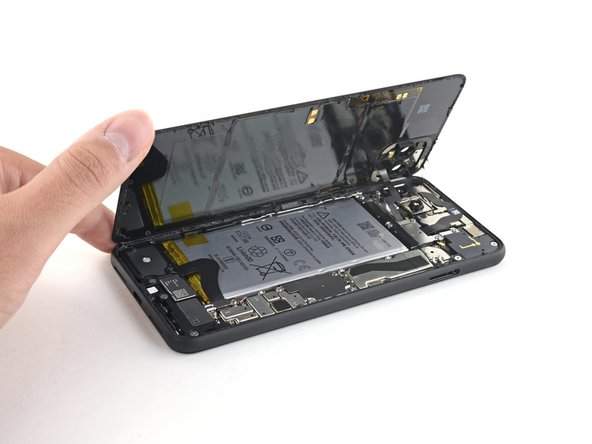
Une fois que tout l'adhésif du périmètre a été coupé, soulevez doucement le bord droit du panneau arrière, en l'ouvrant comme un livre.
-
N'essayez pas de le détacher entièrement pour l'instant, car il est toujours connecté au téléphone.
-
-
-
Continuez à retourner le panneau arrière jusqu'à ce que vous puissiez le poser sur le bord gauche du téléphone, en faisant attention à ne pas tirer sur la nappe qui est toujours attachée.
Geoff B: These are good instructions. Any technician worth his or her salt will test the device for functionality before sealing it up. That’s why it reads, “During reassembly…and test all functions before sealing it up.” Not confusing if you read and comprehend the full pin.
No instructions on how to fit new sticky gasket before assembly. Removing old adhesive was a messy business, I used IPA on a cotton bud and removed as much as possible with flat end of spudger and kitchen paper.
-
-
-
Retirez les quatre vis Torx T3 qui maintiennent le blindage du connecteur de la batterie.
-
Une vis de 1,8 mm
-
Une vis de 4,1 mm
-
Une vis épaulée de 4,4 mm
-
Une vis épaulée de 4 mm
Anyone know the thread size of the 1.8mm screw mentioned here? Mine went missing, and I need to get a replacement. I've got a bunch of tiny screw kits, but none of them have fit!
-
-
-
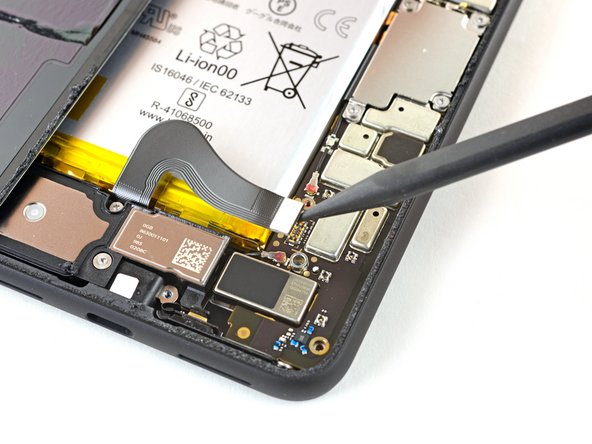
Avec le bout pointu d'une spatule, faites levier pour détacher le connecteur de la carte mère et déconnecter la batterie.
What are the 5 copper dots under the battery connector for.
When you reattach the connector to the motherboard this is a good time to power up and check basic functionality temporarily. Even though it had appeared it was correctly lined, my camera was not functional, in particular the switch button from the rear to the front camera, I was stuck in selfie mode. Then I was getting a message on the screen, possible hardware or software issues. Once I reattached the connecter (several times) until it was correctly inlined, the error went away and I was able to switch from the rear and front cameras.
That was a good call! Thanks!
Esther -
-
-
-
Utilisez un tournevis Torx T3 pour retirer les deux vis de 4,1 mm qui maintiennent le cache du connecteur du panneau arrière.
Wouldn’t it make more sense to use the same (orange) color circles as the other 4.1mm screw?
Maybe Google did it to avoid exchange in the models where they differ
-
-
-
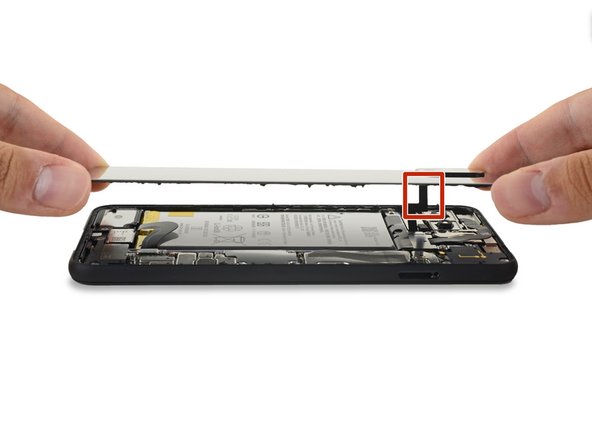
Avec le bout pointu d'une spatule, faites levier et déconnectez le connecteur du panneau arrière.
-
-
-
Retirez le panneau arrière
REASSEMBLY ADHESIVE: This is the step during reassembly that you'll want to set the back glass adhesive strip on (before you reattach ribbons). Set the adhesive strip into the body of the phone with the red tabs down (toward the body of the phone, it will simply rest inside the lip of the phone body). Press the back glass onto the adhesive strip to set the strip onto the back glass, lift the back glass back out of the body of the phone. Next reattach the ribbons, test functions, reattach connector covers, peel red adhesive cover off of the adhesive (on the back glass) then set the back glass into the phone lip. This could have been explained far better but was skipped over and the generic adhesive instructions posted in the comments are useless for this.
There are also detailed instructions at answer 742532, "How do I apply new back panel adhesive on a Pixel 4xl?" (sorry it doesn't let me link directly). But it advises adhering the adhesive to the main frame first before the glass. I do notice a slight lip on the main frame on both sides, which seems less forgiving to align with than the glass, so I would imagine doing the frame first would be easier? I haven't done this yet myself, so would be interested in opinions.
Update: it appears the discrepancy is due to a difference between the third-party adhesives and the iFixit "genuine" one. The iFixit one is not mirror symmetric and must be adhered to the glass back first, though it has cutouts that avoid protrusions and facilitate this. The third-party one (I believe) has no such cutouts and thus must go on the frame first.
However, in trying to follow Michael's instructions, I could not get the adhesive and red tabs off the blue plastic without distorting the adhesive, and had to take the clear side off first. I ended up directly placing the adhesive onto the glass back, without the frame to help align (I posted my method in the above-mentioned answer 742532). The cutouts in the blue plastic seem to have been made with this in mind.
-
-
-
Avec une pincette arrondie, soulever les tirettes de la batterie de manière à pouvoir les saisir plus facilement avec vos doigts.
-
-
-
Tirez sur la languette avec un angle faible et une force continue. Lorsque l'adhésif s'allonge, enroulez-le autour d'une spatule et continuez de tirer.
-
Continuez de tirer fermement sur l'adhésif avec une force constante, en faisant tourner la spatule sur elle-même pour garder une section visible de la languette aussi courte que possible.
-
Continuez ce procédé pour chacun des trois languettes jusqu'à ce qu'elles sortent ou se cassent en deux.
-
-
-
Si les languettes se sont cassées pendant leur retrait, insérez un médiator en haut à droite de la batterie pour couper l'adhésif qui se trouve en-dessous.
Strip of glue is only on the top part, only 3 stripes. Becareful passing the gold strip
I wouldn't risk going across the topside of the battery either. the thin cable connecting the side buttons to the board is exposed and is easy to break. Learned from experience.
Also broke this grip sensor cable but now what where to get one?
I carefully pulled up the battery from the bottom using the opening pick because my adhesive pull tabs snapped. The battery was so strongly glued to the bottom. I needed to use the other tools in the box to really push the battery out. Could not do it that gently. But anyway succeeded! v
All three tabs broke immediately for me. Take your time with the pick, using a sawing and poking motion as described and never cross the threshold of the grip sensor cable. If you're struggling in removing the adhesive, I had great success with using the IPA dropper with high concentrate isopropyl alcohol, applying a few drops, waiting a minute, trying the pick, and repeating. Good luck, you got this.
-
-
-
Soulevez la batterie pour la retirer du téléphone.
-
Retirez les restes d'adhésif dans le compartiment de la batterie.
-
Si vous utilisez des bandes adhésives étirables, appliquez-les sur la batterie. Sinon appliquez de la bande adhésive double-face, ou une carte adhésive pré-découpée dans le compartiment de la batterie, en faisant attention à ne pas recouvrir la nappe du port de charge. Retirez tous les films protecteurs pour exposer l'adhésif.
-
Reconnectez temporairement le connecteur de la batterie à sa prise sur la carte mère. Cela permet de s'assurer que la batterie est bien positionnée.
-
Posez la batterie sur l'adhésif et appuyez fermement.
-
Déconnectez le connecteur de la batterie de sa prise sur la carte mère et reprenez le remontage.
The kit comes with a replacement glue strip for the back cover. I would like to have seen some guidance on putting that on. I’m not exactly a beginner at repairing things in general, but this is the first time I’ve worked on a phone. Figuring it out wasn’t too bad, but getting the old glue off enough to make it work added 15-30 minutes to the process.
This is what I’m sitting at now. probably 90% of the original glue off. did you put the replacement strip on the cover first or the body of the phone?
For this, I peeled off the white strip and placed the new adhesive (with blue template still on) onto the inside of the back cover, making sure it aligned. I then peeled off the blue sheet and applied pressure and a mostly-cooled iOpener to help it adhere. Worked very well for me.
You can follow this adhesive guide for installing new battery adhesive!
-


Pour des performances optimales, calibrez votre nouvelle batterie après avoir terminé ce tutoriel.
Comparez votre pièce de remplacement avec l'originale. Il se peut qu'il faille transférer des composants ou retirer des attaches adhésives de la nouvelle pièce avec de l'installer.
Pour remonter votre appareil, suivez les étapes ci-dessus dans l'ordre inverse.
Amenez vos déchets électroniques à un recycleur R2 ou de déchets électroniques certifié.
La réparation ne s'est pas déroulée comme prévu ? Essayez un diagnostic de base, ou demandez de l'aide dans notre Forum.
Annulation : je n'ai pas terminé ce tutoriel.
92 autres ont terminé cette réparation.
Merci à ces traducteurs :
100%


Ces traducteurs nous aident réparer le monde ! Vous voulez contribuer ?
Commencez à traduire ›


37 commentaires
Worked great, was tough pulling up the battery but other than that went super smoothly. thanks!!
Really comprehensive, helpful and well-written guide. I prefer to learn to fix things on my own, so this was immensely helpful and just what I needed. Thank you so much!
the adhesive pull tabs? there was no way to get them out as the hardware prevents you from pulling at the right angle. i went with softening the glue with a couple drops of alcohol and prying the battery up enough to get a guitar pick in and cut the rest.
Just finished changing the battery to my Pixel 4XL. Battery was slightly bloated (about 1mm) but still running great, at 104% after one year and a half. However, it suddenly stopped charging wirelessly, even from the original Pixel charger.
The kit was great, everything happened according to the instructions. Carefully cleaning the old adhesive took most of the time. I used lint-free wipes and a small syringe filled with Isopropyl alcohol 99.9% to drop the liquid over the adhesive strips in small sections, with the phone positioned vertically, so the alcohol didn’t get inside. Same for the rear cover [Regular rubbing alcohol does not work at all for this purpose] The alcohol really helped removing the old stretch release strips really fast. The connector of the new battery was slightly out of alignment, so I had to plug it first, with the battery leaning at a small angle, then seat the battery on the glue strips. Thank you, that was fun! :)
Great tutorial. I followed all the steps. And, even with the new battery, it's still stuck in 50%.
My phone took a dive in the pool. I love in Brazil, do I don't have Google technical support available, and due to battery mailing restrictions it took 6 months until I managed to receive a spare one.
Do you guys know what could I do?
Thanks
it is stuck both while turned on and while off? does the battery life is decreased? or is it only a broken report of battery %age? while you tore down the phone, did you see any corrosion aroud?
Same problem here, but the Pixel turns on and work.. just don't recognize the level of battery.. it shows a "?" icon in the battery's icon...
Some times turns off or on without any sense.. so i don't know if its a problem of battery (the original one, i didn't change it yet) or the weird"Battery FPC Connector"... Just because i can change a battery, nut i can't do a "Damaged Battery FPC Connector Replacement". So if someone knows please tell me if i need a battery replacement or a FPC Connector replacement :c
Wow. I’ve fixed about 10 phones now and I’ve always had issues getting new adhesive tape delivered without being mangled into an unusable crumpled ball. They packaged it between two thin pieces of plastic and it arrived in perfect condition. They also don’t use plastic bubble wrap as their insulating material which is a refreshing change.
Thanks for the informative guide, competitive price and quality service!
Hi, I'm having issues with my Pixel's battery and I wanted to buy the kit for battery replacement, but I'm from Mexico.
Do you know if there's a place with international shipping? I would like to buy that kit.
Sorry to hear about the trouble! Please contact iFixit Customer Support and they would be happy to assist you.
Great guide. I only wish there was a bit more details in the application of the adhesive in the re-assembly.
That said, my 17-year old son was able to follow the instructions and resurrect his Pixel 4XL that had been destined for the trash bin.
Thank you!
I ordered a new battery kit from iFixIt for my Pixel 4 XL ([produit lié absent ou désactivé : IF356-158]) with the intent to use this guide.
From what I've seen elsewhere on the internet, I expected the battery to say either "Huizhou Desay Battery Co., Ltd" or "Sunwoda Electronic Co., Ltd". However, that portion of the label is blank -- there is no company name listed.
It also has 3700 mAh on the front label but the rear has a QR code and some text printed including "3740 mAh".
I'm concerned about the legitimacy of this battery.
Changed the battery to the second Pixel 4XL. Obviously, it went faster. Having some highly concentrated isopropyl alcohol (>99% by volume) makes your life a lot easier when clearing the gunk and dislodging the battery.
What I want to mention is: please DO NOT RUSH. Take your time, do it elegantly. For the first time changing a battery, 30 minutes estimated time is a little too optimistic. Scrapping off the old gunk from the phone and the back cover took more than I thought, but it’s a cheap price to pay for a job done well. It was fun!
IFixit rocks!
Overall this is a really well made guide, instructions for disassembly are clear and the pictures are definitely helpful. I do wish the guide actually showed the best ways to apply new adhesive though. It’s not hard to figure out but just taking out the battery and doing the steps backwards again isn’t really a complete reflection of the job.
I was getting this warning from my Pixel 4XL “problem reading your battery meter”. Ordered the battery and repair kit. Works great now, error message is gone. The glue ring around the back plate is definitely the most annoying thing. I doubt the phone is water resistant now, but I’m still very happy with this repair.
This is totally my fault that this happened, because I didn’t read both guides thoroughly before starting, but there needs to be a big red “STOP” symbol at the top of this guide that says “Stop! If you intend to replace your screen, start there first. Do not replace the battery and replace the rear cover prior to replacing the screen.” I am out 2 hours of my life and have to wait for another back adhesive piece. But the bright side is the battery works great and combined with a fresh factory reset the phone is running like new.
Just did it. It was tough to get passed the glue thing on both the back cover and the battery, but I did it successfully. Now I have the phone as new, apart from the fact that the phone is not water resistent. I would add new steps to describe how to reseal with new glue and where to buy it. However, I just used the iOpener to reheat the glue so that it attaches again. Taking into account that I use the pixel cover, that shouldnt be a problem.
Help me battery
Thank you for this very GREAT GUIDE. My Pixel 4XL stopped wireless charging due to the internal battery being "bloated". It was of great help also because you have mentioned the tools needed; i.e. T3 driver, removing the battery adhesive was a pain though as all three of them broke at the very moment it was pulled. Nonetheless the entire replacement process took about 40 minutes following this guide, now it is sleek and thin and wireless charging is back.
I followed the guide exactly and somehow my display has been damaged. The haptics still work so I know its on and the touch screen works but the display doesn't power on. Please help.
The lack of explanation for the back glass adhesive is pretty bad. It's a major reassembly step that is just completely skipped over with completely no mention and kind of complicated in comparison to the rest of the process IMO. It really needed to be in here so I've added a comment with regards to it. The generic adhesive instructions that have been posted in the comments aren't helpful for this at all either. Outside of this major instruction flaw the rest was solid and spot on. The phone has been fixed and Is working properly once again for way less than having someone else fix it.
I have assembled the battery but it is not charging: connected but not charging. Can anyone help me solve this problem?
mine didnt charge at first aswell mb try reconnecting the battery
took me 5 tries of reconnecting
corni -
my phone battery started getting worse and worse and didnt display % so i decided to try my luck on replacing it. some small tips from me:
-things u need(from ifixit store): the battery replacement, adhesive strips for battery and back, the iOpener kit and a torx t3 4mm precision bit which is sold separately...
-hardest things when repairing: battery was very hard to get out... i had a friend help me and gently nudged some plectrums under it to make it easier... other hard thing was reconnecting the battery for me... i reconnected it 5 times and on the last try i finally got it right and the phone worked again. that little connector can be tough but still try to be gentle.
Honestly I would not recommend, as the pins on the battery connector broke off after a month of installation. I opened my phone back up to see why my phone would no longer charge and I see that the battery pins got stuck on the phone and that the battery connector on the battery itself was missing. I wish I could post pictures, but bottomline is that this product's build quality is inferior.
Great tutorial and excellent kit! My 3-year old Pixel 4XL could not read the battery meter with a '?' on the battery icon. The adhesive part was pretty fiddly. Apart from that, instructions worked like a charm and my phone has a new lease of life!!!
Thanks!
Hey! For the safest repair possible, we like to disconnect the battery as soon as we're able. In this case, it's accessible right after the back cover lifts away.
Hi Carsten, thanks for the reply. I made the repair today using this guide. Because my battery was replaced under warranty some time ago, things looked a bit different inside. The battery was installed with kapton tape, which made it very easy to remove. I found the hardest part of the process was to create a gap to begin removal of the glass back. The trickiest part was putting the battery and sensor connectors back in place. The battery is definitely charging. Fingers crossed, I haven't ruined the top sensor.
I spent about 2 hours and 40 minutes to replace the battery and reassemble the back panel.
Taking out the battery and removing the adhesive took the longest. Also, keeping the back panel connector secured while putting the screws was hard. I had to hold the cover from closing while putting the screws on with the other hand.
Overall, this guide helped a lot and I couldn't have done without it.
It was fun and nerve-racking at the same time. I'm glad I tried to change my own battery and it's working great! I added a few of my comments in the guide and hope it helps.
Good tutorial, fiddly to reassemble connectors and no instruction for fitting new back gasket. Apart from that it went well. I do have experience in mechanical and electronic assembly however.
I found 2 minutes works best per side. Great Guide btw, thank you for being a strong leader in the fight for right to repair.
Dennis - Réponse