
Remplacement du bloc ventilateurs de la Xbox 360

Introduction
Passez à l'étape 1Conservez la température optimale de votre Xbox en remplaçant le bloc ventilateurs.
Ce dont vous avez besoin


-
-
Saisissez l'ensemble disque dur et soulevez son bord avant pendant que vous appuyez sur le bouton de déblocage.
-
Retirez l'ensemble disque dur de la grille supérieure d'aération.
-
-
Outil utilisé dans cette étape :Xbox 360 Opening Tool$4.99
-
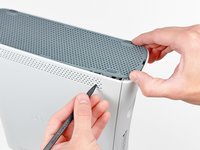
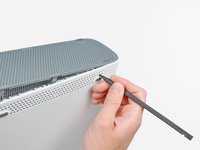
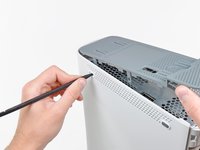
Insérez la pointe d'une spatule ou l'extrémité d'un outil pour ouvrir la Xbox 360 dans le petit trou sur le bord avant de la grille inférieure d'aération.
-
Faites levier entre le bord avant de la grille et la plaque frontale pour les écarter légèrement.
You can avoid this step by pulling the front cover off. Just make sure you don't break the springs for the USB bay area.
Hello, thank you ifix for this guide, I followed this guide, I got stuck at some point but I resolved it. Also I want to share this resource: Step by Step guide to fix Xbox 360 errors it helped me go through all the things associated with Xbox 360 and the troubleshooting of errors. Hope this can also help you all.
-
-
-
Insérez le bord plat d'une spatule (spudger), entre la plaque frontale et le boîtier extérieur à côté du bouton power.
-
Parcourez avec votre spatule le bord de la plaque frontale pour ouvrir les clips la fixant à l'avant de la console.
The faceplate just pulls off, using a tool is completely unneccessary. https://beta.support.xbox.com/help/xbox-...
-
-
-
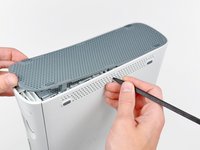
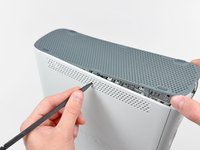
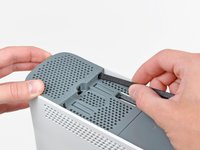
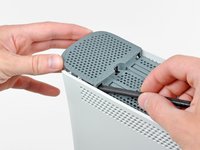
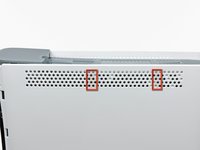
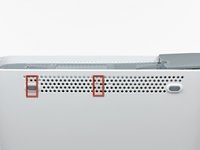
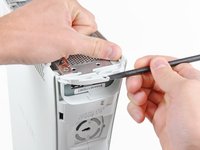
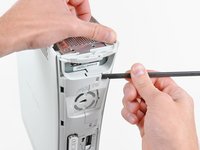
La grille supérieure d'aération est fixée par des clips à la console. Les deux premiers clips se trouvent sous la grille du côté le plus proche de la plaque frontale, comme indiqué sur les photos.
-
-
-
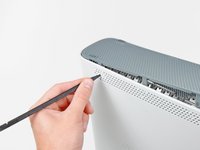
Insérez l'extrémité plate d'une spatule (spudger) dans les petits espaces mentionnés pour ouvrir les clips.
I found this step difficult. I wasn't able to see where the clips were from the pictures. If you look at step 14 you can see what the clips look like after the vent is taken off. Once you realize where they are it is a lot easier.
-
-
-
-
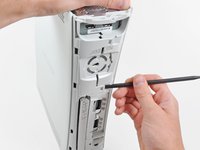
Posez la console à la verticale, avec le bord supérieur vers le bas.
-
Décollez délicatement l'autocollant de garantie de la console.
LOL “Romove the warenty seal”
-
-
-
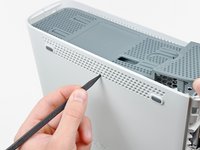
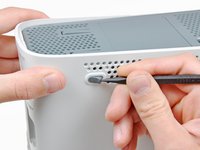
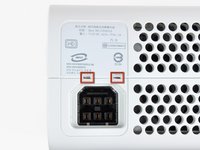
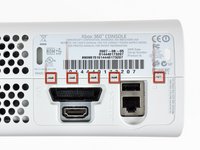
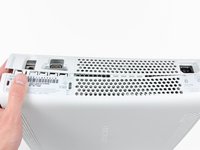
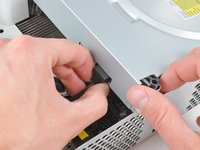
Insérez l'outil pour ouvrir la Xbox 360 dans les clips de fermeture à côtés des ports E/S et appuyez.
-
Pendant que vous appuyez sur l'outil, éloignez les boîtiers inférieur et supérieur pour ouvrir les clips.
I didn't have an XBox tool, so I followed instructions in this video for this step (https://www.youtube.com/watch?v=qaxIB6cX...) to pry it open with your fingers and a screwdriver.
The small (metal) women's hair clip is best for un-latching the tabs. The screw drivers just make the holes bigger.
You can also use the pointed end of a plastic spudger to push each clip free while you separate the case with your free hand.
-
-
-
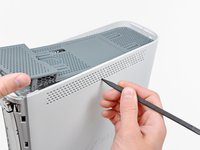
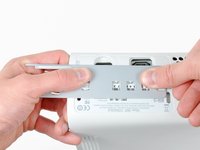
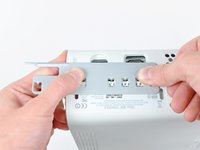
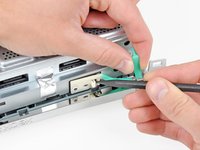
Pendant que vous éloignez les boîtiers supérieur et inférieur, poussez le long clip entouré en rouge vers le milieu de la 360 avec la pointe d'une spatule ou un outil pour ouvrir la Xbox 360.
-
Une fois ce clip ouvert, les deux boîtiers ne sont plus que fixés par les clips à côté du connecteur d'alimentation.
-
-
-
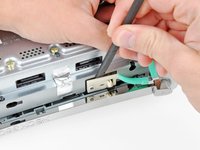
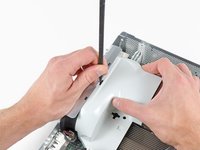
Avec la pointe d'une spatule (spudger), ouvrez le clip fixant le bouton Éjecter au boîtier métallique.
-
Insérez l'extrémité plate d'une spatule entre le bouton Éjecter et le lecteur optique.
-
Faites levier sur le bouton pour le décrocher et enlevez-le de la 360.
-
-
-
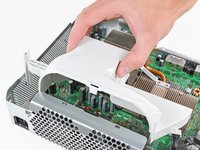
Dévissez les six vis argentées Torx T10 de 64 mm, fixant le boîtier supérieur au boîtier métallique.
-
-
-
Décollez la bande adhésive argentée fixant le lecteur optique au boîtier métallique.
Looking at mine, I doubt it. It looks like standard foil tape
-
-
-
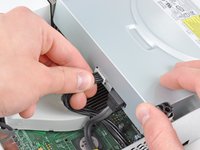
Saisissez le connecteur d'alimentation par les câbles et tirez-le tout droit hors de sa prise sur le lecteur optique.
-
Déconnectez le connecteur de données SATA de sa prise sur le lecteur optique en tirant tout droit.
I found the power cable to be very tough to get out, at least it is the first time doing this.
I found it much easier to remove the SATA cable after lifting the assembly mostly out of the case.
-
-
-
Sortez l'ensemble lecteur optique du boîtier métallique.
Be careful not to lose or break the two teeny metal clips securing the optical drive assembly snugly to the metal casing on either side of the drive's front face. I used a spudger to press in the topmost tines on these clips because they were catching on the drive and bending up. The clips should stay on the metal housing, not come off with the drive.
-
-
-
Insérez l'extrémité plate d'une spatule dans la petite ouverture rectangulaire sur le dessus du canal du ventilateur de refroidissement.
-
Ouvrez délicatement le clip fixant le canal du ventilateur et retirez le canal de la Xbox.
-
Vous pouvez aussi vous servir du doigt métallique de l'outil pour ouvrir la Xbox 360.
Fair warning for people using this guide for maintenance, the inside will likely have a coating of fine dust or dirt
-
-
-
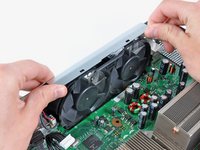
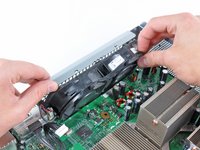
Soulevez le rebord du châssis en métal au-dessus du bloc ventilateurs et tirez les ventilateurs vers le milieu de la carte mère.
Cleaning out the fan now, will help problems in the future.
Do Step 35 first (remove the fan connector from the motherboard), otherwise as you pull the fans forward out of the metal bracket you risk stressing the connector's attachment to the motherboard (because the fans will press against the connector as you pull them forward).
There are small black feet on the bottom of the fan assembly, You can push up from the bottom of the case if needed.
these are powerful fans. im having over heating issues with a brushless motor. anything less than a 120mm pc fan does nothing. but i must keep the top off to fit the 120 and adequate heat removal. so i wanna use tbis turbo fan and mount i ti the lid.
how do i remove the blades and get to the bearings and guts??
theres no rear access hole hiding under the specs sticker.
please help! thank
-


Pour remonter votre appareil, suivez les étapes en sens inverse.
Pour remonter votre appareil, suivez les étapes en sens inverse.
Annulation : je n'ai pas terminé ce tutoriel.
42 autres ont terminé cette réparation.
Merci à ces traducteurs :
100%

Claire Miesch nous aide à réparer le monde ! Vous voulez contribuer ?
Commencez à traduire ›

WARNING: Just replacing the drive will not make it work correctly. Microsoft has married the drives to the motherboard. Hence, in order to get full operation out of the drive you'll have to perform more steps not listed here. Search in the FAQ on this specific topic for more details. Otherwise, before buying a new drive, try cleaning the inside of the old one and/or replace the belt involved in opening and closing the drive door.
- Good Luck
Eric - Réponse
Thanks..helped!
joseph zulu - Réponse
bress the button and lift with the same hand! i thought mine was stuck because of this pic!!!
Maths with Luigi - Réponse