
Remplacement du vibreur de l'iPhone 3G

Introduction
Passez à l'étape 1C'est le vibreur de l'iPhone.
Ce dont vous avez besoin


-
-
Lorsque la vitre de votre iPhone est brisée, évitez toute autre casse ainsi que des blessures éventuelles en scotchant la vitre.
-
Posez des bandes adhésives transparentes se chevauchant sur la vitre de façon à la couvrir complètement.
-
-
-
Retirez les deux vis cruciformes #00 situées près du connecteur de dock de l'iPhone.
-
-
-
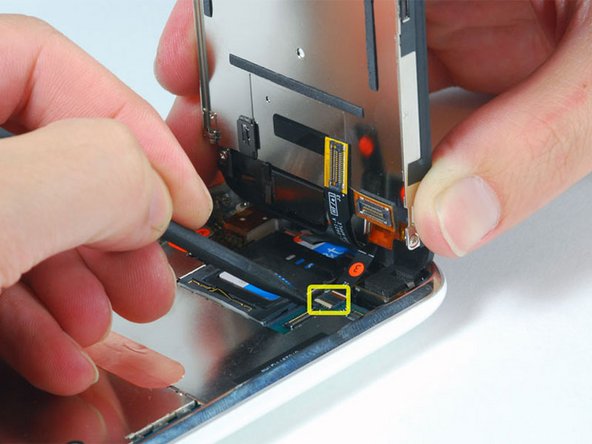
Tenez l'écran avec une main, avec l'autre et à l'aide d'une spatule (spudger), déconnectez la nappe noire marquée "1".
I also went the route of skipping steps 4-16. If you do this, be careful with the front panel since you have just enough room to turn it while it's connected to give you access to the vibrator assembly. The angled tweezers (Part # IF145-020-5) were a lifesaver for replacing the two tiny screws to the vibrator assembly. Also, you might have an issue vibrate not working after you replace the front panel. I fixed this by pushing on the vibrator assembly a splunger while giving each screw another slight turn. It's barely noticeable, but doing that should allow the vibrator to work without hitting the front panel assembly.
-
-
-
A l'aide d'une spatule (spudger), soulevez la languette en plastique blanche à rabat, qui maintient la nappe "3". La languette blanche va pivoter de 90° et relâcher la nappe.
-
Dégagez la nappe noire de son connecteur et retirez l'écran complet de l'iPhone.
can i buy a replacement plastic tab for holding ribbon as mine jumped out when installing new parts if so is there a parts no or price
Following this guide, while trying to "flip up the white plastic tab", it broke (it is the BLACK one that should be flipped) and now I have a 600 EUR paperweight.
On my 3G, there is both a white & black plastic tab; it is the BLACK one that needs to be flipped up 90 degrees...
Normally iFixIt is awesome with the details, but this oversight left me sad, annoyed, and without an iPhone :( :( :(
Citation de casemon :
Following this guide, while trying to "flip up the white plastic tab", it broke (it is the BLACK one that should be flipped) and now I have a 600 EUR paperweight.
On my 3G, there is both a white & black plastic tab; it is the BLACK one that needs to be flipped up 90 degrees...
Normally iFixIt is awesome with the details, but this oversight left me sad, annoyed, and without an iPhone :( :( :(
That's not right, just put my iPhone in parts and on the 3G it's definitly a white plastic which should be flipped!!
Guide worked like a charm!
Thx for this guys!
bg
Citation de M R :
That's not right, just put my iPhone in parts and on the 3G it's definitly a white plastic which should be flipped!!
Guide worked like a charm!
Thx for this guys!
bg
Perhaps I wasn't clear; some have white and some have black; consider yourself one of the lucky ones! This oversight can be costly otherwise.
-
-
-
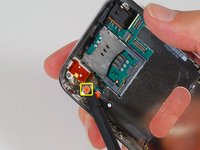
Insérez un éjecteur de carte SIM ou un trombone dans le trou près de la prise jack.
-
Appuyez sur l'outil pour éjecter le tiroir de carte SIM.
-
Saisissez le tiroir de carte SIM et retirez-le de l'iPhone.
I was able to skip steps 7 - 11, then I removed the 5 screws holding the logic board in. This allows enough space that when the screws holding the vibrator in are removed, the vibrator can be carefully tilted up and out and the new vibrator can be tilted in since the contacts are springs. This works great and saves a lot of time and less removal of phone parts. Have a nice set of electronic tweezers to help in grasping parts.
-
-
-
Retirez les 8 vis suivantes :
-
Cinq vis cruciformes #00 de 2,3 mm à filetage partiel, qui attachent la carte mère au boîtier arrière.
-
Deux vis cruciformes #00 de 2,3 mm à filetage total, qui maintiennent la carte mère et la caméra.
-
Une vis cruciforme #00 de 2,9 mm sous l'autocollant "Do not remove".
-
-
-
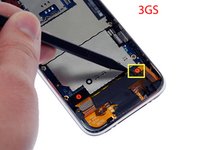
A l'aide d'une spatule (spudger), retirez le clip (maintenu auparavant par les vis) qui retient la caméra, faites levier sur la caméra pour la soulever et retirez-la de son emplacement dans le boîtier arrière. La caméra ne peut pas encore être enlevée complètement, car elle est connectée au fond de la carte mère.
-
-
-
Soulevez le vibreur et retirez-le de l'iPhone.
Replacing the motor, I have just done two phones. One makes a rattly vibrate noise, which I think a bit reminscent to my iPhone 3G when new. The second I used a small dollop of neutral cure silicone between the case and motor (staying away from the rotating mass). The annoying vibration noise is not present on the phone with the silicone, so I will redo the first.
Interestingly, the two phones had different motors. Both iPhone 3G 16GB - one black and one white bought at the same time. One had the motor with coil spring contacts, the other had the bent metal contacts. I decided to replace with the coil spring contacts having read a possible issue with vibration affecting the bent metal contact.
Try changing the screws around, I had this same issue and I`d just put the screws the wrong way around. As soon as I changed them back around, the vibrate motor worked perfectly and sounded normal again. If they are the wrong way around, the vibrator will work intermittently and make the entire phone vibrate.
Luke -
-


Pour remonter votre appareil, suivez les étapes dans l'ordre inverse.
Pour remonter votre appareil, suivez les étapes dans l'ordre inverse.
Annulation : je n'ai pas terminé ce tutoriel.
54 autres ont terminé cette réparation.
Merci à ces traducteurs :
100%


Ces traducteurs nous aident réparer le monde ! Vous voulez contribuer ?
Commencez à traduire ›

5 commentaires
After you are done with the replacement and get everything back in place, hard reset the phone as it is the only way to turn it on.
I have just successfully replaced the motor, remarkably straightforward (though in parts very fiddly), and an excellent guide up to step 6.
Couple of tips -
Step 2: The screen really comes up with a jerk, I actually pulled off a connector with the initial separation and was very lucky nothing broke. Be very gentle with the initial separation.
Step 6: The white/black parts were reversed on mine, I guess it's fairly random. But all you need to know is that you very carefully flip up the smaller section, whichever colour it may be.
At this point, I had access to the motor so I tried my luck. It came out, and the next one went in, with great ease. You do not need to go any further than step 6 to do this fix. The small section of the motor still covered just slides out with a gentle tug, and my replacement is working fine.
After step 6, you can replace the vibration motor by loosening the two screws. You can then tilt the motor from below the motherboard. All the other steps are unnecessary.
I just replaced a 3GS vibration motor with a 3G vibration motor, and yes, it works.
apple 3g ear speaker is not working
thank you so much