Aller au contenu principal

Nexus 5X Teardown

Anglais
Allemand

Traduction de l’étape 4

Étape 4
Nexus 5X Teardown: étape 0, image 1 de 3 Nexus 5X Teardown: étape 0, image 2 de 3 Nexus 5X Teardown: étape 0, image 3 de 3
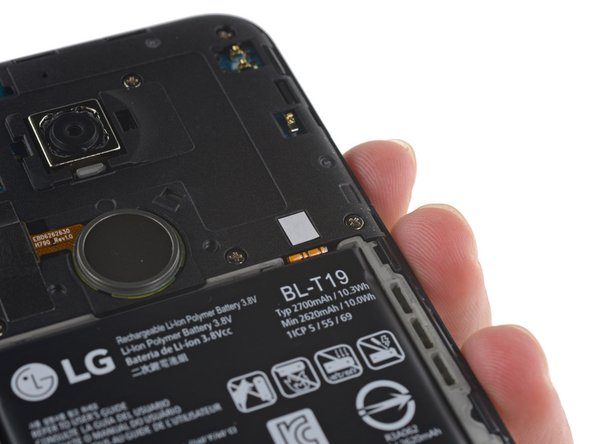
  • That wasn't so bad! Things are looking up for the 5X as we get our first glimpse at the interior of the phone.

  • The Wi-Fi, MIMO, and GPS antennae still reside on the rear case, along with the NFC antenna which formerly lived on its own control board. Unfortunately, those super convenient labels from the Nexus 5 have transformed into cryptic codes.

  • Luckily, this sticker on the inside of the back panel has all the essentials: IMEI, country of origin, and the model number: LG-H790.

  • Our spirits soared as we spied the 2700 mAh battery sitting in plain view—a removable battery is hard to come by these days.

  • But alas, it was not to be. The battery connector is squirreled away beneath the midframe, and it's totally inaccessible for now.

War doch gar nicht so schlimm! Es sieht gut aus für das 5X, als wir unseren ersten Blick auf das Innenleben dieses Smartphones erhaschen.

Die Wi-Fi, MIMO, und GPS Antennen befinden sich noch immer im Rückgehäuse ebenso wie die NFC Antenne, die bisher auf ihrem eigenen eigenen Kontrollbord war. Leider sind diese super praktischen Labels des Nexus 5 nun in kryptische Codes umgewandelt worden.

Glücklicherweise beinhaltet der Code auf der Innenseite der Rückschale alle wichtigen Informationen: IMEI, der Ländercode des Ursprungslands, und die Modellnummer: LG-H790.

Wir waren echt erfreut, als wir den 2700 mAh Akku so offen im Telefon liegen sahen. So einen entfernbaren Akku findet man heutzutage leider nicht mehr oft.

Aber zu früh gefreut. Der Akkustecker liegt unter dem Mittelrahmen und ist im Moment überhaupt nicht zu erreichen.

Vos contributions sont faites dans le cadre de la licence open source Creative Commons.