Il est possible que cette traduction ne reflète pas les dernières mises à jour du tutoriel source. Aidez à mettre à jour la traduction ou bien consultez le tutoriel source.
Introduction
Suivez ce tutoriel pour remplacer l'écran cassé ou défectueux de votre Nokia G42 5G.
Ce tutoriel est destiné à un ensemble d'écran Nokia G42 5G d'origine. L'ensemble comprend l'écran et le châssis central en une seule pièce. Assurez-vous d'avoir la bonne pièce avant de commencer cette réparation écran Nokia G42 5G.
Remarque : cette procédure nécessite le transfert de tous les composants internes de votre téléphone sur le nouvel écran.
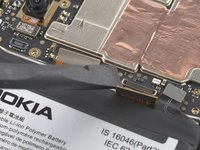
Pour votre sécurité, laissez la batterie Nokia G42 5G se vider en dessous de 25 % avant de vous lancer. Cela réduit les risques de déclencher un incendie dangereux si jamais vous abîmez accidentellement la batterie pendant la réparation. Si votre batterie Nokia G42 5G est gonflée, prenez les précautions nécessaires et ne chauffez pas votre téléphone.
Ce dont vous avez besoin
-
-
Éteignez votre téléphone et débranchez tous les câbles.
-
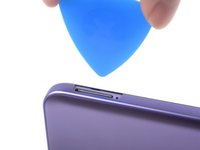
Insérez un outil ou embout éjecteur de tiroir de carte SIM ou un trombone dans le petit trou dans le tiroir de la carte SIM, en haut du bord gauche du téléphone.
-
Appuyez fermement pour éjecter le tiroir.
-
-
-
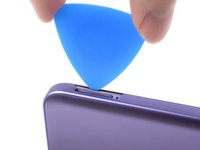
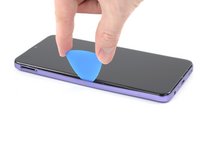
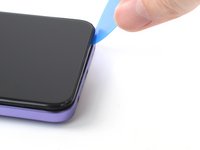
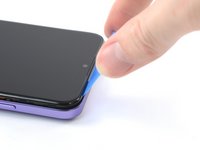
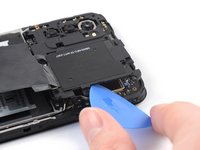
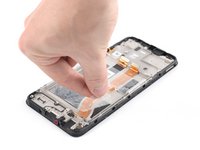
Insérez un médiator sous la petite encoche dans le compartiment du tiroir de carte SIM.
Don't try to fully remove the back cover just yet, as it's still connected with a cable.
-
-
-
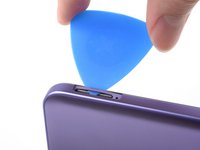
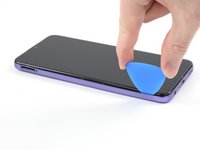
Inclinez le médiator. Il doit former un angle aigu entre la coque arrière et l'ensemble écran.
-
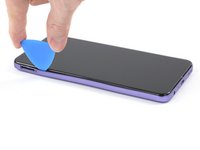
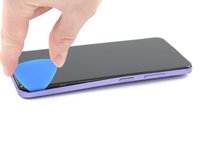
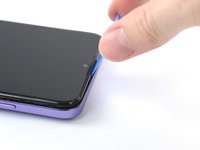
Faites glisser le médiator vers le bas, le long du bord gauche du téléphone, pour défaire les clips en plastique.
-
-
-
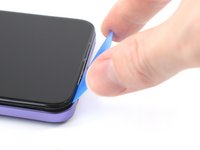
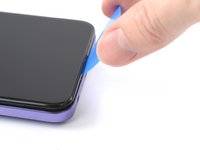
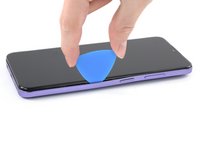
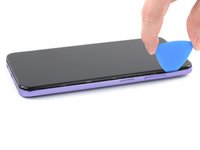
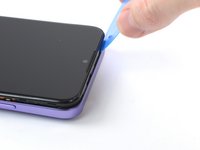
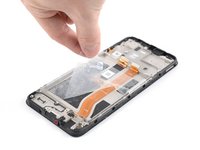
Faites glisser le médiator le long du bord droit, vers le haut, pour défaire les clips en plastique.
-
-
-
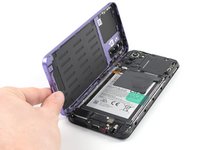
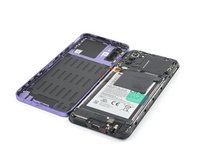
Le téléphone étant positionné écran vers le bas, faites soigneusement pivoter le bord droit de la coque arrière, comme si vous ouvriez un livre.
-
Posez la coque arrière à côté du téléphone.
Das ist nicht das Kabel für den Fingerabdrucksensor, sondern für den Ein-/Ausschalter und der Schalter hat sich bei mir gelöst und es hat mir einige Nerven gekostet das Maleur wieder zu beheben. Der Schalter ist nur sehr lose eingeclipst und muss dann zum Drehen und befestigen des Kabels am Motherboard mit dem Vorderteil gedreht werden.
-
-
-
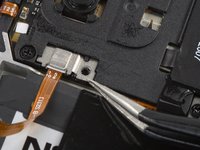
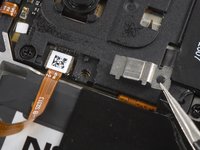
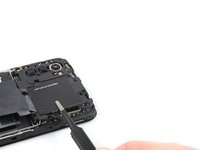
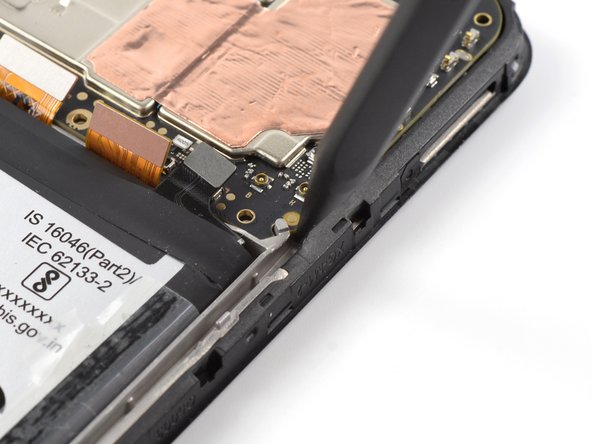
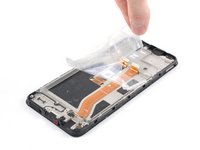
À l'aide d'un tournevis cruciforme, retirez la vis de 3,8 mm de long qui fixe le cache du lecteur d'empreintes digitales.
-
-
Outil utilisé dans cette étape :Tweezers$4.99
-
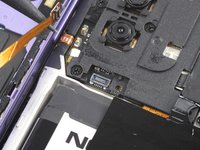
Utilisez une pincette ou vos doigts pour enlever le cache du lecteur d'empreintes digitales.
-
-
-
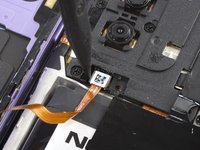
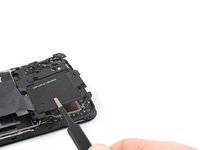
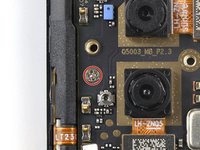
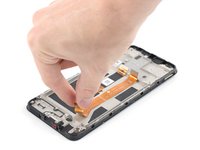
Utilisez l'extrémité plate de votre spatule (spudger) pour déconnecter le lecteur d'empreintes digitales en soulevant son connecteur tout droit hors de sa prise.
-
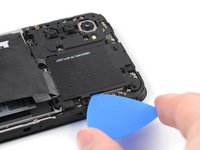
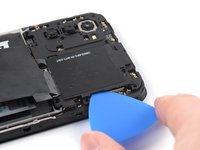
Retirez la coque arrière.
-
-
-
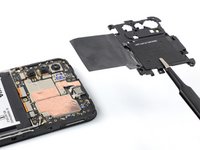
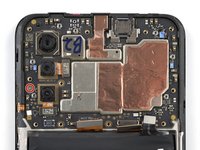
Utilisez un tournevis cruciforme pour retirer les dix vis de 3,8 mm de long qui fixent le cache de la carte mère.
-
-
-
Insérez un médiator sous le bord droit du cache de la carte mère.
-
Tournez votre médiator pour défaire les clips en plastique.
-
-
-
-
Utilisez une pincette ou vos doigts pour retirer le cache de la carte mère.
-
-
-
Utilisez l'extrémité plate d'une spatule pour déconnecter la nappe de la batterie en soulevant son connecteur tout droit hors de sa prise.
-
-
-
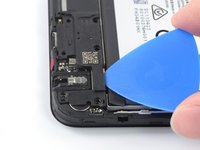
Utilisez un tournevis cruciforme pour retirer les huit vis de 3,8 mm de long qui fixent le haut-parleur.
-
-
-
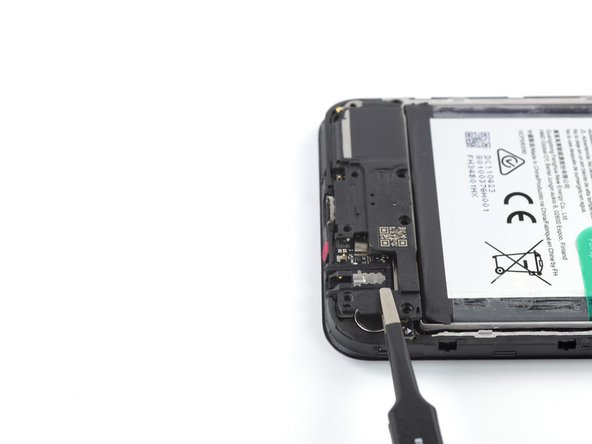
Insérez un médiator sous le bord droit du haut-parleur.
-
Tournez le médiator pour détacher les clips en plastique qui maintiennent le haut-parleur.
-
-
-
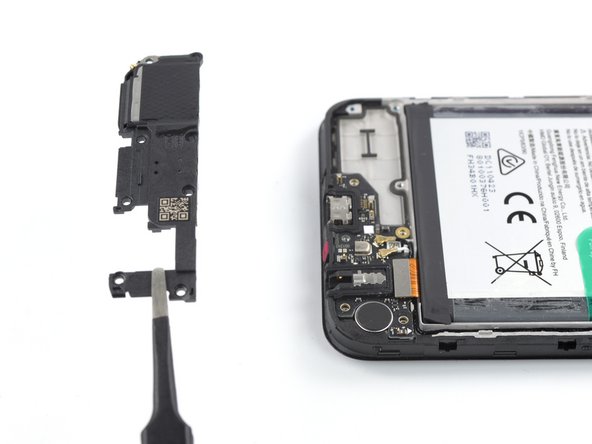
Utilisez vos doigts ou une pincette pour retirer le haut-parleur.
-
-
-
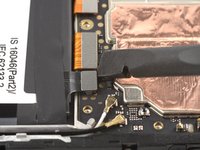
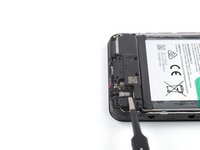
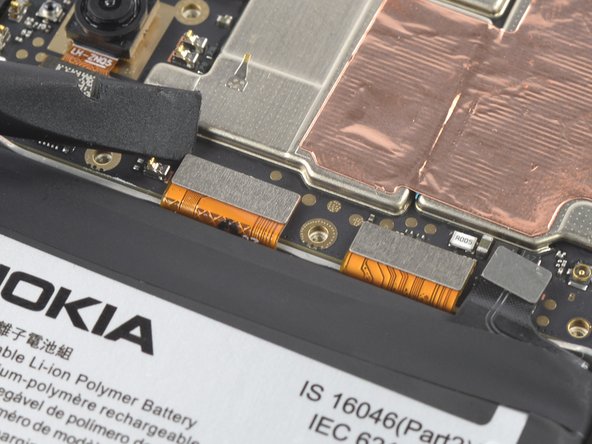
Utilisez l'extrémité plate d'une spatule pour déconnecter la nappe d'interconnexion en soulevant le connecteur tout droit hors de sa prise.
Hello there, I have damaged the interconnect cable during the screen replacement process, do you offer replacement cables for sale?
Hello Oliver, unfortunately we currently do not have interconnect replacement cables available in the iFixit store. In this case, please reach out to Nokia Phones support!
-
-
-
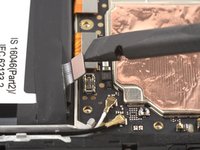
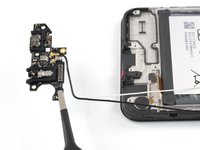
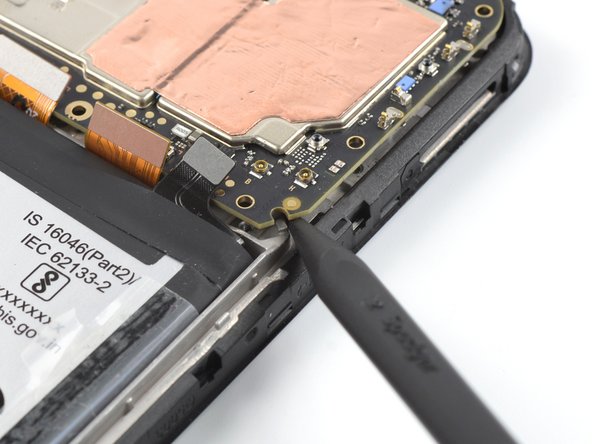
Utilisez une spatule pour déconnecter les deux câbles d'antenne en soulevant leurs connecteurs tout droit hors de leurs prises sur la carte mère.
-
-
-
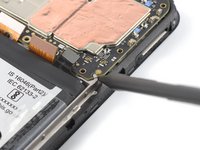
Utilisez une pincette ou vos doigts pour soulever les câbles d'antenne de leur rainure dans le châssis.
-
-
-
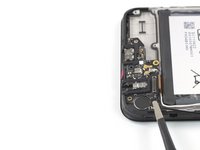
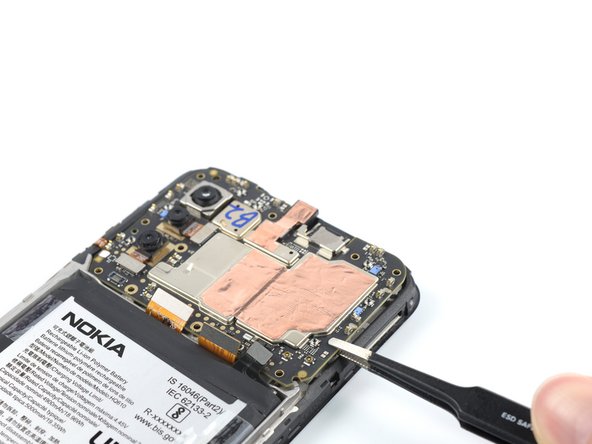
Insérez l'extrémité plate d'une spatule sous le bord supérieur de l'ensemble port de charge.
-
Soulever l'ensemble port de charge, jusqu'à ce que vous puissiez le saisir avec vos doigts.
-
-
-
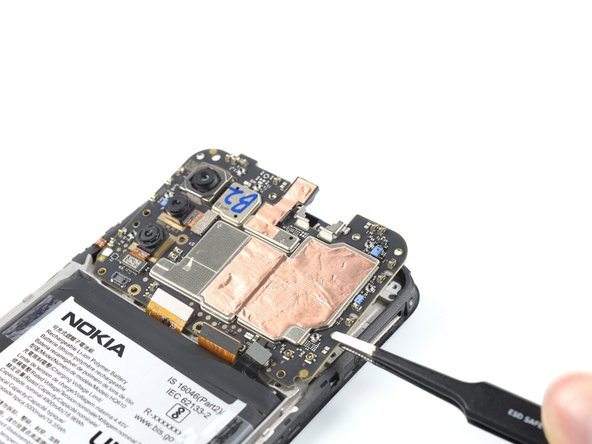
Ôtez l'ensemble port de charge avec une pincette ou vos doigts.
-
-
-
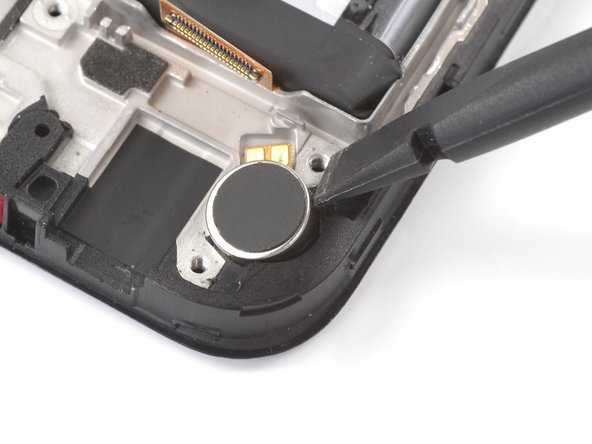
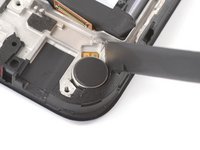
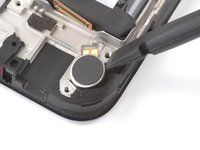
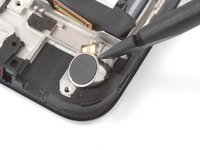
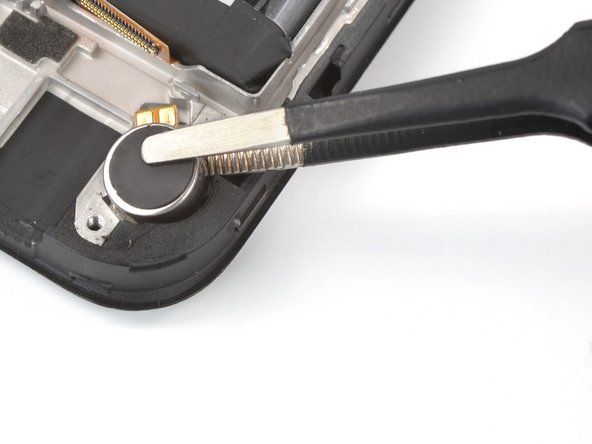
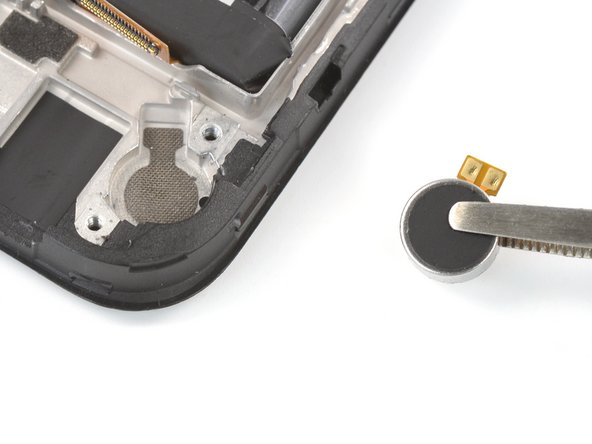
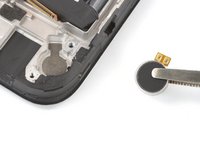
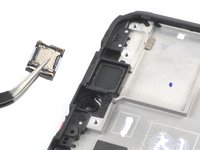
Insérez l'extrémité plate d'une spatule dans la petite encoche en haut du côté droit du vibreur.
-
Faites pivoter la spatule pour soulever le vibreur et le décoller de son adhésif en dessous.
I could not insert the flat end of the spudger into the small recess to remove the vibration motor. In the end I used a very small flat screwdriver to lift it up.
J'ai du utiliser une lame fine la spatule ne rentre pas
-
-
-
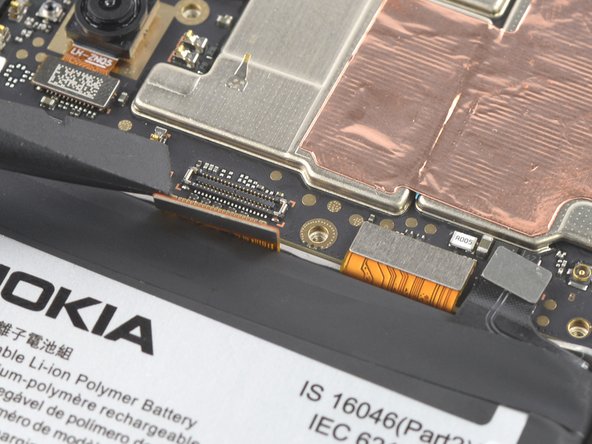
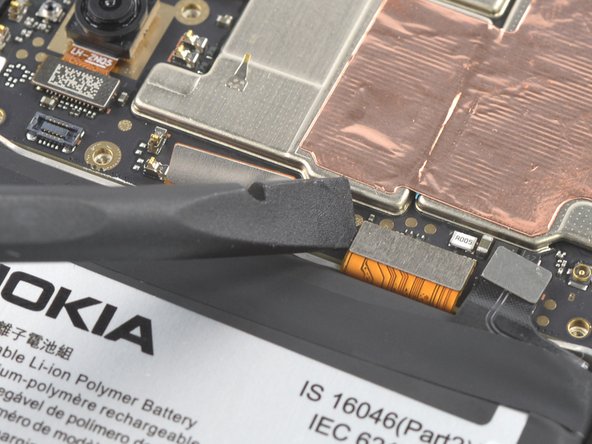
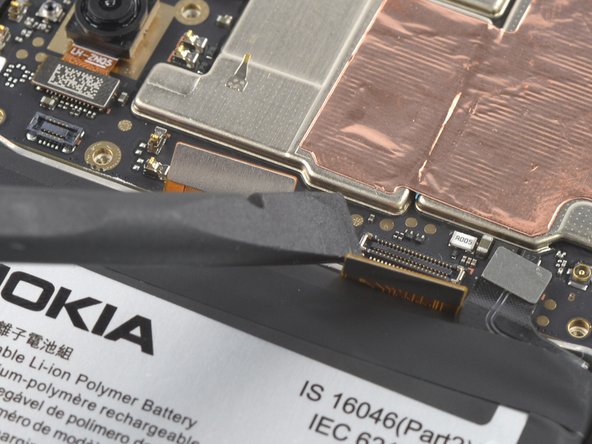
Utilisez l'extrémité plate d'une spatule pour déconnecter la nappe d'écran en soulevant son connecteur tout droit hors de sa prise.
Upon re-assembly the display cable of the new assembly was somewhat longer than the old assembly, I could not reconnect it because there was a little bit too much strain on the cable while bending it. I had to remove the battery again (fortunately I had not applied pressure yet to glue it in place), so I recommend to install the battery after attaching the display cable.
-
-
-
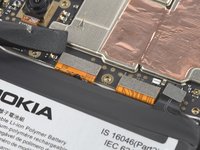
Utilisez l'extrémité plate d'une spatule pour déconnecter la nappe d'interconnexion en soulevant son connecteur tout droit hors de sa prise.
-
-
-
Utilisez un tournevis cruciforme pour retirer la vis de 2,8 mm de long qui fixe la carte mère.
please do not use red circles when the board is green. I actually missed the screw almost.
-
-
-
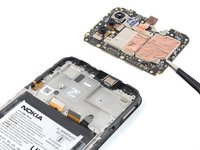
Insérez la pointe d'une spatule sous le coin inférieur droit de la carte mère.
-
Soulevez la carte mère en faisant levier, jusqu'à ce que vous puissiez la saisir avec vos doigts.
There is a clip near the top right screw that the motherboard fits under. When re-assembling, make sure you fit this corner in under the clip first, or the motherboard sits on top of it and the screw ill not engage with the threads in the hole - the motherboard will sit proud by about 1mm.
-
-
-
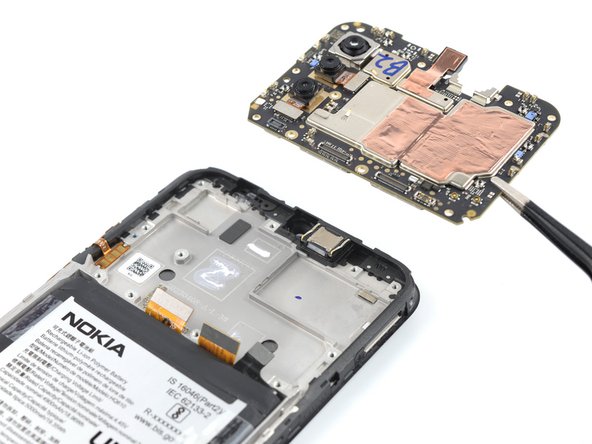
Saisissez la carte mère sur le bord droit à l'aide d'une pincette ou de vos doigts.
-
Ôtez la carte mère.
-
-
-
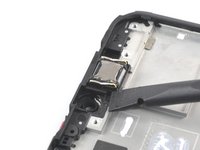
Insérez l'extrémité plate d'une spatule sous le coin inférieur gauche du haut-parleur et faites levier pour le faire sortir de son logement.
-
Retirez le haut-parleur interne.
-
-
-
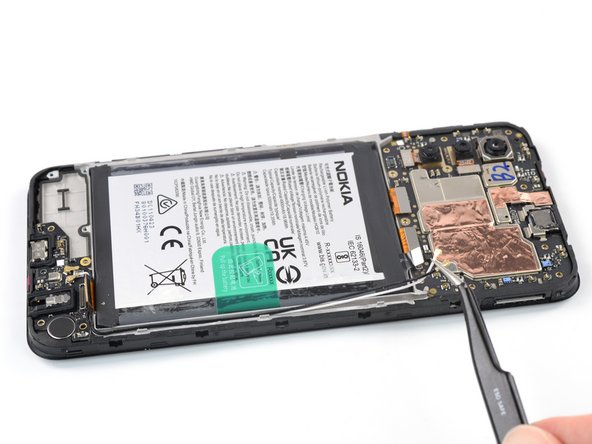
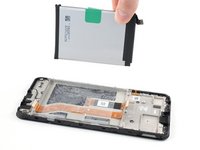
Avec vos doigts, décollez les deux languettes adhésives extérieures de votre batterie.
Please see also step 26: Upon re-assembly the display cable of the new assembly was somewhat longer than the old assembly, I could not reconnect it because there was a little bit too much strain on the cable while bending it. I had to remove the battery again (fortunately I had not applied pressure yet to glue it in place), so I recommend to re-install the battery after attaching the display cable.
-
-
-
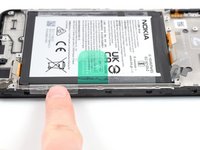
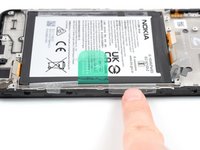
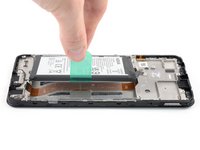
Utilisez vos doigts pour décoller la languette d'extraction verte au milieu de la batterie.
-
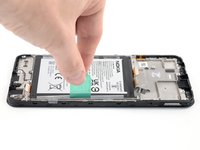
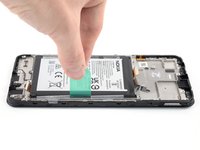
Utilisez une main pour maintenir le téléphone et soulevez lentement et de façon constante la languette verte centrale avec l'autre main, pour séparer l'adhésif qui fixe la batterie en dessous.
-
Si vous rencontrez des difficultés avec l'adhésif de la batterie, vous pouvez contacter l'assistance dédiée aux téléphones Nokia.
-
-
-
Saisissez le bord droit inférieur du film adhésif restant.
-
Tirez-le de façon constante vers le haut du téléphone pour le retirer.
-
Réattachez le film adhésif à la batterie.
-
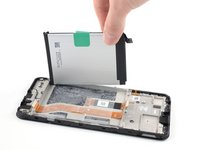
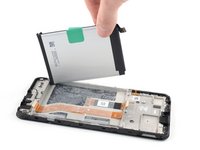
Alignez le bord inférieur de la batterie (le bord sans adhésif) avec le bord inférieur du compartiment de la batterie.
-
Posez la batterie dans son compartiment et appuyez fermement dessus pour qu'elle adhère correctement.
-
-
-
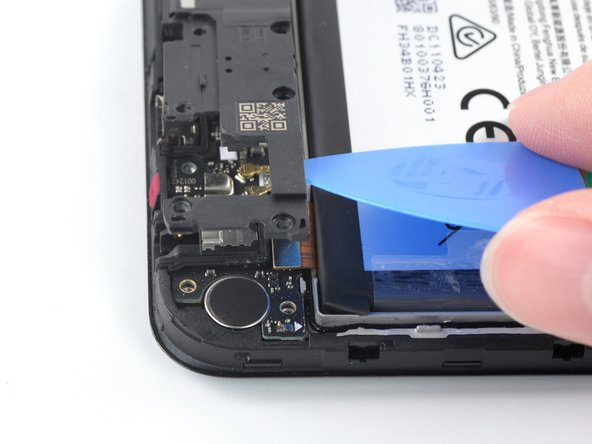
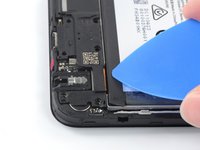
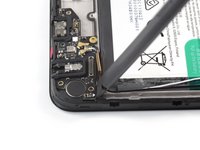
Saisissez la partie inférieure de la nappe d'interconnexion et décollez-la vers le haut du téléphone pour la retirer.
Please see also step 26: re-install the battery after you have reconnected the interconnect cable to the motherboard.
-
-
-
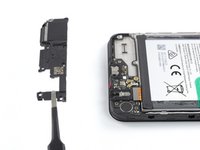
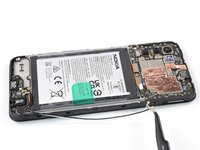
Il ne reste plus que l'ensemble écran.
After replacing the screen myself, the phone stopped receiving the network. I had to throw it away and buy a new phone. Waste of money for screen
Hello Igor, sorry to hear that you experienced issues following your repair. It sounds like the issue might have been caused by the antenna cable being damaged or disconnected. In these cases, we recommend physically reseating the connectors of the antenna cable on both motherboard and daughterboard as well as checking the cable and connectors for signs of damage. If this doesn't help, you can contact Nokia's phones support to get further support.
This worked like a charm! It wasn’t too frustrating and my phone is as good as new!
how can i remove the assemble, i broke my screen and cant find a guide on how to remove and replace the screen
Hi there! The replacement part in this case is the screen assembly, so not just the screen but the midframe and buttons. Therefore, the repair consists in moving the components to the new screen assembly without removing / replacing the screen itself. Hope this helps!
I ordered a screen + frame kit off Amazon but the new frame does not come with the power and volume buttons connector attached. Your guide does not show how to remove this part from the old frame and place it on a new one. Is this possible or should I buy a screen-only kit and attempt to attach it to the old frame?
Hi Daniel! The genuine replacement part available in the iFixit Store should include pre-installed buttons. Transferring the buttons is pretty finnicky and not generally recommended, but definitely possible. The buttons are held in place by adhesive that can potentially be reused for the new frame. Doing a screen-only repair would require a different procedure and application of heat and suction to remove the old screen.
Indeed, had the same issue. The buttons are mildly glued, so you can gently pull them off. Used a needle for it, there are small indents you can use.
jos -
-


Pour remonter votre appareil, suivez ces instructions en sens inverse.
Déposez vos déchets électroniques dans un point de recyclage certifié.
Votre réparation Nokia G42 5G ne s’est pas déroulée comme prévu ? Consultez nos conseils basiques de diagnostic ou notre Forum pour obtenir de l’aide.
Pour remonter votre appareil, suivez ces instructions en sens inverse.
Déposez vos déchets électroniques dans un point de recyclage certifié.
Votre réparation Nokia G42 5G ne s’est pas déroulée comme prévu ? Consultez nos conseils basiques de diagnostic ou notre Forum pour obtenir de l’aide.
Annulation : je n'ai pas terminé ce tutoriel.
8 autres ont terminé cette réparation.
Merci à ces traducteurs :
88%


Ces traducteurs nous aident réparer le monde ! Vous voulez contribuer ?
Commencez à traduire ›


43 commentaires
followed all your rules and snapped the inside of my phone thank you
Hi Lee, sorry to hear that you experienced issues during your repair. Could you provide me with additional information about which step / action caused this? If you assume the repair is not salvageable, please contact Nokia's phones support to get further support.
Pretty straightforward. Followed instructions to the letter - everything went back together fine.
I followed the Instructions and it worked perfectly. Ready in under 1h.
Unacceptable..., screen assembly parts are out of stock.
Could you make it more friendly to users?
Hi Wang, Shou-Cheng,
Good news: screen assembly parts are back in stock again! Additionally, we offer a notification option so you'll get an info email as soon when the item is restocked. Hope this helps!
Bought replacement screen and was sent just screen with digitizer no frame like all repair shown no frame so sat to replace now its in bit and uable to complete it
Hi Chris Bryant,
Unfortunately, we weren't able to match your information with an order. Did you buy the replacement part from iFixit? If so, please contact our customer support (eustore@ifixit.com for EU orders or support@ifixit.com for Non-EU orders), so we can help you get the issue sorted out! Thanks!
The disassembly was fine, but the instructions for reassembly (i..e. NONE) were disappointing. Some guidance on how to align and re-connect the interconnect cable would have been helpful. I now have a phone with a beautiful new screen, but I can't use it because there is no sound and I can't charge it. I'm assuming because the interconnector was damaged in all my attempts to line it up. Of course, you can't buy this cable.... so now I get to throw away the phone AND the new screen
Hi Caroline,
sorry to hear about your problems during reassembly. We will add a reassembly note for the interconnect cable based on your feedback. Have you checked whether the cable connecting to the charging port assembly is seated properly? Please also note our basic troubleshooting information. If you assume the repair is not salvageable or in order to get guidance on a replacement interconnect cable, please reach out to Nokia phones support.
Just exactly the same thing happened to me. I was so excited about fixing my phone, everything was so easy and clear until the moment of re-connecting the interconnect cable. I was struggling few hours and then I realised that the speaker doesn't work and the phone is not charging. Caroline, did you manage to do something with it?
How and where can I buy this cable?
Hi Monika Marchlińska,
I'm sorry that you encountered a problem with the interconnect cable during your repair. We've added reassembly notes to the guide to help with the realignment. If you assume the repair is not salvageable or you want to inquire regarding a replacement interconnect cable, please reach out to HMD support.
I reached HMD support, who told me to contact eustore@ifixit.com which I did, but they told me to post on the forum and noone replied. Is there any opportunity that the interconnect cable will be for sell? Just like other parts?
Hi Monika Marchlińska,
Sorry that you've been routed around on this issue. I've forwarded it internally to try and find a solution for the situation.
Manuel Haeussermann, I'm waiting :)
Manuel Haeussermann did you find any solution? If I could just buy the interconnect cable, that would be great
Hi Monika Marchlińska, Unfortunately, it does seem like the solution to this is still in the works, but I'll ask again. Please apologize the delayed response.
Hi toffvs,
Screen assembly parts are back in stock again, with Fix Kits following shortly! Additionally, we offer a notification option so you'll get an info email as soon when the item is restocked. Hope this helps!
More steps than I initially thought there would be when I bought the phone, but generally quite straight forward. I had to adjust the interconnect ribbon after installation (removing the battery, again). Maybe the step of replacing the battery could be done a little later, when the ribbon cables are set? I think it could be done nearly at the end of re-installation.
Hi Kyle Eyvindson, thanks for the feedback! We've added reassembly notes to the guide to make realigning the interconnect cable more straightforward.
What a complete waste of time. followed the steps new screen didn't work. followed the troubleshooting and replaced the broken screen and phone works. tried the new screen a second time and no joy. So put phone back together with the old broken screen. Love the idea that the Nokia can be fixed. Shame the quality control on the replacment screens is poor.
Hi pd1,
I'm sorry to hear that you encountered issues during your repair. Considering that your replacement part might be non-functioning, please get in contact with our customer support (eustore@ifixit.com for EU orders or support@ifixit.com for Non-EU orders), so we can help you get the issue sorted out! If you assume the repair is not salvageable, please contact HMD support to receive further support.
Took me about an hour, have added a few comments to the instructions. Phone seems to be working fine.
Hi robincm,
Happy to hear about the successful repair and thank you for your input!
Hi, after assembly I have my screen full of horizontal white stripes, any idea how to troubleshoot?
Hi Dino,
It's difficult to assess remotely, but it may be an issue with the cable or the connector. You might try reseating the display connector to see if anything changes as well as check the cable for damages. Please also check our general troubleshooting info. If you assume the repair is not salvageable, please contact HMD support to receive further support. If you assume that the display or the display cable is defective, contact iFixit customer support (eustore@ifixit.com for EU orders or support@ifixit.com for Non-EU orders), so we can help you get the issue sorted out!
I have the same issue, screen full of parallel white lines, I have opened the phone again checked if any damage to the screen cable which I could not appreciate, I reconnected it, reassembled everything but the issue is still there.
Isasi -
Hi Isasi,
I'm sorry you encountered this issue during your repair. Considering you've reconnected the cable and inspected it for damage, the cause might be a defective replacement part. Please contact iFixit customer support (eustore@ifixit.com for EU orders or support@ifixit.com for Non-EU orders), so we can help you sort it out!
telefoon in en uit elkaar gehaald, scherm vervangen met de instructies en wat geduld allemaal gelukt maar nu werkt mijn microfoon niet meer tijdens het bellen of opnemen van een video... kunnen jullie me helpen?
Hi eva,
I'm sorry to hear that you encountered issues during your repair. Based on your description, I assume every other function is working properly? If so, it might point to an issue with the earpiece speaker, it might face the wrong direction or the pins might not make contact with the motherboard. See Step 31 for information on the reassembly of the earpiece speaker. Please also see our general troubleshooting guidance.
Thanks to the guide and the iFixit replacement part, I managed to complete this in an hour or so. First time I'd bought a screen without a frame; don't make my mistake! Definitely get the frame version from here. I've got one screw left as well - hopefully nothing too important...
Was pleasantly suprised the screen and frame came with extra battery adhesive and a tube of thermal paste too, which was handy.
He seguido la guía en castellano y es muy útil. Yo soy un usuario que no suelo montar ni desmontar dispositivos electrónicos y he conseguido que funcionara perfectamente. Eso sí el proceso es algo complejo y requiere de mucha paciencia e insistencia. La traducción está muy bien hecha. ¡Muchas gracias he ahorrado tiempo y dinero en la reparación de mi pantalla y he aprendido algo sobre como funciona un smartphone!
I was expecting instruction on how to replace the screen but the instructions seem to stop before this critical step.. It would also be helpful to have a reassembly guide!
Hi Happy Bunny,
As noted in the introduction, this guide is written for the genuine Nokia G42 5G screen assembly. The screen assembly consists of the screen and midframe together as one part. A replacement of just the screen would require a different procedure and tools.
I've managed to mess up when reattaching the charging port ribbon cable to the charging port. It won't click into place, so I think I must've bent some of the pins. I can see you can buy the charging port assembly fairly easily, but am unsure if it's the cable that's damaged or the connector in the board.
Does anyone know where I can get a g42 charging port ribbon cable replacement from? Or if a replacement from another Nokia phone will work? I can see they are replacements for other models on eBay.
Thanks!
Hi Stefan, Nokia G42 5G Screen Fix Kits are now back in stock! Sorry for the wait time!
I bought this phone because it was repairable, with a good partnership between HMD and iFixit. At least, I thought so...
It is unacceptable that spare parts are out of stock and that no availability date is mentioned. I am registered on the list to be notified when it will be back in stock but there is no indication whether I will have to wait 1 day, 1 week, 1 month or 1 year before being able to repair my device.
I am somewhat disappointed by this nevertheless great initiative that is iFixit.
Hi JMA, Nokia G42 5G Screen Fix Kits are now back in stock! Sorry for the wait time!
The push buttons for on/off and volume are not adressed in this description. Please add
Hi there, any idea when this fix kit (Item # IF318-010-2) is back in stock. I signed up for the email notification, but just curious how long I might be waiting. Also does the screen in the kit come with the mid-frame as I don't want to make the same mistake as mentioned in the comment below?
Thanks to the guide and the iFixit replacement part, I managed to complete this in an hour or so. First time I'd bought a screen without a frame; don't make my mistake! Definitely get the frame version from here. I've got one screw left as well - hopefully nothing too important...
Was pleasantly surprised the screen and frame came with extra battery adhesive and a tube of thermal paste too, which was handy.