Aller au contenu principal
Motherboard Disconnection (Screen)

Motherboard Disconnection (Screen)

Alex Diaz-Kokaisl

Alex Diaz-Kokaisl et 2 autres contributeurs

Dernière mise à jour le June 4, 2024

15 - 30 minutes
Modérée
Conditions préalables uniquement
Ce tutoriel est uniquement destiné à être utilisé comme prérequis d'autres tutoriels. Il ne se suffit pas à lui-même.

Prereq for disconnecting the motherboard for the screen guide in the Kobo Libra Colour eReader.

Ce dont vous avez besoin

Outils

Afficher plus…

iFixit touche une commission lorsque vous achetez par l'intermédiaire de ces liens.
  1. Motherboard Disconnection (Screen), Soften the digitizer cables coating: étape 1, image 1 de 2 Motherboard Disconnection (Screen), Soften the digitizer cables coating: étape 1, image 2 de 2
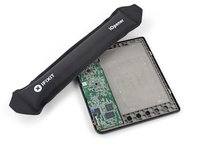
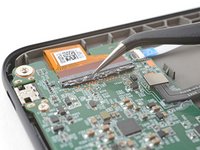
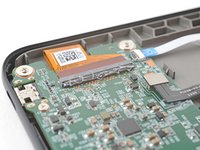
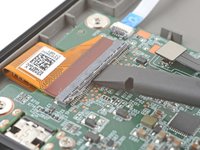
    • Heat an iOpener and lay it on the digitizer cable ZIF connectors for 90 seconds to soften the coating.

    • Alternatively, you can use a hair dryer or a heat gun for 30 seconds.

  2. Motherboard Disconnection (Screen), Remove the coating: étape 2, image 1 de 3 Motherboard Disconnection (Screen), Remove the coating: étape 2, image 2 de 3 Motherboard Disconnection (Screen), Remove the coating: étape 2, image 3 de 3
    Outil utilisé dans cette étape :
    Tweezers
    $4.99
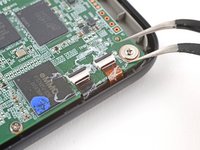
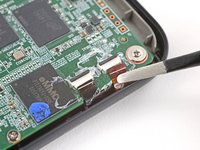
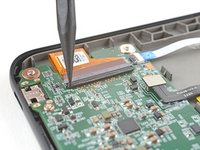
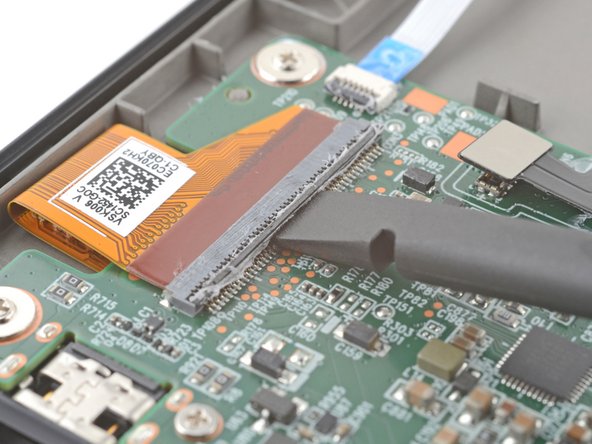
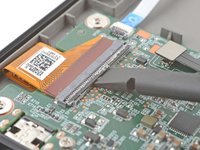
    • Use the tip of a spudger to scrape the coating along the ZIF connectors' black locking tabs—enough so you can grab clumps of it with pointed tweezers.

    • Use pointed tweezers to peel off the coating around the black locking tabs and their hinges on the ZIF connector.

    • If the coating becomes too brittle and hard to peel off, reheat the connectors and try again.

    • This is a meticulous process! Failure to remove enough of the coating could damage the locking tab during disconnection, so take your time!

  3. Motherboard Disconnection (Screen), Disconnect the digitizer cables: étape 3, image 1 de 3 Motherboard Disconnection (Screen), Disconnect the digitizer cables: étape 3, image 2 de 3 Motherboard Disconnection (Screen), Disconnect the digitizer cables: étape 3, image 3 de 3
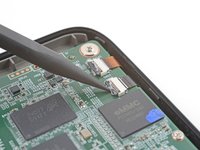
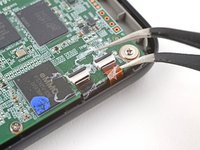
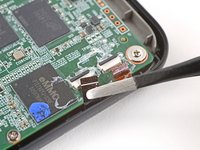
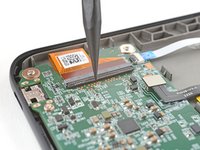
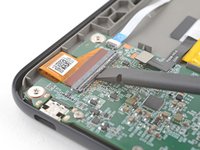
    • Use the point of a spudger to lift up the locking tabs on the ZIF connectors.

    • The locking tabs should be nearly vertical when unlocked. If not, remove more coating until the tabs can move freely.

  4. Motherboard Disconnection (Screen), Reheat the digitizer cables: étape 4, image 1 de 1
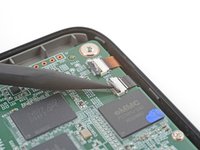
    • Apply a heated iOpener to the digitizer cable ZIF connectors for 90 seconds to soften the coating.

    • Alternatively, you can use a hair dryer or a heat gun for 30 seconds.

  5. Motherboard Disconnection (Screen): étape 5, image 1 de 3 Motherboard Disconnection (Screen): étape 5, image 2 de 3 Motherboard Disconnection (Screen): étape 5, image 3 de 3
    • Slide one arm of a pair of pointed tweezers underneath the cables to separate the coating securing them to the motherboard.

    • You only need to separate enough coating so you can grip the cables with blunt nose tweezers.

  6. Motherboard Disconnection (Screen): étape 6, image 1 de 3 Motherboard Disconnection (Screen): étape 6, image 2 de 3 Motherboard Disconnection (Screen): étape 6, image 3 de 3
    • Because of the awkward angle, this step requires some patience to avoid tearing the cables. Work slowly and apply heat regularly.

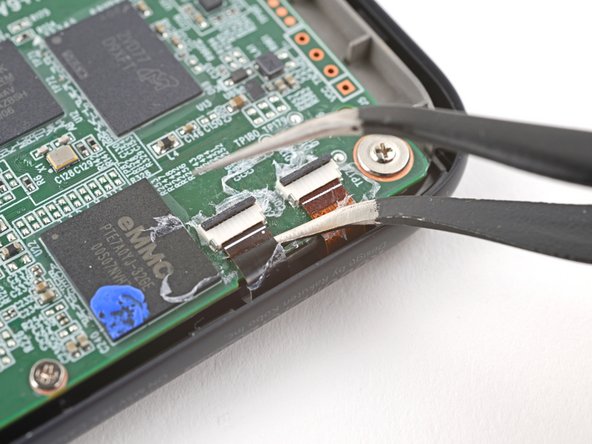
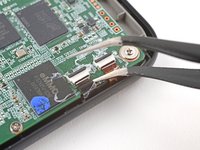
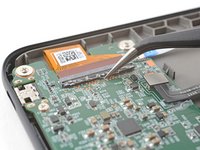
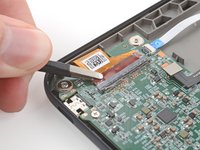
    • Use blunt nose tweezers to pull the cables away from their ZIF connectors slowly and steadily at a level angle to separate the coating.

    • Gripping the tweezers closer to the tip can help get a tighter hold on the cables.

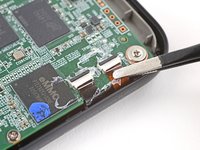
    • Keep pulling on the cables until they're completely disconnected.

    • During reassembly:

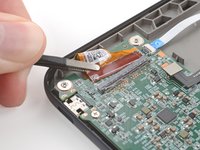
    • Inspect the ends of the cables and the ZIF connectors for any remaining coating that could prevent a good connection.

    • Peel off the coating, heating the cable and the ZIF connectors when the coating becomes too brittle.

    • It doesn't have to look pretty! You just need to remove enough coating to have the cables sit properly in their connectors.

  7. Motherboard Disconnection (Screen), Soften the display cable coating: étape 7, image 1 de 2 Motherboard Disconnection (Screen), Soften the display cable coating: étape 7, image 2 de 2
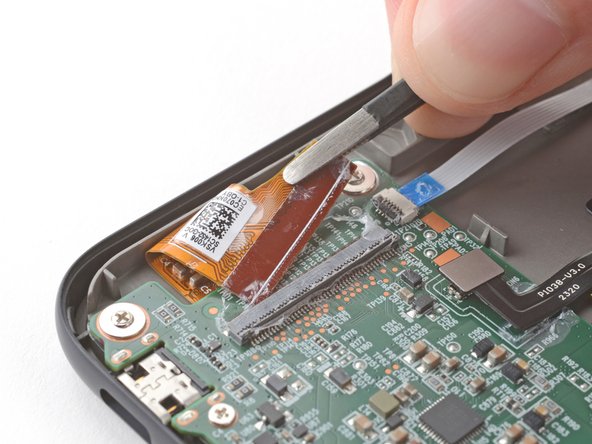
    • Apply a heated iOpener to the display cable ZIF connector for 90 seconds to soften the coating.

    • Alternatively, you can use a hair dryer or a heat gun for 30 seconds.

  8. Motherboard Disconnection (Screen), Remove the coating: étape 8, image 1 de 3 Motherboard Disconnection (Screen), Remove the coating: étape 8, image 2 de 3 Motherboard Disconnection (Screen), Remove the coating: étape 8, image 3 de 3
    • The display cable ZIF connector is larger and requires a different procedure to disconnect properly.

    • Use the tip of a spudger to scrape the coating along the ZIF connector's black locking tab—enough so you can grab clumps of it with pointed tweezers.

  9. Motherboard Disconnection (Screen): étape 9, image 1 de 3 Motherboard Disconnection (Screen): étape 9, image 2 de 3 Motherboard Disconnection (Screen): étape 9, image 3 de 3
    • Use pointed tweezers to peel off the coating around the locking tab and its hinge on the ZIF connector.

    • If the coating becomes too brittle and hard to peel off, reheat the connector and try again.

    • This is a meticulous process! Failure to remove enough of the coating could damage the locking tab during disconnection, so take your time!

  10. Motherboard Disconnection (Screen): étape 10, image 1 de 2 Motherboard Disconnection (Screen): étape 10, image 2 de 2
    • Use the flat end of a spudger to gently pry along the length of the locking tab to separate any remaining coating.

    • Don't pry hard at the corners of the locking tab to avoid snapping it.

  11. Motherboard Disconnection (Screen), Disconnect the display cable: étape 11, image 1 de 2 Motherboard Disconnection (Screen), Disconnect the display cable: étape 11, image 2 de 2
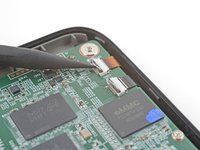
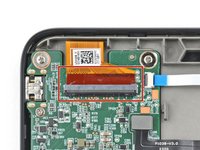
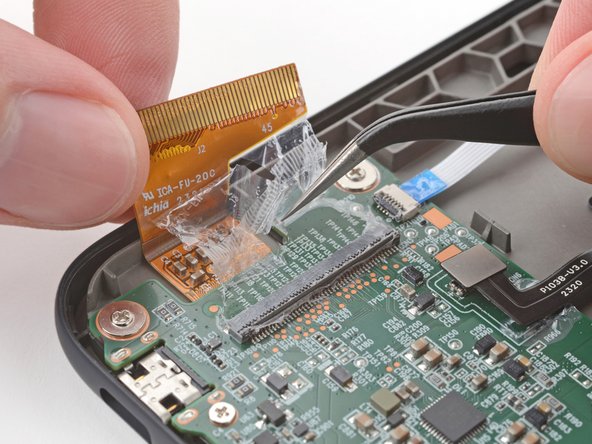
    • Insert the flat end of a spudger under the middle of the locking tab and lift to unlock it.

    • The locking tab should be nearly vertical when unlocked. If not, remove more coating until the tab can move freely.

  12. Motherboard Disconnection (Screen): étape 12, image 1 de 2 Motherboard Disconnection (Screen): étape 12, image 2 de 2
    • Use blunt nose tweezers to grip the corner of the display cable closest to the charging port.

    • Pull the cable away from the ZIF connector slowly and steadily at a level angle to separate the coating at the corner.

    • If you're having trouble, try rocking the cable side-to-side while pulling.

    • Gripping the tweezers closer to the tip can help with getting a tighter hold on the cable.

  13. Motherboard Disconnection (Screen): étape 13, image 1 de 3 Motherboard Disconnection (Screen): étape 13, image 2 de 3 Motherboard Disconnection (Screen): étape 13, image 3 de 3
    • Repeat the previous step for the other corner until the entire cable is disconnected.

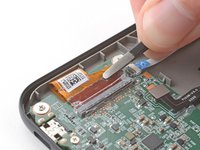
    • Lift up the cable and peel off any remaining coating holding it to the motherboard.

    • During reassembly:

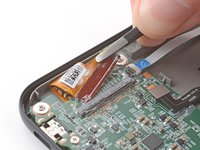
    • Inspect the ends of the cable and the ZIF connectors for any remaining coating that could prevent a good connection.

    • Peel off the coating, heating the cable and the ZIF connector when the coating becomes too brittle.

    • It doesn't have to look pretty! You just need to remove enough coating to have the cable sit properly in the connector.

Conclusion

To reassemble your device, follow these instructions in reverse order.

Alex Diaz-Kokaisl

Membre depuis le 01/16/22

165 955 Réputation

769 tutoriels rédigés

Équipe

iFixit Membre de l'équipe iFixit

Staff

120 membres

20 074 tutoriels rédigés

0 commentaires de tutoriel

Ajouter un commentaire

Nombre de vues :

Dernières 24 heures : 0

7 derniers jours : 0

30 derniers jours : 3

Total : 46