Aller au contenu principal
PowerShot G7 X Mark II Front Cover Replacement

PowerShot G7 X Mark II Front Cover Replacement

Brandon

Brandon et 2 autres contributeurs

Dernière mise à jour le May 25, 2017

40 - 55 minutes
Modérée
Photos d’action
A besoin de meilleures images

This guide will show you how to replace the Front Panel and Focus Ring of the camera if it is damaged or if the lens has gotten dirt lodged in it.

Ce dont vous avez besoin

Outils

  1. PowerShot G7 X Mark II Front Cover Replacement, Top Cover Button Panel: étape 1, image 1 de 2 PowerShot G7 X Mark II Front Cover Replacement, Top Cover Button Panel: étape 1, image 2 de 2
    • Use a Phillips #000 screwdriver to remove four 4mm screws from the NFC panel cover on the bottom of the camera.

  2. PowerShot G7 X Mark II Front Cover Replacement: étape 2, image 1 de 2 PowerShot G7 X Mark II Front Cover Replacement: étape 2, image 2 de 2
    • Use a Phillips #000 screwdriver to remove five screws from under the LCD screen:

    • Three 2.4 mm screws

    • Two 3 mm screws

  3. PowerShot G7 X Mark II Front Cover Replacement: étape 3, image 1 de 1
    • Use a Phillips #000 screwdriver to remove two 3mm screws on the left of the camera.

    the other screw (on the top) must be removed too

    oluc - Réponse

  4. PowerShot G7 X Mark II Front Cover Replacement: étape 4, image 1 de 2 PowerShot G7 X Mark II Front Cover Replacement: étape 4, image 2 de 2
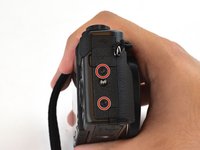
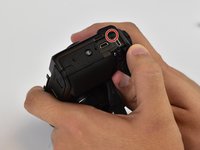
    • Use a Phillips #000 screwdriver to remove one 3mm and one 4mm screw on the surface of the right face of the camera, and one under the USB/HDMI cover.

    Use a Phillips #000 screwdriver to remove one ~6mm above the button and one 4mm screw bellow the button on the surface of the right face of the camera. Additionally, one 3mm under the USB/HDMI cover.

    Andrew Grasman - Réponse

  5. PowerShot G7 X Mark II Front Cover Replacement: étape 5, image 1 de 2 PowerShot G7 X Mark II Front Cover Replacement: étape 5, image 2 de 2
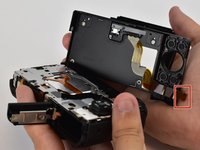
    • Carefully remove the back cover off of the camera by hand. Press the brown actuator in the FFC socket to release the FPC (Flexible Printed Circuit - brown cable attached to the back cover) and pull the FPC out of the socket.

    • If the FPC doesn't come out easily, you haven't yet released it. Do not force it. Do not use a spudger because it will break the socket. A broken socket cannot be fixed and has to be replaced by a skilled technician.

  6. PowerShot G7 X Mark II Front Cover Replacement: étape 6, image 1 de 2 PowerShot G7 X Mark II Front Cover Replacement: étape 6, image 2 de 2
    • Use a Phillips #000 screwdriver to remove two 3mm screws on the pop-up flash.

    and unclip the top hat of the pop-up flash, then push the flash back in place.

    This is needed to be able to remove completely the top cover.

    oluc - Réponse

    ~2.6 ish mm and thinner, not like the other 3mm

    Andrew Grasman - Réponse

  7. PowerShot G7 X Mark II Front Cover Replacement: étape 7, image 1 de 2 PowerShot G7 X Mark II Front Cover Replacement: étape 7, image 2 de 2
    • Use a Phillips #000 screwdriver to remove two 2mm screws attaching the button panel to the camera body.

    • Use a Phillips #000 screwdriver to remove a 3mm screw from beneath the mode dial.

  8. PowerShot G7 X Mark II Front Cover Replacement: étape 8, image 1 de 3 PowerShot G7 X Mark II Front Cover Replacement: étape 8, image 2 de 3 PowerShot G7 X Mark II Front Cover Replacement: étape 8, image 3 de 3
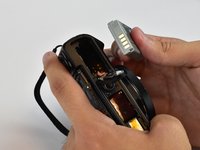
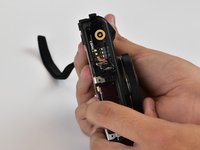
    • Open the battery compartment and remove the battery by flipping the small latch holding it in.

    • Use a Phillips #000 screwdriver to remove one 6mm screw in the bottom of the battery compartment.

    Wow I removed the battery before Step 1!!!

    JOHN J GRAY - Réponse

  9. PowerShot G7 X Mark II Front Cover Replacement: étape 9, image 1 de 2 PowerShot G7 X Mark II Front Cover Replacement: étape 9, image 2 de 2
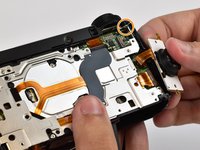
    • Pry the top cover button assembly off of the camera body by detaching clips around the base of it.

    first, detach the ZIF connector

    oluc - Réponse

    be careful when detaching the top cover : there's a small metallic part that is loose and will fall.

    This part is a ~10mm bent metal strip, with a screw hole.

    When in place it holds with the long screw from the battery compartment (step 8)

    oluc - Réponse

    hi can u please help me remove the dial wheel on the upper cover. mine become stuck and i am hoping that you could help me fix it.. thankyouu

    keith. - Réponse

    please do a tutorial on how to remove the dial wheel on upper cover..

    keith. - Réponse

  10. PowerShot G7 X Mark II Front Cover Replacement, Front Cover: étape 10, image 1 de 1
    • Use a Phillips #000 screwdriver to remove two 3mm screws on the left and one 5mm screw on the right from the front panel.

    I got

    - two 4mm screws on the left (golden-ish)

    - one 3mm screw on the right (silver)

    (rather than “two 3mm and one 5mm”)

    oluc - Réponse

  11. PowerShot G7 X Mark II Front Cover Replacement: étape 11, image 1 de 1
    • Remove the USB/HDMI panel from the right side of the camera.

  12. PowerShot G7 X Mark II Front Cover Replacement: étape 12, image 1 de 1
    • Separate the front cover and focus ring assembly from the front of the camera. Use a plastic spudger to detach the ZIF connector holding the ribbon cable connected to the focus assembly.

    That ZIF connector in step 12 was really hard to detach so I think I broke one of those little holders for it. Is there any replacement ribbon with those holders? What are my options?

    Bartol Filić - Réponse

    actually it's not a ZIF connector, so don't try to pull/push the grey “box”, you'll break it.

    It's a basic connector/socket : just gently pull the ribbon.

    you can see it for example (at 7”20’)

    https://www.youtube.com/watch?v=v0vso3CI...

    oluc - Réponse

Conclusion

To reassemble your device, follow these instructions in reverse order.

2 autres ont terminé cette réparation.

Brandon

Membre depuis le 02/15/17

626 Réputation

4 tutoriels rédigés

Équipe

USF Tampa, Team 12-3, Eyestone Spring 2017 Membre de l'équipe USF Tampa, Team 12-3, Eyestone Spring 2017

USFT-EYESTONE-S17S12G3

3 membres

4 tutoriels rédigés

2 commentaires

thank you so much for the guide!! extremely helpful, clear pictures, and easy to understand instructions.

victoria - Réponse

Please give instructions how to disassemble the flash and replace the flash capacitor. Thank you very much

Momchil Panayotov - Réponse

Ajouter un commentaire

Nombre de vues :

Dernières 24 heures : 2

7 derniers jours : 6

30 derniers jours : 40

Total : 4,318