Il est possible que cette traduction ne reflète pas les dernières mises à jour du tutoriel source. Aidez à mettre à jour la traduction ou bien consultez le tutoriel source.

Remplacement de l'écran du OnePlus 2
Introduction
Passez à l'étape 1Avant de remplacer votre écran, vous devrez retirer la batterie.
Ce dont vous avez besoin


-
-
Vérifiez que votre téléphone est éteint avant de commencer.
-
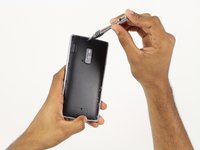
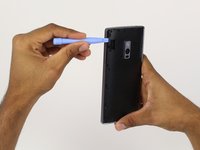
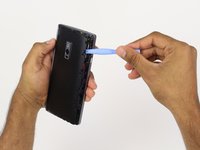
Utilisez un médiator, votre ongle ou une spatule (spudger) pour retirer délicatement la coque arrière.
-
-
-
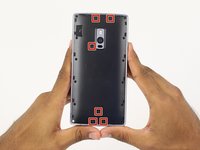
Trouvez et retirez soigneusement les 6 cache-vis en caoutchouc avec la pince à épiler.
-
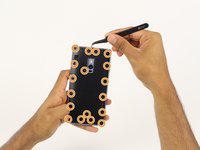
Dévissez les 18 vis du cadre central.
-
-
-
-
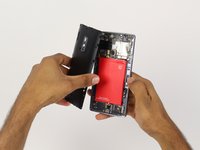
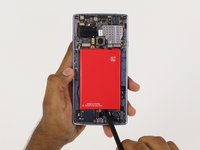
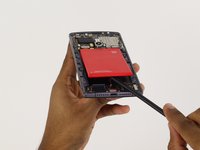
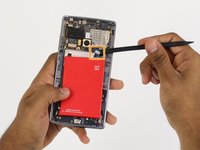
À l'aide de l'outil spudger, soulevez la batterie de l'adhésif.
-
Une fois que la batterie est détachée de l'adhésif qui la maintient enfoncée, utilisez l'outil spudger pour soulever la connexion de la batterie au téléphone en haut à droite.
The battery connection was under a black tape in my phone. Remove the tape strip first.
Removing the battery was really difficult. I had to apply a lot of force. You think something is going to break, but it eventually comes loose.
Followed the procedure and all worked as expected. Thanks for this tutorial.
-
-
-
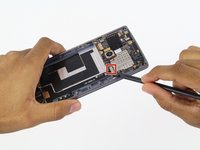
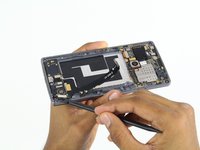
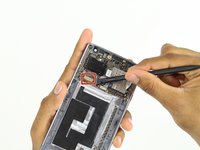
Utilisez l'outil spudger pour soulever la connexion supérieure du port de charge.
-
Suivez le câble avec le spudger et soulevez-le lentement de l'adhésif en le maintenant enfoncé.
-
Arrêtez-vous à la prochaine connexion.
-
-
-
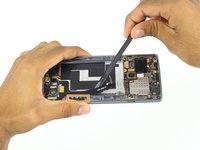
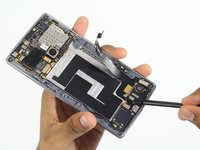
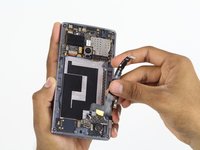
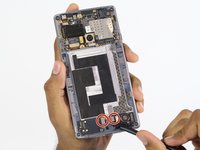
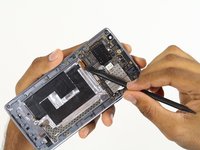
Localisez les deux connecteurs en bas du téléphone.
-
En utilisant une spatule, soulevez délicatement les connecteurs et repliez-les vers le haut du téléphone.
-
-
-
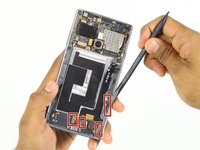
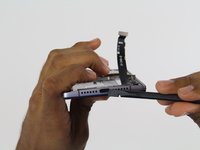
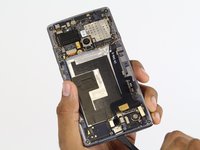
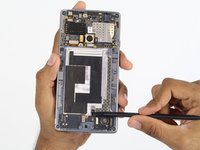
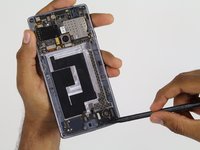
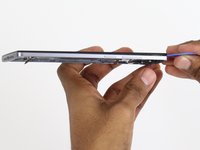
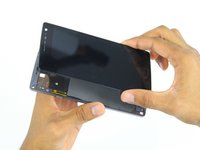
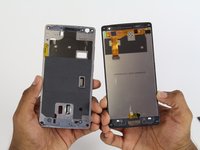
Séparez lentement l'écran du reste du téléphone.
The replacement screen sold on ifixit does come with the rear camera connection, so you can remove that with the old screen, but it does not come with the home button or charging port. Be especially careful not to damage those parts as you pull off the old screen because you will be salvaging them.
-


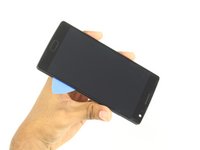


Pour réassembler votre appareil, suivez ces instructions dans le sens inverse.
Pour réassembler votre appareil, suivez ces instructions dans le sens inverse.
Annulation : je n'ai pas terminé ce tutoriel.
65 autres ont terminé cette réparation.
Merci à ces traducteurs :
88%


Ces traducteurs nous aident réparer le monde ! Vous voulez contribuer ?
Commencez à traduire ›
Équipe

Cal Poly, Team 4-5, Maness Fall 2015 Membre de l'équipe Cal Poly, Team 4-5, Maness Fall 2015
CPSU-MANESS-F15S4G5
4 membres
19 tutoriels rédigés
29 commentaires
Screen is available on internet but without frame and buttons. I bought one of those so the only pb i had was to separate capacitive buttons and fingerprint scanner from the screen. i had to separate the black plastic frame from the screen too. It takes me around 2 hours to do it but now my OP2 works with a brand new screen. Changing screen on OnePlus2 is doable and cost around 100€ but you have to be careful and patient.
Is the screen working properly??
It's the glue on the back of the screen or on the frame? Do you need to apply new glue?
krugern -
Hi, can you recommend the place where you bought your screen?
yeah what kind of glue or something do i use? I was thinking of getting the 3m Scotch Core XQ 3mm version. Would that work?
I am facing the same issue.. Does someone have a clue on getting the digitizer on the screen again ?
I replace the display but now I can't configure the fingerprint scanner. What can I do?
I used adhesive strips from here: http://www.repairpartsplus.com/Phone-Rep.... It worked well following these steps and the additional steps here: http://www.etradesupply.com/blog/how-to-....
Why do you have to remove the charging port? There seems to be no problem replacing the screen, without removing the charging port first...?
Yeah completly pointless
I used double sidded 3M Scotch Tape and its working fine. But its very important that you reattach the Captontape of the Homebutton and Flexcables in the right Position. Because those Cables have some groundingpoints on their backside. If those groundingpoints have contact with your LCD-Backplate the touch is not working properly.
Where can I buy a OnePlus 2 a2005 screen
Where can I possibly buy a screen frame thing?? Can anyone please help me.
I too need it .. Plz hlep
Kiran -
Just did the replacement yesterday.
The steps are accurate until the last step, where you'll have to move the buttons from your old screen on the new one. (or carefully buy a screen with button integrated?)
In my case buttons where glued. I had to take them appart, and glue it on the new screen.
I bought the screen on aliexpress.com along with replacement tools. 28$ with shipping cost.
I have used a double face scotch to assemble together the screen with frame, but I'm still looking for a better solution there.
Hi! Everything in the tutorial was right. Now I have a problem, I just tear apart the tape of the power button connector. Any idea on how can I link there 2 gain?
Hello all,
I've just gone through and repaired my little brother's oneplus two. We had a difficult time getting everything replaced and working at the same time. A simple screen replacement turned into a misbehaving charge port, then a malfunctioning home button. I ordered replacements for the malfunctioning parts assuming I had just damaged them. I also played around with grounding tape.
Symptoms:
- Home button acts without prompt.
- Charge Port refuses activity.
Solution:
There are a lot of screws on the back of this device. There was one specific screw that was causing us trouble. Directly over the charge port there is a cluster of three screws. The middle screw of that cluster should not be tightened too tightly. Something inside the device happens with grounding, contact, or perhaps just pressure. The charge port stops working like clockwork when it's tightened too tight.
Hope this helps some friends.
Be safe and use plastic on batteries!
I just did this job last night. As previously stated there were two steps missing.
1 - The new screen needs to be somehow glued to the phone as it requires adhesive. I used small amounts of CA glue around the outside edge
2 - The buttons & ribbon cable need to be transferred from the old screen to the new one
I noticed the lights on my buttons no longer work but the buttons still work so meh. Also I used a heat gun to heat up the phone before glass removal.
Make sure you use safety glasses when removing the glass. If you pry too hard it can shatter and spray shards of broken glass up towards you.
The comment of Mike Stelzer is very good, his advice helped me a lot.
I used this double face band to glue the display: Rayher Hobby 30069000
As with others, there were extra steps involved to transfer the touch buttons, fingerprint reader and a couple of sticky labels that were covering unused contacts on the top ribbon on the screen. It is tricky to separate the connectors of the touch buttons and the fingerprint reader since they cross over. There are circles on the screen that you need to align with holes in the backing of the touch buttons.
Some additional steps missing, such as:
- Wear vinyl (or any other non-conductive material) gloves when working on and around the electronic parts
- Clean any electronic parts you touched with isopropyl alcohol-impregnated Q-tip
- Separate the old screen from the screen frame, as the phone has 3 layers => main frame / screen frame / screen (itself, as you buy it)
- Carefully port fingerprints sensor and buttons from the old screen to the new one
- Make sure you put some non-conductive tape on the new screen at the places where there was non-conductive tape on the old screen
- Rid the screen frame of the old screen (this might take a while if your old screen is shattered, you’ll have to remove all shards, along with the original adhesive that held it onto the frame)
- Clear the main and screen frames from the original adhesive
- Put new adhesive (electronic glue or double-layered tape) on the frames at strategic places
Aside from that, very clear guide.
Took me ~4h to complete at a careful steady pace.
Thanks!
I failed to pry the battery loose. Can I use heat to soften the glue?
use a creditcard sized card to pry in from the bottom. the lift a little with card and push under the battery with that card
Thank you all for the instructions. Esspacially to Paul Wringt and Thibault Tordeurs who described the missing steps. Following these addiotional steps avoids tons of issiues. such as grounding problems. I’d like to add general advices:
- take your time for preparing the new screen. Carefully look at details on the old screen and copy them to the new one.
- remove all original adhesive and replace ist with new one. I used double-layered tape 2mm (https://www.mobiledefenders.com/tesa-tap...)
It took me 4-5 hour but it’s totally worth it.
When trying to lift the screen out, there is a thin black plastic bezel that the display sits in. Do not start to lift underneath it 😢 you need to put your plastic pick in 1 layer up. It helps to push the screen from the back with your spudger through the rounded rectangle hole pictured in Step 10 picture #2 where the guy's spudger is.
Whether you lift the screen with or without the bezel, you will need new adhesive/glue to put the screen back in. These phones are getting old now and the adhesive will not be reusable (as I've just found out the hard way - I found all these comments warning about it AFTER taking the screen out).