
Remplacement de la manette de la Nintendo 2DS
Introduction
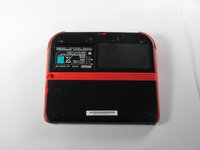
Passez à l'étape 1Nous vous apprendrons comment retirer d'abord la batterie et le panneau arrière, puis accéder au joystick à des fins de réparation ou de nettoyage.
Ce dont vous avez besoin


-
-
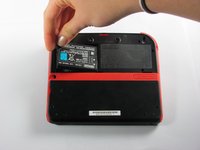
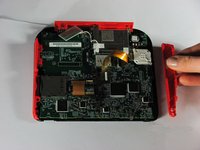
Retirez les 2 vis captives cruciformes qui fixent la coque arrière supérieure.
-
-
-
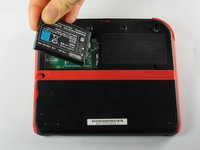
Retirez les dix vis cruciformes qui fixent le panneau arrière.
Can't take off the screw top left next to the battery. What type of screwdriver do I use and where can I find some?
I used a husky with changeable heads, you could probably find one on amazon
The screws are 6.2mm long
god I thought it was because I was repairing a sibling's ds that had something spilled on it (idk maybe that they didn't clean it good when it happened) but continued to struggle even with screws that looked fine... wish I had checked the comments sooner :/ Please like the above, update this guide! It sucks knowing that someone like me is also gonna probably miss this. I didn't get super far but well. I already stripped down some which sucks either way. Ironically, I noticed that using a size slightly smaller gets the job done better. Ironic in that you'd normally avoid that because it's more likely to strip with small bits scrapping the inside. But if you are real careful it can hang on and twist. I'd recommend just getting the JIS but maybe this might work for some- I also want to emphasize SLIGHTLY smaller phillips.
-
-
-
-
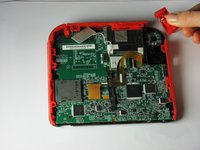
Tirez délicatement le panneau arrière de l'appareil vers le haut.
-
-
-
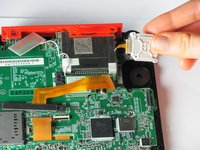
Retournez soigneusement le panneau arrière pour repérer la nappe qui y est connectée.
-
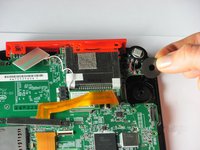
Retirez les deux vis cruciformes qui fixent la nappe au panneau arrière.
You can also detach the cable from the motherboard safely by flipping up the connector on the motherboard. Just don't forget to reattach. Some will find this tedious but may save time if you know what you're doing with said connectors.
I agree, this is what the guide i followed said to do and since I was disconnecting all the other ribbon cables it made perfect sense to do it that way.
Lin -
pay attention: my 2ds dropped it's lens covers at this step
Likewise, I used a tiny drop of glue to put the lens back in place. Take care not to dirty the lens.
The picture you have there has the camera lens ribbon installed upside down. The ribbon needs to be pointing down when you re-attach it not up.
Agreed, ribbon cable looks upside down in picture
-
-
-
Pour remonter votre appareil, suivez ces instructions dans l'ordre inverse.
-
Retirez le panneau latéral rouge droit en le tirant vers l'extérieur.
I recommend not removing the right trigger. I didn’t find it necessary and I hard a hard time getting the spring lined up again.
-
-
-
Retirez les deux vis d'angle Phillips de 2,7 mm qui maintiennent le couvercle blanc du joystick.
-
-
-
Retirez le couvercle du joystick. Il doit se détacher avec peu de force.
-
Retirez la rondelle du joystick sous le couvercle du joystick.
I completed the tutorial but my stick is now drifting by itself and I’m afraid to open it up again and try because the screws, it seems, are damaged from scratching it too much. It’s been like that for at least a year
-


Pour remonter votre appareil, suivez ces instructions dans l'ordre inverse.
Pour remonter votre appareil, suivez ces instructions dans l'ordre inverse.
Annulation : je n'ai pas terminé ce tutoriel.
25 autres ont terminé cette réparation.
Merci à ces traducteurs :
100%

Ces traducteurs nous aident réparer le monde ! Vous voulez contribuer ?
Commencez à traduire ›
Équipe

Cal Poly, Team 70-1, Forte Winter 2015 Membre de l'équipe Cal Poly, Team 70-1, Forte Winter 2015
CPSU-FORTE-W15S70G1
4 membres
35 tutoriels rédigés
12 commentaires
My ribbon cable is broke, Is there a way to fix it?Thanks.
When I put the circle pad back in, my 2DS thinks that I am holding up and right on it, when in reality it is in the neutral position. Please help.
Use the calibrate option in system settings. Also make sure the cable is connected nicely.
Recalibrate it in system settings.
The guide fails to mention that the joystick ribbon cable is locked into the motherboard. You can use a spudger to lift the grey tab, leveraging upwards on the side opposite of the ribbon cable. The tab will pop up and should make getting the ribbon cable out (and back in) easier.
I followed this guide and ripped the ribbon cable while attempting to get it connected back to the system. If I had known the grey tab unlocks, I might not have ripped the cable by trying to force it back under the pins. My iFixit tweezers were also very sharp, and may have cut the ribbon cable. Would anyone be able to recommend something gentler for the ribbon cable?
@ryango This looks like an oversight on the part of the guide author. I’ve updated the text with (hopefully) better instructions. Sorry it led to tearing your cable. :( That looks like a pretty standard ZIF connector, and once unlocked, it should disconnect and reconnect with minimal force. Personally when working with ribbon cables I prefer blunt-nose tweezers, but it sounds like your tweezers weren’t at fault here. Thanks for the heads-up, and better luck with your next repair.
I replaced my analog stick, but it has the same problem, when i turn on the system, the cursor go crazy and then stops, i can move only left and right, no up and down with two different analog sticks…so, it’s not a analog problem, do u have any idea on how to fix it? thank you
Try recalibrating it, I guess. After that, let me know how it is? I might find another possible solution.
So mine doesn't have the gray tab. Any help with that?
I've found that a Phillips #000 Screwdriver works better.
Will iFixit be selling the parts for this repair ever again?