Il est possible que cette traduction ne reflète pas les dernières mises à jour du tutoriel source. Aidez à mettre à jour la traduction ou bien consultez le tutoriel source.

Remplacement du clavier du Toshiba Satellite C55-B5200

Introduction
Passez à l'étape 1Il s’agit d’un clavier standard avec 101 touches et un pavé tactile multipoint.
Ce dont vous avez besoin


-
-
Éteignez l’ordinateur portable et débranchez toute source d’alimentation.
-
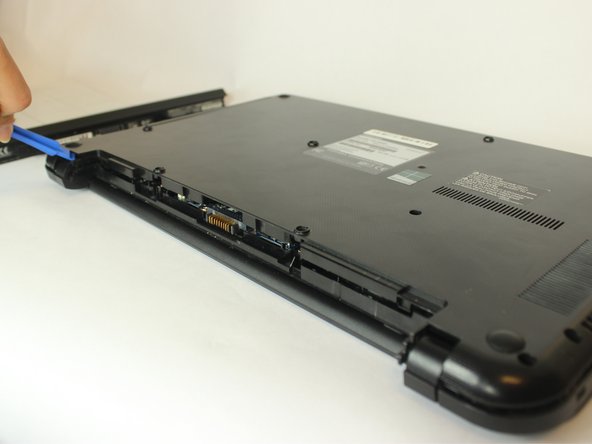
Retournez l’ordinateur portable de sorte que le dessous soit face à vous.
-
Retirez de la batterie les deux vis cruciformes n° 0 de 6,6 mm.
-
-
-
-
Retirez les six vis cruciformes n° 0 de 2,3 mm de la carte mère.
-
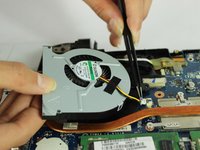
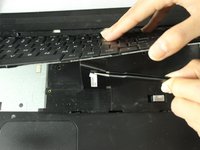
Utilisez une pincette de précision pour relever le clapet de verrouillage des connecteurs ZIF et débrancher leur nappe.
You only need to remove ONE screw in this step not six since there are only two screws holding the bottom side of the keyboard in place. One of these screws is removed from the bottom case, and the other is inside just to the left of the motherboard in the middle. There is no need to remove the motherboard, hdd and heat sink in order to replace the keyboard in this laptop. Don't know what the author is trying to do here.
-
-
-
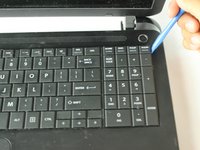
Utilisez un outil d’ouverture en plastique pour détacher le clavier de l’appareil.
-
Soulevez le clavier de l’ordinateur portable, en faisant attention à la nappe IDE.
This is absolutely NOT how you do this step. I've done several of these. You need to use a guitar pick or credit card and start at the bottom clip just to the left of the space bar trying to release that clip then work your way to the right and left releasing the clips. DON'T START AT THE TOP OR SIDES. YOU WILL ONLY BE WASTING YOUR TIME. The top part of this keyboard does not contain clips that can be released. Instead the top contains metal tabs that slide into slots. Each side has one clip, but it's easier to start where I said. Once you release all the plastic clips on the bottom then the one on each side, you can slide the top portion of the keyboard right out. You have to be patient with the plastic clips on the bottom and sides though. Make sure you use a non-marring tool like a plastic guitar pick or a credit card instead of something metal that will just scratch up everything and make it look terrible.
-


Pour remonter votre appareil, suivez ces instructions dans l’ordre inverse.
Pour remonter votre appareil, suivez ces instructions dans l’ordre inverse.
Annulation : je n'ai pas terminé ce tutoriel.
2 autres ont terminé cette réparation.
Merci à ces traducteurs :
90%

Brendan nous aide à réparer le monde ! Vous voulez contribuer ?
Commencez à traduire ›

Équipe

USF Tampa, Team S3-G1, Nance Spring 2018 Membre de l'équipe USF Tampa, Team S3-G1, Nance Spring 2018
USFT-NANCE-S18S3G1
4 membres
22 tutoriels rédigés