
Remplacement du ventilateur de la Xbox One
Introduction
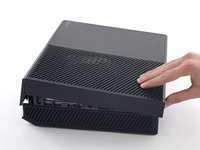
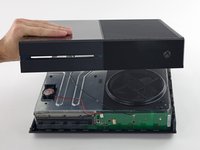
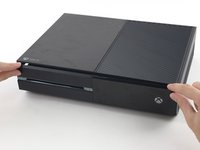
Passez à l'étape 1Si votre ventilateur est bruyant ou ne fonctionne plus, suivez les étapes de ce tutoriel pour le vérifier ou le remplacer.


-
-
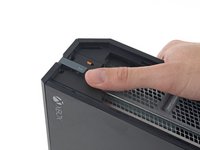
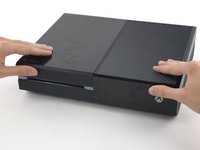
Pour ouvrir votre Xbox, vous allez devoir couper ou décoller ce scellé de sécurité. Mais ne vous en faites pas—Microsoft ne peut pas annuler votre garantie, du moment que vous n'endommagez rien. Amusez-vous bien !
-
-
-
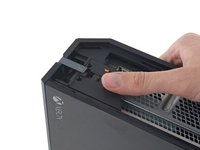
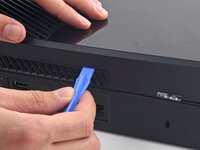
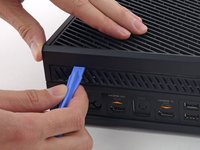
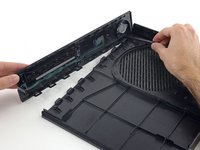
Utilisez un outil d'ouverture en plastique pour lever et retirer la grille d'aération en plastique qui entoure le port USB du côté.
-
La grille d'aération est flexible, et est tenue en place par des fixations en plastique fragiles—commencez à lever par derrière et décollez là.
- 플라스틱 오프닝 도구를 애용해서 측면 usb 포트를 둘러싼 통풍구를 들어올려 분리하세요.
- 이 통풍구는 무척 유연하며 연약한 플라스틱 클립으로 고정되어 있습니다. 뒤쪽에서부터 들어올려 분리하고 떼어냅니다.
-
-
-
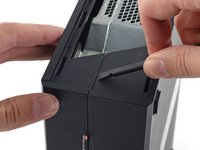
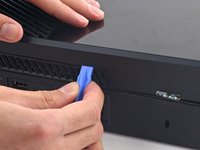
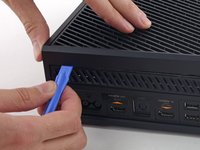
Faites glisser ce bout de plastique en arrière et enlevez-le.
Here is What's Stated in Step-3 : (There is a small plastic tab that reinforces the front corner of the Xbox.) Actually, the "Tab" is NOT SMALL at all. See the Picture: The "TAB" is the Piece that this Person has their Thumb on, is the Tab that you NEED TO SLIDE TOWARDS THE "REAR" of the Unit. You will be able to tell How this Large Tab Holds the Top and the Bottom Case Covers together. Take Note how to Replace this tab back where it Belongs, when you are putting the Case Covers back together. Hope that this comment will help you. 6-29-2017
- xbox의 전면 모서리를 지지하는 작은 플라스틱 탭이 있습니다.
- 뒤쪽으로 똑바로 밀어서 제거하세요.
What is this small tab referred to as?
What is it called i need to order one.
-
-
-
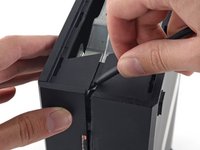
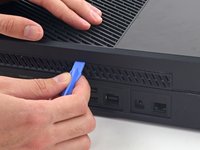
Insérez le bout plat d'un "spudger" (spatule) entre les boîtiers supérieur et inférieur où elles se rencontrent à l'arrière de l'ouverture d'aération.
prying does not work. my spudger is causing damage. my soft. plastic. spudger. and the %#*@ thing does not move. this is a common issue with the instructions on this site. you write instructions like you assume people have extensive repair experience. describe the plastic tab. add detail. because simply prying WILL damage the case. hire a %#*@ writer. cause you guys do not know how to precisely convey important detail. constant problem with tech companies actually. no writers.
- 벗겨낸 통풍구쪽부터 상판과 하판 사이의 틈으로 spudger의 평평한 끝을 밀어넣습니다.
- 플라스틱 클립들이 꽤 강하기 때문에 생각보다 강한 힘을 사용해야 합니다.
- 케이스를 완전히 열 때까지 spudger를 계속 끼워두세요. 클립이 강해서 작업도중 다시 닫힐 수도 있습니다.
it would be very very nice that the part, that you sell, will Fix. This an ols Tutorial. The new opening tools that you sell, will not help anything, cause there is no flat sign on the side. you link these tools at this tutorial, but never tested, if the new tools work. so i tell this you, no they dont fit. Thanks for nothing.
I ve made it this far with only a Lego membership card and a flimsier amusement park card (I'm a big year old)
I had to use a 1/32nd flathead screw driver. In the corner to get it started push the top joint of the case down and up will simultaneously pulling up and down to seperate the seam. You will need a 3rd hand to insert the 1/32nd flathead and pry up to get the case started.
I had a virgin never opened xbox day one og so that might be why I had to do it this way.
even the wikihow instructions are better
It’s easier if you push the top empty area part of the plastic with your finger, and stick the spudger about 3/4” (2 cm) away from the back of the xbox and start prying. You have to do this because that is the only spot where there are no clips in the way. If you do any less or more distance, the clips are in the way, and you’ll never be able to pry open the Xbox because the tool can’t get in.
A youtube video I found explains this step better. You are meant to pull up on one half and push down on the other, this separates the two halves. Then use a spudger on the rear of the console to separate the clip right under the warranty sticker, then move down the back of the console to the other clips
-
-
-
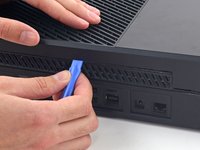
Insérez un outil d'ouverture en plastique entre les boîtiers supérieur et inférieur pour séparer la fixation au dessus du ventilateur arrière.
- 상판과 하판 사이에 끼인 후면 단자판은 여러개의 클립으로 고정되어 있습니다.
- 플라스틱 오프닝 도구로 후면 통풍구의 클립들을 분리하세요.
-
-
-
Continuez à avancer au long de l'arrière de la Xbox, en séparant les fixations.
- 후면을 따라서 계속 클립을 들어서 분리하세요.
- spudger가 제대로 꽂혀 있는지 중간중간 확인하세요. spudger가 빠질정도로 케이스가 분리 되더라도 남은 클립들이 매우 탄력적이라서 방심하면 도로 닫히기 십상입니다. 원활한 진행을 위해 spudger가 잘 꽂혀서 사이를 벌리도록 유지하세요.
-
-
-
Continuez à retirer les fixations. Cela pourrait vous aider à faire glisser l'outil en plastique à travers les fixations.
- 클립들을 계속해서 분리합니다. 클립들을 가로질러 플라스틱 오프닝 도구를 주욱 미는 것이 도움이 될수도 있습니다.
- 후방 케이스를 따라 분리하면 상판이 열릴 기미가 보여야 합니다. 만약 열릴 기미가 보이지 않는다면 모서리부터 플라스틱 오프닝 도구로 분리를 시작하고 usb포트가 없는 쪽을 따라서 클립 분리를 다시 시도하세요.
-
-
-
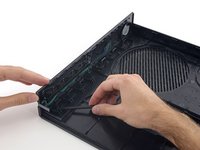
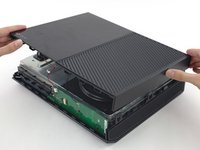
En commençant avec le "spudger" que vous avez laissé dans la fente, levez le boîtier supérieur pour libérer les dernières fixations.
-
Levez légèrement le boitier supérieur et faites le glisser en arrière pour avoir accès à la carte électronique du panneau frontal.
I got confused here. I couldn’t unclip the front panel at all. I found out that if I open the case like a clamshell (or a book, with the front being the spine of the book) I popped right off easily.
Yeah, I saw your comment afterwards but this is exactly what I ended up doing as well. just a note for anyone reading this be careful of the flex cable as it does seem to put a questionable amount of strain on it when you open it in this manner.
"Lift the upper case slightly and shift it" isn't descriptive enough for this step. Also, pictures of actually getting the front panel loose would be really helpful.
-
-
Outil utilisé dans cette étape :Tweezers$4.99
-
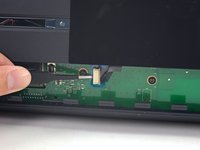
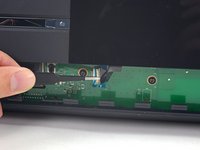
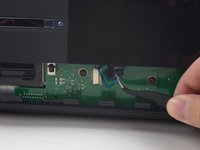
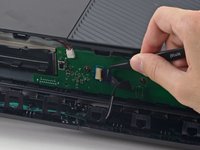
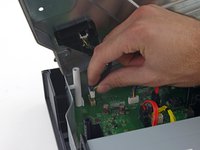
Utilisez une pincette pour lever la boucle bleue en plastique retenant le connecteur blanc sur la carte électronique.
-
Utilisez la pointe d'un "spudger" pour pousser la languette de verrouillage du connecteur vers le câble pour le déverouiller.
Or anyone else who has this problem or reads this on this thread, which is not the correct thread for this question by the way, here is a link to the forum for that. It could be any of a number of issues including overheating, Portland elation, or infestation, among others.
Is there somewhere that I can buy a replacement zif connector
-
-
-
-
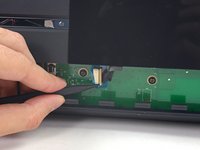
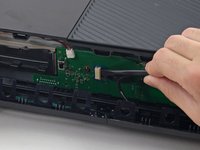
Utilisez une pince pour tirer le câble hors du connecteur de la carte électronique.
-
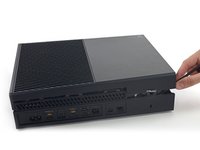
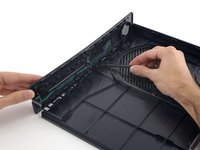
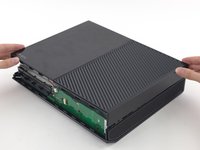
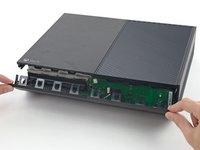
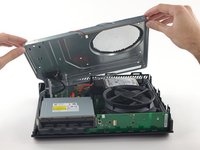
Retirez le boîtier supérieur.
-
-
-
Utilisez le bout plat d'un "spudger" pour libérer les fixations tenant le panneau frontal au boitier supérieur.
-
Retirez le panneau frontal du reste du boîtier supérieur.
-
-
-
Apportez le panneau frontal près du devant de la Xbox.
-
Utilisez une pince pour replacer le câble du bouton avant dans sa prise ZIF.
-
Utilisez le bout plat d'un "spudger" pour pousser le loquet de verrouillage ZIF sur la gauche afin de sécuriser en place le câble.
My Xbox stopped working after this thanks
Mine did as well, its possible it may be the same reason. For me I had to unplug and plug it back in a few times and then clean off the contacts with isopropyl alcohol. Seems simple but if you haven’t already, I would try it.
-
-
-
En tenant le panneau frontal à un angle de 45 degrés, verrouillez ses crochets en plastique avec ceux du boitier inférieur.
-
Poussez le haut du panneau frontal dans la Xbox, comme si vous fermiez une boite postale américaine par example. Appuyez fermement pour que les fixations sécurisant le panneau frontal au boîtier supérieur tiennent correctement.
-
-
-
Retirez délicatement le connecteur du câble du haut-parleur pour le débrancher de la coque avant.
-
Utilisez l'extrémité plate d'un spudger pour débrancher le câble d'antenne, de la carte du panneau avant.
If this connector is broken off, will that prevent the control panel to not work at all and NOT turn on? Is there a fix or work around IF this connector is broken off?
-
-
-
Retirez les deux vis Torx T8 de 9,5 mm de la carte WI-Fi.
-
Soulevez la carte Wi-Fi vers le haut pour la sortir de sa prise dans le boîtier métallique supérieur.
-
Laissez le câble d'antenne de la carte Wi-Fi là ou il est, déplacez la carte Wi-Fi, pour accéder à la vis marquée «C3», qui se trouve en dessous.
When reassembling- put the outer ones on first to secure the port to the metal. Then putting the wi-fi board into the port will be easy
The T9 fit but was a tad big, for me the T8 worked fine
Where can i get a T9
-
-
-
Retirez les huit vis Torx T10 de 65 mm du haut du boîtier métallique supérieur.
-
-
-
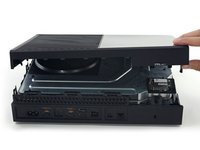
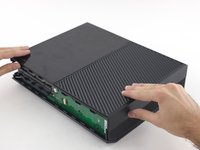
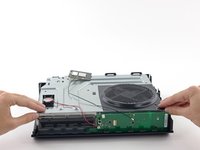
Soulevez – mais sans l'enlever – le boîtier métallique supérieur.
-
-
-
Débranchez le câble d'interconnexion de la carte Wi-Fi de la carte mère.
Gave up on trying to unplug this and took out the 3 torx screw that was mounting the black connector on the other end 😈 way easier
-
-
-
Déconnectez de la carte mère les câbles d'alimentation et de données du disque dur SATA.
I found that it is not necessary to take out the hard drive in order to remove the front panel module. If you can lift the whole metal enclosure a little to get to the right most torx screw, then you do not need to move the hard drive.
Thanks for letting us know about when the open day is going to be. Will make sure get my work completed by rushmyessay before the day so I can attend it in peace.
-
-
-
Débranchez les nappes d'alimentation et de données SATA du lecteur optique de la carte mère.
I their a way to replace the motherboard pins the piece that connects to the hard drive, part on the motherboard that connects to HD
-
-
-
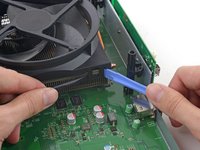
Déconnectez le câble du ventilateur de la carte mère.
What happens if you pull the pins out of the white piece in accident?
There are some locks on this connector for me. I had to use a straight pin from a cork board to press them in as a gently rocked the connector back and forth to remove this.
-
-
-
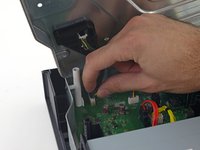
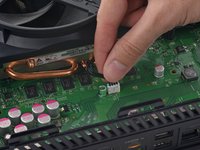
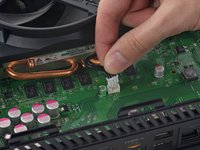
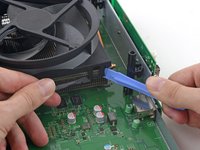
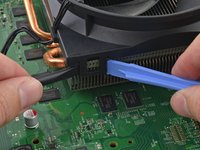
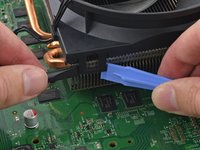
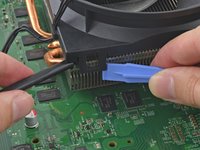
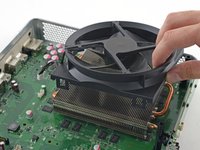
Faites la même opération pour le clip de gauche. Utilisez de nouveau une spatule et un outil en plastique pour écarter le clip plastique de sa rainure dans le dissipateur.
-
Une fois que le clip est suffisamment écarté du dissipateur, insérez-y la spatule et faites délicatement levier pour enlever le ventilateur.
-


Pour réassembler la console, veuillez suivre les étapes dans le sens inverse.
Pour réassembler la console, veuillez suivre les étapes dans le sens inverse.
Annulation : je n'ai pas terminé ce tutoriel.
84 autres ont terminé cette réparation.
Merci à ces traducteurs :
100%

Ces traducteurs nous aident réparer le monde ! Vous voulez contribuer ?
Commencez à traduire ›

12 commentaires de tutoriel
As a device repair tech of a 3rd party store, I have found this be quite easy and profitable for my store to make money. Thanks to these guides, I can now start working on video game consoles.
My fan is making a weird clicking noise everytime I turn on my Xbox One. Does anyone know how to fix this.
I have a quick question so after I remove the fan then what I do
So i dropped my xbox one ans now everytime i try to play a game my xbox will make a sound with the fan to say its loading then it will shut down .. what is it i can ro fix this problem
I have this same issue. It turns on for a second then powers down. Only thing is fan wants to start spinning after it powers down.
What happens when one of the plastic clips on the fan breaks. Can the console still run properly or no?
Hi Jayden, the console should still run properly, but the fan won’t sit as secure against the heat sink as it should be. This might not make any difference at all, or the fan might vibrate because it’s not quite as sturdy.
puedo usar Cualquier ventilador O debe Ser un Ventilador especifico
I purchased this new fan for a Xbox One. I received an XBox fan labeled for XBox S Fan - New. The part had one clip broken and was obviously not new from the dirt covering it. Very unsatisfied with this product.
These instructions were perfect. Made an intimidating job easy to follow and complete. I had a working fan back in my Xbox in about an hour. Thanks to the author of this guide and thanks to the guys who made this website for such an incredible resource.
Thanks for the guide. It was pretty straight forward and gave all the advice I needed.
In the United States the Magnuson-Moss Warranty Act of 1975 is a Federal Law that states that stickers and clauses are illegal. It says you can open your electronics without voiding the warranty, regardless of what language of that warranty says.
Dustin D'Amour - Réponse
Stickers are illegal!?
Brandon -
For anyone concerned, if you apply heat with a blow dryer or heat gun you can carefully remove the sticker without damaging it, making it impossible to know that the sticker was ever removed.
Kelton Stewart - Réponse
All the immature comments aside, thank you Dustin for sharing the information.
Wade - Réponse
xbox를 열기 위해서 이러한 위조방지 테이프를 자르거나 떼어내야 합니다. 하지만 걱정 마세요. 여러분이 무언가 직접적으로 망가트리지 않는한 ms는 보증을 취소하지 않습니다.
승대/SeungDae 정/Jeong - Réponse