Aller au contenu principal
Sony DVP-SR200P Power Supply Circuit Board Replacement

Sony DVP-SR200P Power Supply Circuit Board Replacement

Brian Hua

Brian Hua et 13 autres contributeurs

Dernière mise à jour le December 15, 2023

20 minutes
Modérée
A besoin de meilleures images
Photos d’action

The following instruction is designed to help you replace the Sony DVP-SR200P power supply circuit board and power cord. Extreme caution must be used while handling the motherboard and other fragile internal components to prevent damage. Furthermore, there's a chance of electric shock, so you need to be extra cautious. You may confidently do this installation with moderate difficulty if you carefully follow our comprehensive instructions.

In order to ensure that the power supply circuit board and power cable replacement goes smoothly and successfully, this guide attempts to give you a clear and concise set of instructions. Throughout the procedure, be mindful of the exposed motherboard's fragility and handle it with extreme caution. Let's get started on revitalizing your Sony DVP-SR200P with a new power supply system, following our step-by-step instructions for a hassle-free experience.


Ce dont vous avez besoin

Outils

Afficher plus…

  1. Sony DVP-SR200P Power Supply Circuit Board Replacement, Top Cover: étape 1, image 1 de 2 Sony DVP-SR200P Power Supply Circuit Board Replacement, Top Cover: étape 1, image 2 de 2
    • Remove the five #1 Phillips screws (black, 3/16") attaching the cover to the DVD player.

    • One 3/16" screw on the right side of the DVD player.

    • One 3/16" screw on the left side of the DVD player (directly opposite of other screw).

    • Three 3/16" screws on the back of the DVD player.

  2. Sony DVP-SR200P Power Supply Circuit Board Replacement: étape 2, image 1 de 2 Sony DVP-SR200P Power Supply Circuit Board Replacement: étape 2, image 2 de 2
    • Slide the cover away from the front of the DVD player until it is off.

  3. Sony DVP-SR200P Power Supply Circuit Board Replacement, Processing Board: étape 3, image 1 de 1
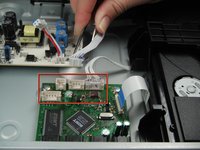
    • Remove the blue tape from the processing board by gently pulling upward.

  4. Sony DVP-SR200P Power Supply Circuit Board Replacement: étape 4, image 1 de 2 Sony DVP-SR200P Power Supply Circuit Board Replacement: étape 4, image 2 de 2
    Outil utilisé dans cette étape :
    Tweezers
    $4.99
    • Use the tweezers to remove the four sets of wires connected to the processing board. Start with the cord located in front of the row of three cords.

    • The wires may be difficult to remove. Wiggling them while lifting them up may help remove them.

  5. Sony DVP-SR200P Power Supply Circuit Board Replacement: étape 5, image 1 de 1
    • Handle the processing board with care. It is fragile.

    • Unscrew the two #1 Phillips screws (silver, 3/16") located on the two edge corners of the processing board.

  6. Sony DVP-SR200P Power Supply Circuit Board Replacement: étape 6, image 1 de 1
    • Orient the DVD player so that you are facing the video and audio jacks.

    • Unscrew the two #1 Phillips screws (silver, 3/16") located on the outside of the DVD player

    • The processing board is now free to be removed and replaced.

  7. Sony DVP-SR200P Power Supply Circuit Board Replacement, Power Supply Circuit Board: étape 7, image 1 de 1
    • Caution: The circuit board contains capacitors (they look like cylinders) that can shock you if they discharge. Be careful not to touch them as you work. If possible, use a capacitor discharge probe to safely rid the capacitors of dangerous charges.

    • Unhook the power supply connector from the power supply board by pressing down on the small latch.

  8. Sony DVP-SR200P Power Supply Circuit Board Replacement: étape 8, image 1 de 1
    • Orient the DVD player so the back of the DVD player is opposite of you.

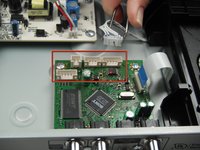
    • Unscrew the two silver 4.8 mm Phillips #1 screws that attach the power supply circuit board to the bottom of the DVD player.

    I thought it's the power supply board that needs to be replaced. Why is the the processing board being removed and replaced in this instruction?

    djingsaquino - Réponse

Conclusion

To reassemble your device, follow these instructions in reverse order.

4 autres ont terminé cette réparation.

Brian Hua

Membre depuis le 01/11/13

80 Réputation

3 tutoriels rédigés

Équipe

Cal Poly, Team 5-17, Forte Winter 2013 Membre de l'équipe Cal Poly, Team 5-17, Forte Winter 2013

CPSU-FORTE-W13S5G17

5 membres

6 tutoriels rédigés

2 commentaires de tutoriel

my sony home theater showing push power protector how to resolve it.

Vinod Kumar - Réponse

Service center said that we need to change motherboard. plz help me out if you can

Vinod Kumar - Réponse

Ajouter un commentaire

Nombre de vues :

Dernières 24 heures : 0

7 derniers jours : 1

30 derniers jours : 14

Total : 8,555