Introduction
Le bienaimé assistant vocal d'Apple est de retour, il s'est métamorphosé cette fois en rouleau de papier toilette Mac Pro en veston. Siri est maintenant capable (d'essayer) de répondre à vos questions sur un angle de 360° et avec un son extrêmement fidèle à l'original. Comment les ingénieurs d'Apple a bien pu comprimer autant de son dans un si petit espace – et pourquoi ont-ils mis autant de temps pour cela ? Peut-être suffira-t-il juste de l'ouvrir pour le savoir !
Bonjour Siri, comment est-ce que je peux rester au courant des dernières vues éclatées ? Venez nous faire coucou sur Facebook, Instagram et Twitter. Si vous souhaitez recevoir notre vue éclatée directement chez vous, inscrivez-vous à notre newsletter.
Ce dont vous avez besoin
Vidéo d'introduction
-
-
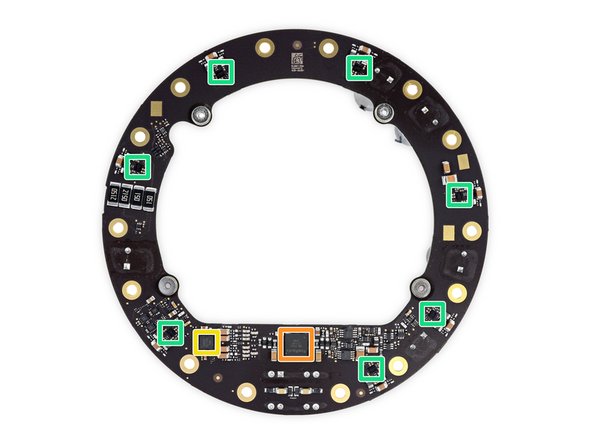
Quelle sorte d'high-tech Apple a-t-elle caché là-dedans ? Voilà ce que disent les spécifications :
-
Boomer longue portée à diffusion indirecte d'un diamètre de 4 pouces
-
Ensemble de sept tweeters à faisceaux
-
Ensemble de six microphones à faisceaux
-
Microphone basse fréquence pour calibrer le boomer en temps réel
-
Interface tactile en haut
-
802.11ac Wi-Fi avec MIMO + Bluetooth 5.0
-
-
-
Le HomePod n'est peut-être pas le plus grand de la rangée, mais il est sûrement le plus surprenant.
-
Il garde la forme cylindrique de base, typique des enceintes connectées circulaires.
-
En plus du rapport de tailles, la différence qui frappe le plus, c'est que, contrairement à l'Amazon Echo et au Google Home, le HomePod est muni d'un bloc d'alimentation intégré et d'un câble d'alimentation
nonamovible. (si vous tirez suffisamment fort)
Power cord IS apparently removable if you pull hard on it., and you can plug it back into a proprietary connector. What else to expect from Apple.
Actually, letting high voltage run along the power cord into the device without protecting earthing ground is a safety issue. Converting the voltage down inside the wart already fixes that.
Double insulation ftw! See Class II devices: https://en.wikipedia.org/wiki/Appliance_...
Oy…I’m confused with the switching to top to bottom top to bottom… If one wanted to get out the main board with the A8 on it, what’s the least destructive and relatively easier path…work from the bottom or work from the top?
You work from the top. I wrote up a disassembly guide, it’s on the device page. Remove the top touch surface cover, then the actual touch pad/LED portion and then the logic board is directly underneath. :)
-
-
-
Nous découvrons un tas d'informations règlementaires presque invisibles sous la base :
-
FCC, les avertissements e-déchets, les indications obligatoires en Europe et en Australie – malgré la prise de courant US de notre modèle – et le sigle des appareils doublement isolés.
-
Le numéro de modèle flambant neuf A1639.
-
Et quelques petits trous.
What’s the FCC ID?
The tiny holes must be present to prevent a vacuum from forming when the base rests on a flat surface like a glass top.
I am 100% agree with Leonard, this tiny little hole is to release vacuum.
As everybody know, silicone is a super sticky rubber, it has to have special treatment to reduce stiction.
The vacuum will not only appears on glass furniture any sealed surface will create this issue.
As we see the “residue gate“ currently have on wood furniture. The silicone will release some oil or “blooming“ on rubber technology. These oil is intends to let the elastomer softer as an internal lubricant(an internal lubricant is to soften the silicone rubber) but they will gradually release over time.
-
-
-
Nous admirons à présent de plus près la grille acoustique 3D sans couture d'Apple.
-
Une interface tactile élégante (au cas où Siri ait besoin d'une pause) et un voyant LED pas vraiment inconnu occupent le haut du HomePod.
-
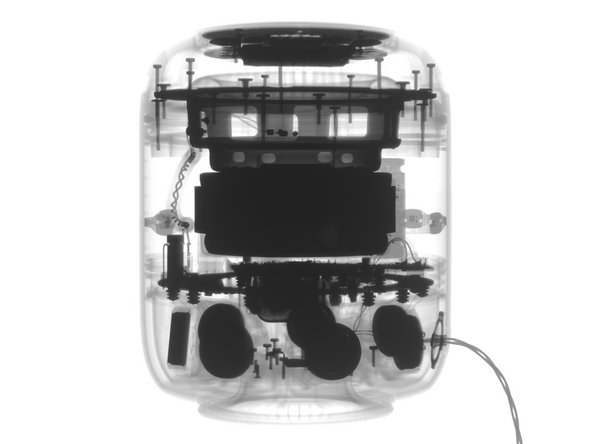
Les rayons X de Creative Electrons nous permettent de jeter un œil aux composants internes qui semblent compter d'énormes aimants (les tâches foncées).
-
-
-
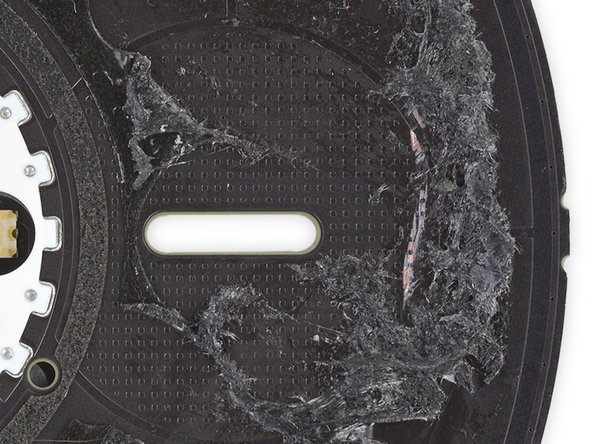
Notre vision X a révélé quelques vis sous la base, nous décidons donc nos efforts sur l'adhésif de cette partie. Nous devons bien insister avec le pistolet à air chaud avant de réussir à désencastrer lentement la base.
-
Bien qu'avertis de la présence de vis, nous nous préparons au pire après ce cauchemar gluant …
-
… mais la vue de ces vis Torx prêtes à être dévissées nous rassure. Nous trouvons également un port à 14 broches sous la base collée, il s'agit là probablement d'un port destiné à tester ou programmer les HomePod sur des broches Pogo lors du montage en usine.
yes any news on the pogo pins connection? No leaked schematics? It might be helpfull to connect the homepod to a pc for a firmware update like it’s possible with the mini?
There is no way to downgrade them because the IPSW isn't public
Shim -
-
-
-
Peut-être que ces vis ne sont pas aussi sympas qu'elles en avaient l'air. Elles sont dévissées, mais la pièce en plastique qu'elles retenaient … ne bouge toujours pas. On dirait que la grille maintient la porte d'entrée de l'appareil en place.
-
Comme nous aimerions vraiment éviter de couper cette grille, nous faisons glisser un médiator le long du bord enduit de colle de la grille et retirons cette pièce. Notre récompense ? Encore plus de plastique imprenable qui ne mène à nulle part.
Those particular screws are T5. We didn’t encounter any security screws—just standard Torx.
Mine has 3 smaller screws on the bottom as well
-
-
-
Probablement un objet pointu. Nous avons cherché à épargner la grille à tout prix, mais en vain. Enfin, ce n'est pas la première fois que nous sommes réduits à couper du précieux tissu.
-
Tailler la maille épaisse 3D, type fil de fer, révèle un manchon secondaire en tissu.
-
Cette couche, moins épaisse et plus flexible, est prise sous la partie supérieure, il est donc impossible de l'enlever complètement pour l'instant.
-
Heureusement, la partie intérieure n'est pas sans couture et nous trouvons d'autre vis Torx cachées sous des caches en caoutchouc (très raffinés).
Before you cut the fabric you can remove the cable! It’s a snap-in design which you can see here: https://www.youtube.com/watch?v=gjxILSOf...
If there’s a solid wall of plastic behind the mesh, why does it matter if the mesh is “acoustically transparent” or not?
The mesh covers the openings for the speakers and microphones as well, they’ve just extended the mesh from those areas to uniformally cover the entire device except the touch controls area.
Urname -
Urname, but those slit openings appear to be only for the microphones, are you sure, looks like from the photos that the tweeters have to blast through the plastic which would very much explain the muffled sound the HomePod produces.
-
-
-
-
L'avantage de cette découpe forcée : nous pouvons nous faire une idée de la fibre magique utilisée pour fabriquer ce manchon.
-
Il ne s'agit pas de magie, mais d'une maille composée de deux couches de filet et de minuscules spirales en fil de fer entre les deux.
-
Maintenant que nous avons retiré la grille, nous nous rendons compte qu'un cordon en faisait tout le long. Y a-t-il donc un moyen de venir à bout du manchon sans le détruire ?
Yes, the sleeve slides off as shown in Kelsey’s video above this guide. :)
The outer mesh looks very similar to the paper based rope used in their retail bags.
Yes, it has a drawstring! Oops!!!
-
-
-
Toujours à la recherche de la porte d'entrée, nous décollons la partie supérieure enduite de colle pour trouver encore plus de vis qui ne mènent apparemment nulle part.
-
Après encore une séance de chauffage, un autre bloc de colle, nous venons à bout d'une couche supplémentaire et arrivons au bout du tunnel.
-
La porte numéro trois cache : une carte bien isolée, une large nappe et le système de fixation du cordon.
How does the top plate respond to touch - it looks like a piece of plastic that isn’t connected to anything
Great question. We think there’s a capacitive grid on the board below—see Step 10 for some updated info. But you’re right, the touch surface itself isn’t wired to anything.
Great teardown! I’m super interested in how the light gets passed through from the “+ -” symboles shaped holes in the pcb, all the way out of the cover plastic.
I have a hunch that it’s a transparant part, where they used a black film on the back side, with the + and - marks cut out, but I’m not sure.
do you happen to know if they used a multi-layered material for the cover plastic?
The LEDs are mounted to the board and diffused through the clear plastic light guide you see to the left of the board in the first image in step 10, all the lights on the board shine through the semi-transparent plastic lid.
The LEDs are mounted to the board and diffused through the clear plastic light guide you see to the left of the board in the first image in step 10, all the lights on the board shine through the semi-transparent plastic lid.
-
-
-
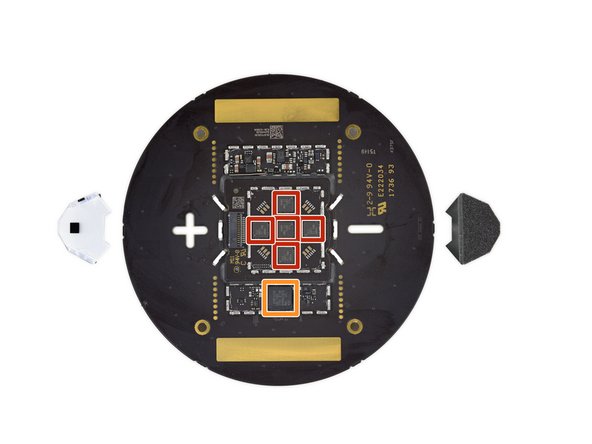
Une fois l'isolation de la carte enlevée, nous découvrons la petite bête qui fait marcher le voyant :
-
Pilote LED TLC 5971 Texas Instruments
-
Système sur une puce (SoC) programmable CY8C4245LQI-483 Cypress, probablement chargé du contrôle tactile
-
Le revers de la carte abrite le voyant LED et le diffuseur qui donne au voyant son aspect brumeux.
-
Un dessin formé par l'agencement méticuleux de minuscules pivots orne la partie supérieure de la carte (deuxième photo). Il se peut que ce soit une grille capacitive chargée d'enregistrer les petits coups et les touchers sur la surface au-dessus, comme dans le Google Home.
it looks like the + and - buttons have their own lights on the bottom side of the board (those 3 led bars on each side). if they wre lit purely from the array, how are they lit when the array is off, and how do they turn off when the array is on?
I think you’re right about that! We didn’t look closely enough. The teardown has been updated to make that bit more accurate. Thanks for the tip!
-
-
-
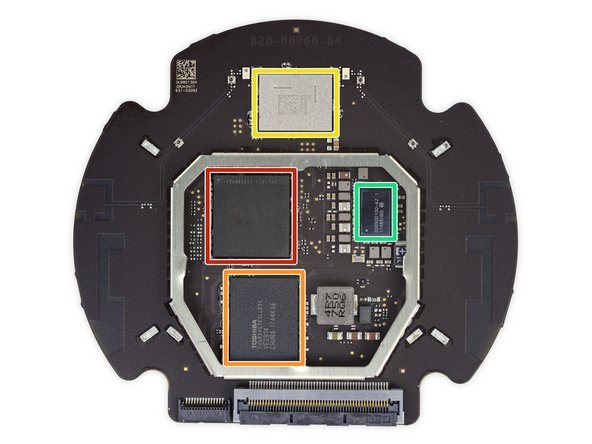
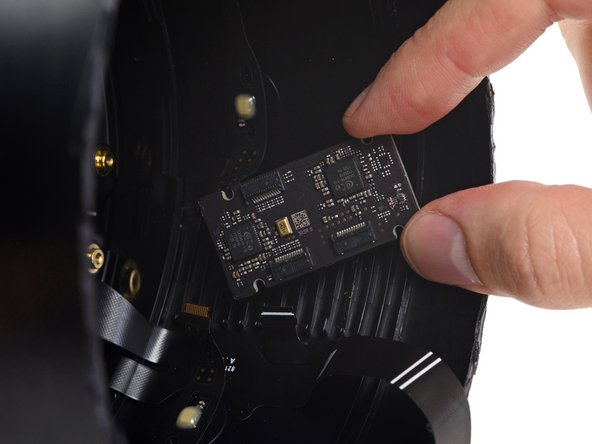
Nous extrayons le prochain disque, celui qui abrite le raffiné système de fixation du cordon ainsi que la carte mère principale, juste derrière.
-
Parmi les puces, nous sommes ravis de vous présenter :
-
Système sur une puce (SoC) Apple A8 APL1011 SoC (nous l'avons déjà rencontrée quelque part, mais elle exerçait une autre fonction), vraisemblablement combinée avec 1 Go de RAM posée en dessous
-
Mémoire flash NAND de 16 Go THGBX4G7D2LLDYC Toshiba
-
Module Wi-Fi/Bluetooth 339S00450 USI, dissimulant certainement une puce BCM43572 Broadcom à l'intérieur
-
CI de gestion d'alimentation 338S00100-AZ Apple/Dialog
-
Curieusement, le verso ne montre que quelques socles SMD pour quelques puces et plusieurs éléments passifs. La conception du HomePod aurait-elle subi quelques changements de dernière minute ?
-
-
-
Enfin une jointure au bout de laquelle nous ne semblons pas pouvoir venir à bout. Nous nous armons de la scie à métaux (et de notre appareil de découpe à ultrasons) pour libérer le boomer de ouf.
-
Ce n'est pas pour rien que le boomer semble énorme par rapport à l'enceinte, c'est vraiment le cas. Les sons graves et dramatiques dans les basses fréquences dépendent de la masse d'air déplacée par l'enceinte.
Kinda disappointing that they cheeped out with a ferrite magnet and not neodymium.
This guy manages to disassembly in a non-destructive way: https://youtu.be/3AnAy6HvlbI?t=634
il suffit de chauffer doucement , pour séparer les éléments
Caution!!!
This is not the way to open the lid.... There is an non destructive way look at Nic's Fix he has mastered it. https://www.youtube.com/watch?v=FfGiuh_Q... 7:52 in -
-
-
Nous avons presque fini de nous frayer un chemin à coup de couteau et d'instruments de levier vers l'intérieur de cette forteresse et arrivons face au dernier obstacle : un anneau fileté.
-
Tout compte fait, il était donc possible, du moins à un certain moment, de dévisser le HomePod pour séparer le groupe contrôle/boomer et le bloc alimentation/tweeters.
-
Notre passage en force n'a cependant rien de quoi nous donner mauvaise conscience. Voyez un peu la quantité d'adhésif sur la face inférieure du tube, le filetage n'a pas été conçu pour le consommateur. Ce truc a été scellé à la colle.
Has anyone figured out a non destructive way inside? The fabric/mesh can be removed and reinstalled with out damage as can the brains, but there is no way I know of to access the speakers, power supply or amplifier board.
@ouimetnick Someone did! See the update to Step 12, above.
This guy manages to disassembly in a non-destructive way: https://youtu.be/3AnAy6HvlbI?t=634
Thiago -
-
-
-
Nous passons à la couche suivante de notre oignon d'HomePod (à moins qu'il ne s'agisse d'un millefeuille ?), c'est-à-dire le bloc d'alimentation composé de deux morceaux : un bloc interne chargé de convertir le courant alternatif en courant continu et un anneau extérieur qui distribue le courant aux huit haut-parleurs.
-
Le matériel de la carte gérant l'entrée du courant (AC-in) est inondé d'époxy, probablement pour empêcher que les folles vibrations le décollent. Le courant est distribué vers la carte en forme d'anneau via des chevilles conductrices genre Mac Pro.
How come you conclude “durability is not an issue” with a mofset GLUED, to a capacitor ?!
How can you miss that ? This is why most electronic appliance fail after a few year.
Judging from the appearance of the surface, the filling between the components is probably Silicone not Expoxy. Epoxy is avoided nowadays because of the toxic base components, difficult curing behaviour, bad flexibility after curing and limited thixotropy.
-
-
-
Notre crochet se révèle très pratique pour pêcher le numéro deux du bloc d'alimentation, l'anneau
Porte des étoilesHalodistributeur de courant. -
La face émaillée de condensateurs de la carte de ce bloc d'alimentation intergalactique abrite également un microcontrôleur ARM à ultra basse consommation STM32L051C8T7 STMicroelectronics.
-
L'autre côté abrite :
-
Amplificateur audio PowlRaudio 98-0431 International Rectifier
-
4350C Y01742 TWN
-
Plus sept amplificateurs audio SSM35158 Analog Devices répartis sur tout le périmètre – on dirait bien qu'il s'agit des amplificateurs personnels des tweeters !
-
-
-
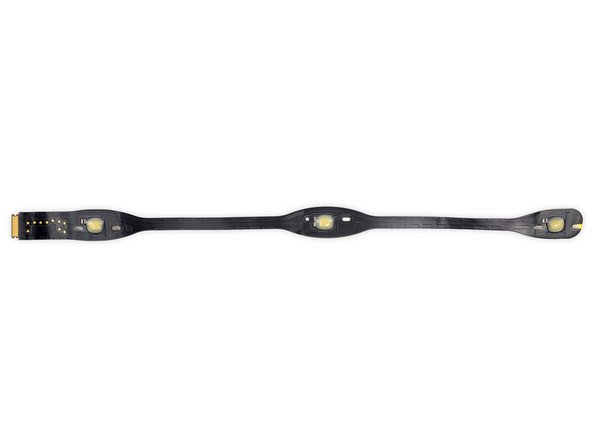
Nous insistons pour décoller une petite carte, de l'adhésif la fixant au tube et remarquons deux puces ADC CX20810 Conexant de la marque Synaptics, destinées à la rangée des microphones.
-
Il ne faut surtout pas omettre que la carte a son propre microphone, probablement le microphone basse fréquence chargé de calibrer le boomer.
-
Au tour des autres microphones : nous extrayons deux longues bandes de trois micros chacune. Chaque bande est solidement collée à l'intérieur du boîtier et les micros sont posés sur les parties renflées de la bande.
-
-
-
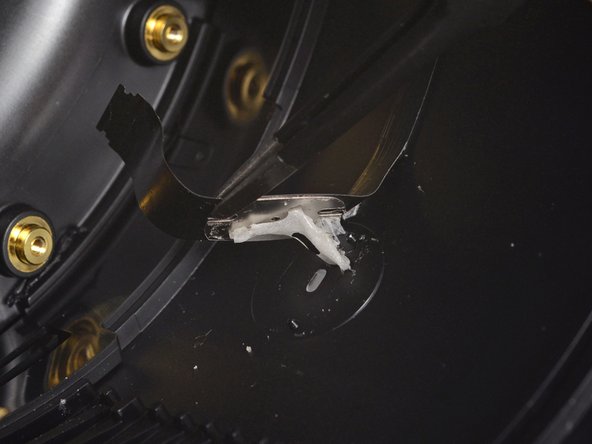
Nous extirpons encore un anneau fileté du HomeBody et rejoignons enfin
Blanche-Neige etles sept tweeters accompagnés de leur dispositif de raccordement au courant. -
C'est vraiment vrai, ces petits dispositifs dorés distribuent le courant aux tweeters.
-
Nous jetons un œil à un port, mais nous ne sommes pas rassurés du tout. À moins que le tweeter soit intimidé.
-
Il est temps d'affûter notre appareil de découpe à ultrasons pour ouvrir cette pièce !
-
-
-
Enfin nous pouvons examiner de plus près l'intérieur de ce tweeter aéré, muni d'un cornet et comprendre comment il produit le son "précis" du HomePod.
-
Les aérations sur les côtés de la bobine et les quatre trous à l'arrière du tweeter empêchent l'air de se comprimer derrière le dôme du tweeter quand celui-ci se déplace.
Is this oil at the edge of a voice coil?
I think what you’re referring to might be the potting epoxy. The golden brown liquid-looking stuff on the coils?
Ted -
Also I’m baffled by a sentence in the post linked about diamond tweeters, what does “accurately reproducing audio above and beyond the limits of human hearing” even mean? Isn’t that a little paradoxical?
Ted -
I guess its for your dog who’s hearing is better than ours ;-}
Dan -
Maybe we have to update the adage “If a tree falls in a forest beyond the limits of human hearing, does it make a sound?” :P
the oil is probably ferrofluid to cool the tweeter and improve it’s magnetic properties
Ohh, right that makes more sense… It would sound horrible if it was solid the way it’s so thick and uneven on the coil. Scratch what I said about “potting epoxy”
Ted -
You gotta wonder though, with the vents on the other side of the driver, doesn’t this mean that the ferrofluid would degrade that much more quickly? Maybe it’s only meant to be used for 5-7 years, which is reasonable for laptops, etc, but if I’m going to buy a speaker, I’d want to get one that sounds great, and keeps sounding great for a long time…
Ted -
There is no oil in that photo.
-
-
-
Et voilà toutes les pièces du sweet Home(Pod) de Siri.
-
D'après vous, comment Apple fait pour accéder à toutes ces pièces ? Serions-nous passé à côté de la formule magique de l'enceinte ? Écrivez-nous un commentaire et n'oubliez pas d'aller regarder la vidéo de la vue éclatée sur YouTube.
-
Voici venue l'heure de prononcer le score de réparabilité. Malgré quelques aspects positifs, la procédure d'ouverture est vraiment irréversible et nous devrons noter l'appareil en conséquence.
Salut Apple,Je suis André!
j’ai mon Home pad il s’allume mais il ne foctionne pas,ça arrive brusquement.que puis je faire?
-
- Sa construction rappelle un char d'assaut. La durabilité ne devrait donc pas poser un problème.
- Bien qu'elle n'ait aucune couture, la grille tissée extérieure peut être retirée sans dommage grâce à un astucieux cordon.
- Toutes les vis sont de type standard Torx. Aucune vis de sécurité pour nous casser les pieds.
- Des chevilles conductrices géniales minimisent le bazar habituellement causé par les nappes traversant les multiples couches de composants.
- Des couches d'adhésif extrêmement fort enduisent l'interface tactile, la rangée des microphones, la base en caoutchouc et (c'est là le plus embêtant) la porte principale d'entrée en haut de l'appareil, qui semble par ailleurs avoir été conçue pour être dévissée sans problèmes.
- Même s'il semble exister un chemin non destructif, nous ne l'avons pas trouvé. Sans manuel de réparation, les chances de succès sont minimes.


Dernières pensées
Indice de réparabilité


(10 étant le plus facile à réparer)
Merci à ces traducteurs :
78%


Ces traducteurs nous aident réparer le monde ! Vous voulez contribuer ?
Commencez à traduire ›
82 commentaires
Thanks guys, very interesting report!
The power cable is actually user removable and replaceable. You just have to pull on it *really* hard. https://www.youtube.com/watch?v=gjxILSOf...
Very good teardown! Thanks!
Apparently the AC cable is replaceable, yet not meant to be user-replaced: https://9to5mac.com/2018/02/10/remove-ho...
What is the DAC?
My best guess would be Digital to Analog Converter :)
Rok -
I can’t seem to understand how the sound from the tweeters comes out. The whole thing looks like a solid plastic tube except at the top where the woofer is. I see the tiny holes for the microphones, but how is sound dispersed from the tweeters?
I was wondering the same thing. I remember The Verge mentioning that the tweeters actually fire downwards and reflect off the table, but I can’t figure out how that works either…
Jared -
It does seem like they’re down firing out of the bottom. It’s just odd there’s so much “transparent mesh” all through the sides of the speaker and no sound actually coming from the sides.
Look closely at the step 7, this thing has vents on the top and bottom
In step 17 you can see two small trapezoid/squares at the bottom that match the vents in the tweeter, these are the only openings in the bottom (the test port being plugged by the rubber foot). I think Gleb is confusing the gaps in the top (to the left where the mesh is still attached) for the bottom.
“It does seem like they’re down firing out of the bottom. It’s just odd there’s so much “transparent mesh” all through the sides of the speaker and no sound actually coming from the sides.“
that is for the microphones…see the holes around the outside of the cylinder?
It looks like if you had opened the top first you might have been able to release the draw string and not have to cut the mesh…
Yep! We did mention that in the teardown. ;)
But the guide still says that you have to cut it. Might want to edit that out.
Hi Zachary! This is not a guide, and isn’t meant to be used to repair a device. Teardowns are just meant to be a look at our first attempt to disassemble something, rather than explaining the best way to replace a part like a guide would. In the interest of giving readers a genuine look at our experience, we like to leave teardowns as they are, mistakes and all.
Step 15: Think you should look for what amplifiers drive the tweeters; looking closely at the underside of that PCB there are some parts labelled “SSM” - which may be Analog Devices IIRC?
Good catch! Thanks for the tip. We’ve added a note to that step.
I know ifixit wants everything to be repairable but I also want everything not to fall apart. Your comment about all the adhesive holding things in place is why I would consider getting this outrageous speaker. I suggest you add a second score for durability and give it at least a 9 until you can determine if the power cord can actually be removed and replaced for less than $300. I’d like to see how durable all the other speakers are. Just because you can repair them doesn’t mean everyone WANTS to have to repair them. Even if a couple of the tweeters fail, I’m sure you’ll still get some really good sound out of it.
I’m with you on this…seeing how well this is constructed, tightened and sealed up to prevent the many vibrations from loosening things up, that, if not done that way, could easily have caused this to make vibration noises or break over time. This is some pretty ingenious engineering —hardware, and, from what I’ve read, software — if I could, I’d run out and buy a couple of these right now!
Do you recall the 1 TB Time Machine? I thought that thing was built solid, but it lasted exactly one day past the warranty expiration date. Failed due to a massive design flaw (no fan). With that much power going to drive the huge magnet on that speaker, I doubt it will last. The epoxy will solidify with no way for the heat to escape, then break apart after repeated use of playing music. You may say air will flow through with the movement of the cone, but I don’t think it will be static enough to properly cool over repeated use. That thing will break one day after the warranty expires.
Thanks you very much !
I think, we must be take care of our HomePod.
Would using a hack saw to open, pretty much basically make this un-repairable? I would think that would be a 0 for repairability
It gets 1 point for the few things you can get at non-destructively. It only gets 1 point because that’s a small fraction of the total system.
You guessed that the epoxy keeps the speaker from rattling its power supply apart, but it might just as likely prevent buzzin/rattling sound from vibrating parts , since this thing seems to be quite the power shaker.
Is it really built like a tank? Wow!
The idea that everything has to be repairable is utter nonsense and needs to go away. Just stop it with that. 99.9% of consumers cannot repair things, for gods’ sakes so many people don’t even know how to cook! The reason things are hard to repair these days is because of 3 main factors:
1) They would be more expensive to manufacture if they used lots of nice machine screws all over rather than glue. This cost would be passed to us.
2) If they were built weaker to make it easier to take apart, unless they are designed in a more expensive way, they would be less durable and in the case of this speaker, you’d hear buzzing and rattling noises after a while. No thanks.
3) Repairing would require detailed repair manuals, spare parts that are packaged for individual resale, logistics of all that resale. And out of millions how many need repair before outdated? Have you taken these facts into account? Easy to just want want want, how about think through what that desire actually entails and how complex it would be!
Horses for courses. I think 99.9% is way off. I have been tearing stuff apart since childhood and love to DIY. Curiosity is a huge factor. It does not always end well but iFixit has been invaluable and I consider it another tool in my repair kit! Another great job.
With respect, this is a ridiculous thing to say. You’re at a website called iFixIt. What do you THINK people care about here? If this were a random tech site, then sure— repairability is probably not a priority. But at a website dedicated specifically to repairing electronics… I think you’re in the wrong place, my friend.
This kind of attitude is why there are overflowing landfills, chemicals in our water, and plastic in our oceans. The unfortunate thinking of racing headlong toward disaster being averted by some new magic technology to reverse our foolish ways—or we’ll move to Mars—is a sad commentary on our society today.
1) When devices that are put together with screws already, and then glued or taped shut (iMac,) so as to avoid repair, 99.9% of the reason why is to force consumers to buy again.
2) No speakers I own cannot be repaired, and the drivers are easily more powerful than those on the HomePod.
3) Actually, this argument sounds like a direct plug for iFixit.com! Repairing isn’t for everyone, but many used to have this necessary skill and many still have an interest. Clearly, we are a consumer society who are not meant to be self-sufficient, lest our benevolent-overlord companies lose profit margins (aww, poor, sad Apple.) Planned obsolescence also goes against the very nature of we who would like to repair.
I’m just tired of DIYers insisting that non-DIYers subsidize the extra cost of making everything repairable. If you want to repair something, figure out how to do it, but don’t ask everyone else to subsidize your tinkering hobby.
Benf -
Hey Benf! This isn’t just about hobbies and personal repairs! Every one of these devices will eventually need to be retired, either recycled and shredded, or put in a landfill. If the device is too hard open, it’s usually too hard to recycle, it’s not monetarily worth it to attempt it. That means the device, and all the manufacturing energy and materials are going to waste. Repairability means thinking about the full life of the device. Plenty of manufacturers are successfully building repairable devices—Apple included, with little visible cost to the user (Compare a Note8 $950 USD, score of 4, to an iPhone 8 Plus $800 USD, score of 6). Also as a note: I would guess that leaving the glue out of the threads is probably not a wild cost increase that requires customer subsidy.
Sam Lionheart, I agree with you. Sadly, I highly suspect the reason for the repair costs being as high as they are is because Apple won't even try to repair your old unit if it breaks. They'll just throw it in the bin and ship you a new one.
Anton -
It’d be fun to see how it is built!
I wonder if Apple could be “persuaded” to do that - to make “assembly videos” for all to see? Or maybe - given that it’s Apple - for a 1.99 Apple iTunes purchase. $0.99 if you just want to see one, $2.99 gets you six, $9.99 gets you the whole lot. Not sure how many people they could get to pay once the novelty had warn of though.
jimwitte -
I’m really curious what was supposed to be on the unpopulated SMD slot on the back of the main board. Also, the shieldings on the side hasn’t been opened in the shot.
The tweeter firing direction is pretty clearly downward per the see-through picture on https://www.apple.com/homepod/
I do see that, just seems like such a small area (per image in step 7) for all the sound to come out compared to the size of the speaker, but I guess that’s part of the magic of getting the mics to work while sound is blaring.
HF sound doesn’t need a big space, the wavelengths are quite short, so the tweets flowing out the bottom seems logical. The horns will control dispersion somewhat, and possibly add efficiency (not much really), plus essentially they are there to change the direction of the sound.
Also re: getting mics to work while sound is blaring, that’s the easiest part to conceive of how to do. Since the sound is digital and it knows what’s playing, it should possible to “subtract” that sound from the incoming waveforms from the mic(s) in real-time, so it can “hear” you no matter what is playing or how loud.
ed -
You have it all wrong. There is no right to repair. Apple made it durable. JRX16, great comment. I find it far more dubious that a company that sells tools and repair knowledge is agitating for legislation that gives consumers repair rights than a company that uses adhesives to manufacture a durable and well made product. iFixit is the solution in search of a problem.
Just a random person on the internet here: I want to be able to repair stuff I buy.
Repairability is good for the environment.
I think you’re on the wrong website. This site exists for those of us who DO believe that there is a right to repair, and who DO put value in products that can be repaired easily, whether that’s by someone with some skill, or by a layman who doesn’t want to fork out 85% of the cost of his product again to get it fixed.
While it is absolutely your right to disagree with this view, you are the one on this site, looking at this teardown, of your own free will, so if you don’t put any stock in what this site, or it’s many users think, then you are more than welcome to go, buy your durable adhesive secured speaker and not worry about us. But, please keep those views to yourself as the other 99% of the users here would very much like to be able to repair our speakers.
- Also, just an aside, the repair information on this site is available for free.
Joe -
Repairability is good for the environment only if the number of people willing and able to do repairs is high enough to offset the greater materials cost of building something both durable and repairable. Repairability has a cost of its own that can’t be ignored.
I’m very skeptical that enough DIYers exist to offset the higher cost, but it’s not an issue of opinions but simply a factual question that requires research.
The other aspect to consider is that DIYers are asking non-DIYers to subsidize the extra cost for them of making a repairable device.
Benf -
A picture of a hacksaw, seriously? Why include a sensationalist picture of “hacking at the device to fix it”? That’s very misleading to those who miss the details that a hacksaw was NOT used. I understand that not everyone is going to have a sonic cutter; but that leads me to my next point…
iFixit was so rushed to get this article out on Monday that they just King Kong’ed their way into it without re-evaluating what was the correct way. Couldn’t you have heated the outer edge of the unit to loosen the glue on the thread of the sub? Couldn’t you have unglued the top to gain access to the draw string so that you didn’t have to cut the fiber mesh?
It sounds like the major complaint was use of adhesive everywhere; but I do not believe it is unreasonable to consider Apple would do that for a device that instead to have a high rate and amplitude of vibrations, like a multi-driver speaker.
People use these tear downs as guides for fixing their device. I hope iFixit redos this article with a more sane approach.
This is not, in any way, meant to be used as a guide. That’s clearly stated in the banner right at the top. ;) If someone decides to take a hacksaw to their HomePod, that’s on them. Regarding the glue, unfortunately there’s no way to see where it’s located or even that there’s glue at all until you have the thing open.
iFixit explicitly states at the top of each of their tear-downs: “This teardown is not a repair guide.” I for one love the humor iFixit exhibits in their tear-downs. Maybe you should take a look at one or two others, you will see various forms of this humor reproduced throughout.
I’ve got a bone to pick, and it’s possible there’s a logical explanation to this I’m not seeing. Why did this score a 1/10, but the Surface Laptop scored a 0/10. I’m pretty sure both of these were destroyed to disassemble them. I don’t want to cry “fan-boy” but I consider both of these absolutely non-self-repairable and both are overpriced for their respective category. !&&* you cannot even replace a single component on this, at least the surface adapter’s AC cord can be swapped for a non-us plug (or vice-versa).
It had a few bits accessable without the hacksaw. They weren’t able to get at anything in the Surfacebook without cutting the fabric earning it an even worse score.
Great post! A question posed here rather than another site simply because there are smart folks here… Why are mics inside the unit being used to tune/modify the woofer? Why not instead do software-side processing before the sound is put out, based on analysis of the soundwave and clear understanding of the internal acoustics during hardware design? If anything, I would think once the sound is emitted from the speaker you might take into account external factors like specific room acoustics, or even air pressure(?) and then accordingly modify the sound. In that case, I’d think the mics are on the outside, not the inside. But what do I know.
somehow the speaker/microphone combination reminds me of the motion-feedback speakers that Philips promoted in the mid 1970’s.
Seems to me that the 6 Mics listen to the outside through little tubes in the housing. They are glued over little openings, which can be seen in the second picture of step 7.
> Why not [tune/modify the woofer] software-side processing before the sound is put out, based on analysis of the soundwave and clear understanding of the internal acoustics during hardware design?
Is that really possible though? The acoustics I presume (might) be affected by whether it's sitting on glass or wood (or hung from the ceiling?!), whether it's next to a wall, maybe air dynamics (pressure, humidity, etc). And then there's maybe a "random factor" - most of us here have probably seen plots of the famous Lorentz Attractor.
But then, what exactly does "tuning the ["sub"]woofer" even *mean*? I would assume identifying whether it's creating some frequency that's making a buzz with relation to the case/table/whatever, and getting rid of it. But is there anything else going on?
jimwitte -
I don’t understand the comments about products not being repairable.
There does not need to be a conflict between product lifetime, ease to repair. IFixit compared the HomePod to a tank. Well in fact you can repair tanks. And you can repair comparable speakers - for example the Sonos 3.
In the past, basically all speakers have been repaireable. And I haven’t heard “buzzing and rattling noises ” being a problem. Also with more easy to repair high-end connected speakers eg from Sonos or Raumfeld, rattling noise is not an issue.
I indeed believe it ultimately comes down to cost. Cheaper production. And not wanting to stock spare parts. Apple want to maximise their profit - which of course is their right. In fact that is the goal of every company, I guess. Even though a gross margin of ~40% or ~88,000,000,000 US$ should allow for adding a few screws.
Joking aside - I think we have a responsibility for our children, reducing waste, by products repairable and recyclable - for both glueing is not the best choice.
There are pros and cons about product repairability against cost efficiency as well as build quality. We have seen the failure of modular phone (project Ara?) which is a clear indicator that modularity/repairability (since you can swap out any component) evidently not the best selling point. Consumer prefer a neat, smooth and well built product which doesn’t break when get dropped, bent when seated on than an average, highly repairable product. It’s just not ‘sexy’ to be repairable and we have to deal with it.
That aside, why do we want repairability in the first place? Actually we don’t… but the environment need it. Imagine top of the line product that is sold in number of 100 millions get depreciated and broken after 2-3 year because 1 hard to replace component is design to fail in that period of time (planned obsolescence), we’d get ~1,7 thousand tons of electronic waste every single year.
If you as a company design unrepairable stuff, step up your game with environmental responsibility.
Was anyone able to identify the maker of the microphones?
I want to know the MIC brand!!
Nao -
Great tear down!
Super informative and humorous!
Very cool! Hopefully I will never buy one, so I will never need to fix it ;)
Personally, I believe it is everyone right and responsibility to be able to repair just as its their right not to do so if they choose. The point in question is choice. If wr are not given choice then hardware becomes more like software and is only ever leased. In my view a slippery slope designed simply to extract more money and condoning poor or inadequate design.
A bit of an example from history on repairability …
The 1970s British TV manufacturers used to make fine TVs featuring a main chassis with daughter boards for the various bit and bobs - making them very repairable.
The Japanese manufacturers, e.g. Sony, competed making sets using as few boards as possible - not very repairable.
The British sets often experienced problems caused by issues associated with the various boards, those issues *required* repairs - which though easy to perform meant expensive engineer callouts and downtime!
There were, essentially, zero British TV manufacturers pretty soon, everyone wanted the cheaper, more reliable - yet less fixable - Japanese models!
YES repairability is GOOD, but surely not so if in achieving that repairability the kits becomes unreliable!
^ this ^
Funny that the Japanese were at first bashed for being unrepairable!
The argument against repairability has added weight for a high-quality speaker. You really don’t want anything inside to move that is not supposed to move, least you get vibrational resonances that can cause buzzes or distort the sound. And you want everything to stay put during many years of service under lots of good vibrations. That is a compelling reason to eschew easily removable covers and fasteners and go for lots of glue and epoxy. Sounds like the HomePod is built to last, but $39 for the second year AppleCare warrantee may be a wise investment.
So I guess you should’ve started from the top-down instead of the bottom-up. Also, there are no pictures or view of the underside of the HomePod after you removed the access plate. Would like to have seen how the opening of the tweeters looked and how the sound is dispersed. I sort of see some fins or slots but that’s about it.
Apple claim that the rings from HomePod on furniture is the result of oil coming out of the silicone pad on the bottom. Does that pad appear to actually be made of silicone? There should not be any oil in silicone to have such a reaction. Some variant of SEBS rubber could. That is the over mold found on power tools or a hacksaw handle.
Replying to
“
[…]
The 1970s British TV manufacturers used to make fine TVs featuring a main chassis with daughter boards for the various bit and bobs - making them very repairable.
The Japanese manufacturers, e.g. Sony, competed making sets using as few boards as possible - not very repairable.
The British sets often experienced problems caused by issues associated with the various boards, those issues *required* repairs - which though easy to perform meant expensive engineer callouts and downtime!
There were, essentially, zero British TV manufacturers pretty soon, everyone wanted the cheaper, more reliable - yet less fixable - Japanese models!
YES repairability is GOOD, but surely not so if in achieving that repairability the kits becomes unreliable!
[http:///User/2379205/Guy|Guy]
“I repaired video games in the 1980s. The CRTs were from Japan and card based. Repair=card swap. This, the norm in commercial gear. Consumer gear is throw away.
Now the HomePod appears to be quite modular. One just can’t get into it in 15 seconds as it should be.
so there is only a tiny opening in the case in front of each tweeter, which seem to block the sound, then they put a mesh around the case to let sound move freely …
Super random, specific question: where do you get replacement blades for your ultrasonic cutter??
Thx!
So far we’ve not had to replace the blade on our unit, but, for the one we have, these blades should fit the bill.
Anyone figure out a non destructible way into this? No easy truck discovered 2 years later?
Any way to remove the brains, microphone, and amp and output to external speakers? I’d like to 3D print a smaller enclosure that forgoes the homepod’s speakers and leverages in-wall or in-ceiling speakers.
Unlikely. The microphones in the enclosure work with the A8 to provide the best sound for the woofer and 7 tweeters. This is their adaptive EQ/spatial sound. This isn’t a dumb speaker like SONOS or regular Bluetooth speaker. If it didn’t have an adaptive EQ/Spatial sound, you probably could. What you are looking for is a HomePod mini with an AUX out jack, and they don’t exist. Closest thing is an AirPort Express, but it doesn’t have Siri or a touch surface. Basically Apple needs to make something like Amazon’s Echo Input device.
Hello
mine is 110V and I was travelling in Europe and there is 220V , Which part should be changed ?
Thanks
Do you think it would be possible to disconnect the MEMS microphones to have a Homepod with all the features without any capability to listen?
This teardown should be re-done to accommodate for the much more clever approach to open the box – without any destruction! I have rarely seen a more destructive teardown than this one...
Could you guys give a more in-depth review of the logic board and the inter connectivity of it with the other components? I am wondering if it’s hackable to get rid of Siri in fevour of snips
Daniel Shapira - Réponse