Aller au contenu principal
W-King X10 Tweeter Replacement

W-King X10 Tweeter Replacement

Justine

Justine et 2 autres contributeurs

Dernière mise à jour le December 20, 2024

50 minutes - 2 heures
Difficile
Nécessite plus d'images
Texte bizarre

Unlike the main subwoofer speakers, the pair of small "tweeter" speakers at the edges of the W-King X10 are responsible for only the higher frequency sounds produced by the X10. Where a malfunctioning main speaker will result in a sharp, tinny sound quality, a malfunctioning tweeter will result in a dull, muffled sounding quality. This is because the X10 will be unable to produce the higher ranges required.

Follow this guide to replace your tweeters if they are malfunctioning.

Before you begin this repair, power off your speaker and disconnect it from the charging cable.

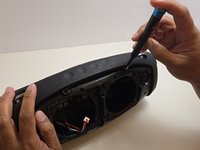
The prerequisite guide to remove the speakers requires soldering. For detailed instructions, refer to the How to Solder and Desolder Connections guide.

Ce dont vous avez besoin

iFixit touche une commission lorsque vous achetez par l'intermédiaire de ces liens.
  1. W-King X10 Tweeter Replacement, Speaker: étape 1, image 1 de 1
    • Make sure the X10 is powered off and disconnected from the charger before beginning the replacement.

    • Orient your W-King X10 so that the front is facing you.

    • The W-King logo will be facing you when the X10 is oriented correctly.

  2. W-King X10 Tweeter Replacement: étape 2, image 1 de 2 W-King X10 Tweeter Replacement: étape 2, image 2 de 2
    • Using a metal spudger, pry open the top points of the front-facing mesh guard.

    • The connection points are approximately in line with the strap clips on the central control panel.

    • You will hear an audible "pop" when the connection opens, and the top edge of the mesh guard will visibly separate from the X10.

  3. W-King X10 Tweeter Replacement: étape 3, image 1 de 3 W-King X10 Tweeter Replacement: étape 3, image 2 de 3 W-King X10 Tweeter Replacement: étape 3, image 3 de 3
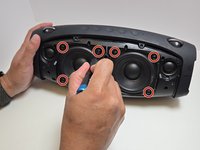
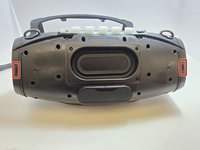
    • Lay the X10 on its back so that the bottom is facing you.

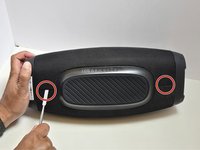
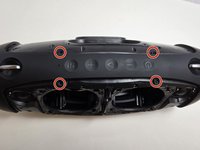
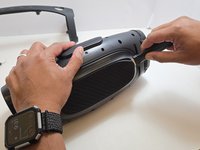
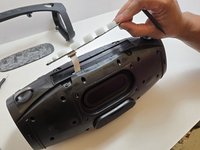
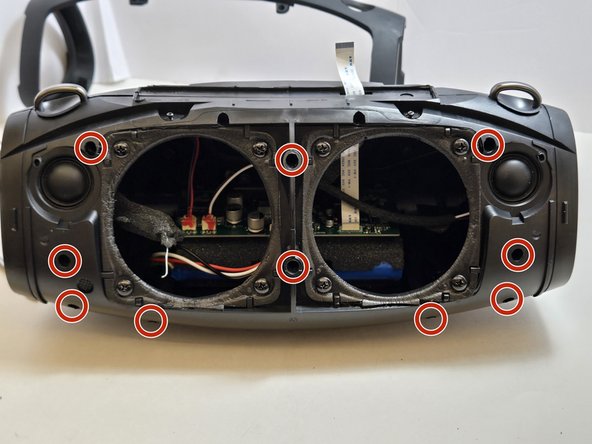
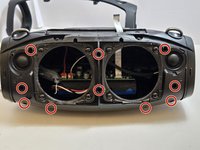
    • Using the metal spudger, separate the two connection points located on the left and right sides of the mesh panel as shown.

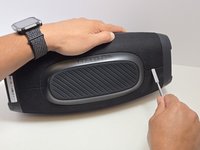
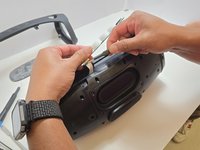
    • Separate the connection point in the center of the bottom section of the device.

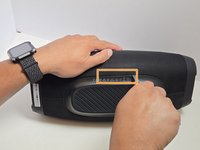
    • As before, all connection points should audibly 'pop' when disconnected, and the mesh panel will visibly separate from the body of the X10.

    • Take care not to accidentally reconnect the points you’ve already separated. Using opening picks to hold the connections open can be helpful as you complete this step.

  4. W-King X10 Tweeter Replacement: étape 4, image 1 de 1
    • Remove the front and back mesh panels of the device.

  5. W-King X10 Tweeter Replacement: étape 5, image 1 de 2 W-King X10 Tweeter Replacement: étape 5, image 2 de 2
    • Use a Phillips #2 screwdriver to remove four 15.5 mm screws from the corners of each speaker.

  6. W-King X10 Tweeter Replacement: étape 6, image 1 de 2 W-King X10 Tweeter Replacement: étape 6, image 2 de 2
    • Gently pull the speaker straight out of the frame of the device.

    • If you tilt the speaker too far, it may catch on the frame, making it impossible to remove.

    • The speakers are connected to the board by cables, so avoid yanking or pulling on them forcefully.

  7. W-King X10 Tweeter Replacement: étape 7, image 1 de 2 W-King X10 Tweeter Replacement: étape 7, image 2 de 2
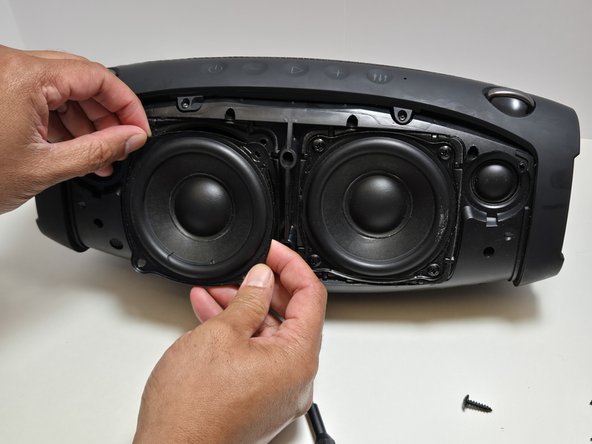
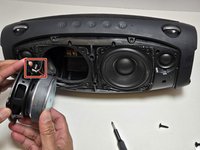
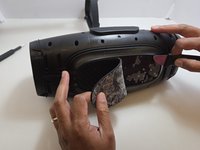
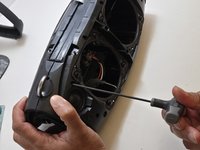
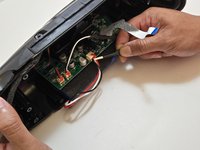
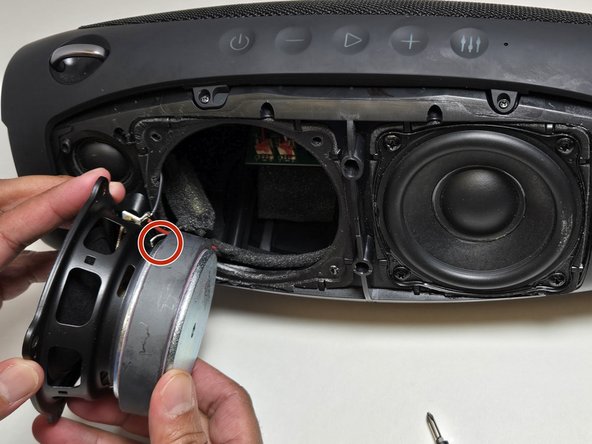
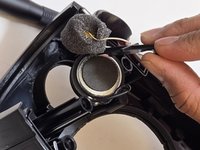
    • Use a soldering iron to disconnect the three wires connecting the speaker to the motherboard.

  8. W-King X10 Tweeter Replacement, Battery: étape 8, image 1 de 3 W-King X10 Tweeter Replacement, Battery: étape 8, image 2 de 3 W-King X10 Tweeter Replacement, Battery: étape 8, image 3 de 3
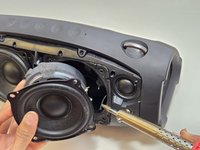
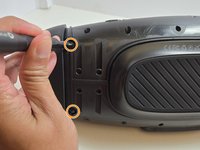
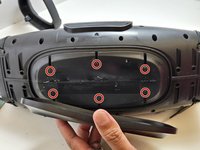
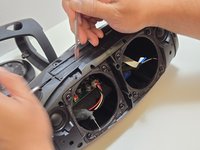
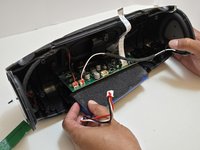
    • Unscrew the top arm of the X10.

    • There are 4 7.5mm Phillips #0 screws at the center of the top arm.

    • There are 2 7.5mm Phillips Head #0 screws at the base of each side of the arm.

  9. W-King X10 Tweeter Replacement: étape 9, image 1 de 2 W-King X10 Tweeter Replacement: étape 9, image 2 de 2
    • Use the metal spudger to dislodge the two clips on each side of the arm.

    • The two clips are at the front and back sides of the arm.

    • Remove the arm but pulling apart the two sides of the arm away from the casing and lifting the arm free from the casing.

    • All 4 clips must be dislodged in order to free the arm. Be careful not to accidentally reconnect one or more as you dislodge the others.

    • Removing the arm takes moderate force. The plastic is strong and should not break, but be careful with yourself and your X10.

  10. W-King X10 Tweeter Replacement: étape 10, image 1 de 2 W-King X10 Tweeter Replacement: étape 10, image 2 de 2
    • Remove the rubber foot at the bottom of the X10.

    • Use the Jimmy to separate the glue that holds the foot on to the casing.

    • Be gentle so as not to damage the soft rubber foot.

    • Peel away the rubber foot to expose the bottom panel of the casing.

  11. W-King X10 Tweeter Replacement: étape 11, image 1 de 3 W-King X10 Tweeter Replacement: étape 11, image 2 de 3 W-King X10 Tweeter Replacement: étape 11, image 3 de 3
    • Remove the Control Panel from the top of the X10 by using the plastic spudger to separate the glue that attaches it to the casing.

    • There will be limited slack on the panel until you disconnect the ribbon cable. Be careful to not overexert the cable by keeping the panel close to the casing until you have disconnected the cable.

    • Using a pair of tweezers, gently pry the ribbon cable that connects the control panel to the motherboard.

  12. W-King X10 Tweeter Replacement: étape 12, image 1 de 2 W-King X10 Tweeter Replacement: étape 12, image 2 de 2
    • Use a Phillips #0 screwdriver to remove the six 7.5 mm screws connecting the bottom panel.

  13. W-King X10 Tweeter Replacement: étape 13, image 1 de 3 W-King X10 Tweeter Replacement: étape 13, image 2 de 3 W-King X10 Tweeter Replacement: étape 13, image 3 de 3
    • Use a 2.5 millimeter hex key to remove the ten 17.5 mm screws that connect the two halves of the X10 casing.

    • Several of these hex screws are in deep, narrow holes in the casing. We recommend using a full-length hex key rather than a hex bit at the end of a driver.

    • Separate the two halves of the casing using the metal spudger to pry apart the 10 connection arms that form the structure of the casing.

    • If this is the first time opening the casing of this X10, there will be glue around the seam of the casing. Use the spudger to split the glue to loosen the seam.

  14. W-King X10 Tweeter Replacement: étape 14, image 1 de 2 W-King X10 Tweeter Replacement: étape 14, image 2 de 2
    • Use tweezers to disconnect the push-in wire connection between the battery and the motherboard.

    • Batteries connected to a circuit pose a risk of electrical shock. Use ESD-safe tools when handling electronics.

    • Remove the battery.

  15. W-King X10 Tweeter Replacement, Tweeter: étape 15, image 1 de 2 W-King X10 Tweeter Replacement, Tweeter: étape 15, image 2 de 2
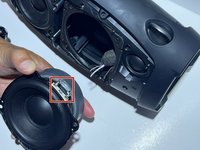
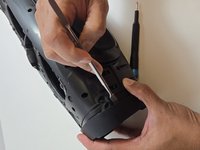
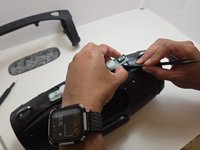
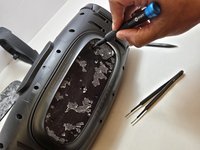
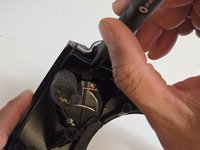
    • Use a Phillips #0 screwdriver to remove the two 7.5 mm screws securing each tweeter.

  16. W-King X10 Tweeter Replacement: étape 16, image 1 de 2 W-King X10 Tweeter Replacement: étape 16, image 2 de 2
    • Remove the tweeter and the plastic coverings.

    • The tweeters are wired directly to the main speakers. These wires are disconnected when removing the speakers, allowing the tweeters to be removed. However, if you plan to reuse the wiring, you must desolder it from the old tweeters.

Conclusion

To reassemble your device, follow these instructions in reverse order. Take your e-waste to an R2 or e-Stewards certified recycler.

Justine

Membre depuis le 09/07/24

331 Réputation

2 tutoriels rédigés

Équipe

Austin Community College, Team 7-2, Watkins Fall 2024 Membre de l'équipe Austin Community College, Team 7-2, Watkins Fall 2024

AUSTINCC-WATKINS-F24S7G2

4 membres

5 tutoriels rédigés

0 commentaires

Ajouter un commentaire

Nombre de vues :

Dernières 24 heures : 0

7 derniers jours : 0

30 derniers jours : 3

Total : 35