Aller au contenu principal
iMac 2009-2010 SSD Upgrade (IcyDock)

iMac 2009-2010 SSD Upgrade (IcyDock)

Arthur Shi

Arthur Shi et un autre contributeur

Dernière mise à jour le December 1, 2020

40 minutes - 2 heures
Modérée
Conditions préalables uniquement
Ce tutoriel est uniquement destiné à être utilisé comme prérequis d'autres tutoriels. Il ne se suffit pas à lui-même.

Follow this guide to upgrade your iMac's hard drive with an SSD. It includes steps on installing the SSD's temperature sensor so that the Mac's fans will operate at the correct speed.

Prerequisite-only guide. SSD upgrade with temperature sensor for late 2009-2010 iMacs.

Ce dont vous avez besoin

Kit de réparation

Ce kit contient toutes les pièces et tous les outils nécessaires à la réalisation de ce tutoriel.

Outils

Afficher plus…

  1. iMac 2009-2010 SSD Upgrade (IcyDock), SSD (2009-2010 IcyDock): étape 1, image 1 de 3 iMac 2009-2010 SSD Upgrade (IcyDock), SSD (2009-2010 IcyDock): étape 1, image 2 de 3 iMac 2009-2010 SSD Upgrade (IcyDock), SSD (2009-2010 IcyDock): étape 1, image 3 de 3
    • Only follow the next ten steps if you are replacing your hard drive with an SSD kit.

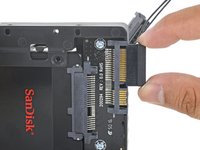
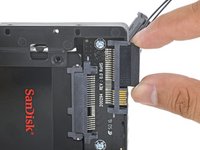
    • Depress the enclosure's front plate latch with your finger. While holding the latch down, swing the plate out.

    • Remove the front plate.

  2. iMac 2009-2010 SSD Upgrade (IcyDock): étape 2, image 1 de 3 iMac 2009-2010 SSD Upgrade (IcyDock): étape 2, image 2 de 3 iMac 2009-2010 SSD Upgrade (IcyDock): étape 2, image 3 de 3
    • Line up the small SATA connectors so that the narrow side of the connector on the SSD matches the narrow side on the enclosure connector.

    • Slide the drive in through the front of the enclosure until the SATA connector is fully seated.

    • The SSD connects with the enclosure in only one way. If the connectors are not lining up, rotate the SSD and try again.

  3. iMac 2009-2010 SSD Upgrade (IcyDock): étape 3, image 1 de 1
    • You may optionally install two Philips #1 screws that came with the enclosure kit to secure the SSD in the enclosure.

  4. iMac 2009-2010 SSD Upgrade (IcyDock): étape 4, image 1 de 2 iMac 2009-2010 SSD Upgrade (IcyDock): étape 4, image 2 de 2
    • Plug the included sensor-enabled SATA power cable into the wide side of the enclosure's SATA connector.

    • The cable is keyed to connect in only one way. If you can't connect the cable, rotate it 180°, and try again.

  5. iMac 2009-2010 SSD Upgrade (IcyDock): étape 5, image 1 de 3 iMac 2009-2010 SSD Upgrade (IcyDock): étape 5, image 2 de 3 iMac 2009-2010 SSD Upgrade (IcyDock): étape 5, image 3 de 3
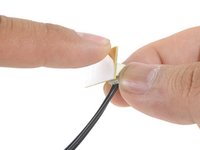
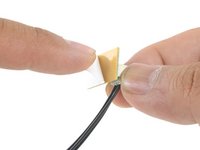
    • Peel the backing off of the adhesive back of the small temperature sensor board.

    • Adhere the temperature sensor board to an exposed, metal area of the surface of the SSD, as close as possible to the SATA connector.

    • Fold the excess temperature sensor wires so that they are out of the way while you install the enclosure.

  6. iMac 2009-2010 SSD Upgrade (IcyDock): étape 6, image 1 de 1
    • Install the mounting pins from the old hard drive onto the sides of the enclosure.

    • The holes on the enclosure may not be threaded, so screwing the mounting pins into them may require extra effort. Take your time and screw them in slowly, making sure they go in straight.

  7. iMac 2009-2010 SSD Upgrade (IcyDock): étape 7, image 1 de 2 iMac 2009-2010 SSD Upgrade (IcyDock): étape 7, image 2 de 2
    • Attach any mounting brackets removed from the old hard drive onto the enclosure.

  8. iMac 2009-2010 SSD Upgrade (IcyDock): étape 8, image 1 de 2 iMac 2009-2010 SSD Upgrade (IcyDock): étape 8, image 2 de 2
    • Connect the iMac's SATA power cable to the new temperature-capable SATA power cable.

    • Route the SATA cables where they will not interfere with any other components.

  9. iMac 2009-2010 SSD Upgrade (IcyDock): étape 9, image 1 de 2 iMac 2009-2010 SSD Upgrade (IcyDock): étape 9, image 2 de 2
    • Connect the iMac's SATA data cable to the enclosure's SATA data connector.

  10. iMac 2009-2010 SSD Upgrade (IcyDock): étape 10, image 1 de 3 iMac 2009-2010 SSD Upgrade (IcyDock): étape 10, image 2 de 3 iMac 2009-2010 SSD Upgrade (IcyDock): étape 10, image 3 de 3
    • Find a connector on the motherboard labeled HD TMP or HDD TEMP.

    • If you have trouble locating it, trace the two-wire temperature cable you disconnected from the old hard drive.

    • If the previous temperature cable is still connected to the board here, disconnect and remove it. You will no longer need it.

    • Connect the temperature sensor's two-wire red-black cable to the motherboard plug labeled HD TMP or HDD TEMP.

    • The connector is keyed to fit in one way only. If it seems like the connector is not fitting the socket, flip the connector and try again.

    • Route the excess wire so it does not interfere with any other components.

Conclusion

To reassemble your device, follow these instructions in reverse order.

Arthur Shi

Membre depuis le 01/03/18

284 792 Réputation

588 tutoriels rédigés

Équipe

iFixit Membre de l'équipe iFixit

Staff

120 membres

20 020 tutoriels rédigés

0 commentaires de tutoriel

Ajouter un commentaire

Nombre de vues :

Dernières 24 heures : 0

7 derniers jours : 1

30 derniers jours : 12

Total : 3,832