Aller au contenu principal
Lenovo ThinkPad T480 Wi-Fi Card Replacement

Lenovo ThinkPad T480 Wi-Fi Card Replacement

Sarah Westberg

Sarah Westberg et 2 autres contributeurs

Dernière mise à jour le July 8, 2024

20 - 30 minutes
Modérée

The Wi-Fi card communicates with your wireless network through the router. If it is in range, your laptop will be able to connect to the internet if it's not password protected. If your Wi-Fi card is failing, follow this guide to replace your Lenovo ThinkPad T480 Wi-Fi Card.

The main symptom of a failing Wi-Fi card is problems with connectivity—more specifically failure to locate wireless connections, intermittent wireless connections and loss of connectivity due to hardware damage.

Prior to beginning this guide, be sure to disable the internal battery, power off the device, and unplug the laptop from the charging cable.

Ce dont vous avez besoin

Pièces

Outils

  • Phillips #1 Screwdriver
    Phillips #1 Screwdriver
  • iFixit Opening Tool
    iFixit Opening Tool
  • Spudger
    Spudger

Afficher plus…

  1. Lenovo ThinkPad T480 Wi-Fi Card Replacement, External Battery: étape 1, image 1 de 2 Lenovo ThinkPad T480 Wi-Fi Card Replacement, External Battery: étape 1, image 2 de 2
    • Disable the battery, power down, and unplug your device before you begin.

    • Flip the laptop over so the bottom of the device is showing.

  2. Lenovo ThinkPad T480 Wi-Fi Card Replacement: étape 2, image 1 de 3 Lenovo ThinkPad T480 Wi-Fi Card Replacement: étape 2, image 2 de 3 Lenovo ThinkPad T480 Wi-Fi Card Replacement: étape 2, image 3 de 3
    • Using your fingers, slide the lock on each side of the battery to the unlocked position.

    • Remove the battery from the slot.

  3. Lenovo ThinkPad T480 Wi-Fi Card Replacement, Back Cover: étape 3, image 1 de 2 Lenovo ThinkPad T480 Wi-Fi Card Replacement, Back Cover: étape 3, image 2 de 2
    • Using the Phillips #1 screwdriver, loosen the six captive screws.

  4. Lenovo ThinkPad T480 Wi-Fi Card Replacement: étape 4, image 1 de 3 Lenovo ThinkPad T480 Wi-Fi Card Replacement: étape 4, image 2 de 3 Lenovo ThinkPad T480 Wi-Fi Card Replacement: étape 4, image 3 de 3
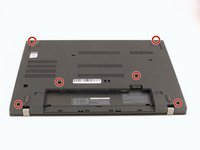
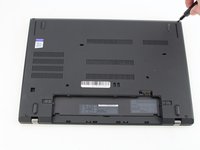
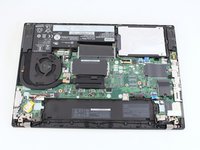
    • Insert the blue plastic opening tool into the space between the lower case and the chassis.

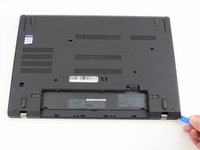
    • Slide the opening tool around the perimeter of the case to release the clips holding the case and the chassis together.

    • If it feels like the battery well portion of the back cover isn't loose, these clips may be holding the cover to the laptop. Use your opening tool to pry the clips loose and try removing the cover again.

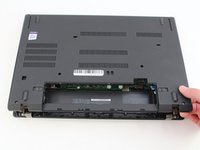
    • Remove the back case.

    I found a tough spudger (or even better a plectrum) is best here as the clips, although easy to separate, hold the case firmly leaving a tight gap which a soft spudger may fail to enter.

    Benjamin Kinsey - Réponse

    Hi Benjamin, thanks for the tip!

    Sarah Westberg -

    You also have to pry the near the battery. I experienced that you can't pry the front side.

    Minko Kelko - Réponse

    I used a credit card to pry the clips loose, it worked great. Added 2nd RAM stick easily.

    NFR Computers - Réponse

  5. Lenovo ThinkPad T480 Wi-Fi Card Replacement, Internal Battery: étape 5, image 1 de 2 Lenovo ThinkPad T480 Wi-Fi Card Replacement, Internal Battery: étape 5, image 2 de 2
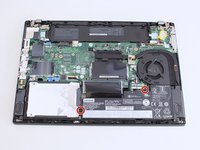
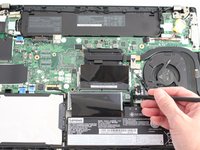
    • Use a Phillips #1 screwdriver to remove the two 4.6 mm screws that secure the internal battery to the frame.

  6. Lenovo ThinkPad T480 Wi-Fi Card Replacement: étape 6, image 1 de 3 Lenovo ThinkPad T480 Wi-Fi Card Replacement: étape 6, image 2 de 3 Lenovo ThinkPad T480 Wi-Fi Card Replacement: étape 6, image 3 de 3
    • Use the spudger to slide the battery socket connector parallel to the motherboard and out of its socket on the motherboard.

  7. Lenovo ThinkPad T480 Wi-Fi Card Replacement: étape 7, image 1 de 2 Lenovo ThinkPad T480 Wi-Fi Card Replacement: étape 7, image 2 de 2
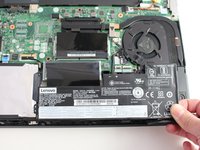
    • Lift the battery straight out of its recess and remove it.

    • If the battery is difficult to remove from the recess, use a nylon spudger to gently lift it on one edge, making it easier to grasp and remove by hand.

    • To prevent damage or potential fire, do not bend or flex the battery. Only use a plastic spudger and avoid any sharp tools that could puncture the battery.

    DO NOT wedge out the battery - T480 has two screws that hold down a plastic battery tray which easily lifts out after the two frame screws are removed. Wedging out will ruin the battery and could damage the cell and cause a fire.

    Poseidon219 - Réponse

    The guide says to remove those two screws. They are "lifting" with the wedge. Probably more of a way to promote their tools than out of necessity, but idk

    Lorenzo Serrano - Réponse

    You lift the internal battery first from the top, and then the bottom.

    This is because there are 2 "clips" on the bottom that the battery uses to slide into the chassis.

    Tai Lam - Réponse

  8. Lenovo ThinkPad T480 Wi-Fi Card Replacement, Wi-Fi Card: étape 8, image 1 de 1
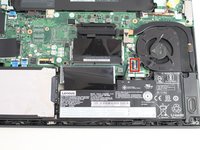
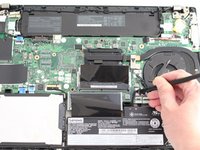
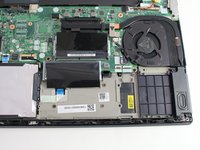
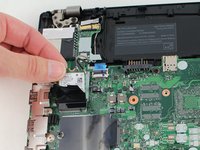
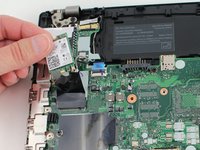
    • Using the Phillips #1 screwdriver, remove the single 3.6 mm screw at the top of the Wi-Fi card attaching it to the motherboard.

  9. Lenovo ThinkPad T480 Wi-Fi Card Replacement: étape 9, image 1 de 2 Lenovo ThinkPad T480 Wi-Fi Card Replacement: étape 9, image 2 de 2
    • Insert the point of a spudger under one of the antenna cables close to the connector. Pry straight up to disconnect the cable off of the Wi-Fi card.

    • Be careful as you pry the cables off of the Wi-Fi card as they are fragile and easily damaged.

  10. Lenovo ThinkPad T480 Wi-Fi Card Replacement: étape 10, image 1 de 2 Lenovo ThinkPad T480 Wi-Fi Card Replacement: étape 10, image 2 de 2
    • Slide the Wi-Fi card out from the slot to remove it from the board.

Conclusion

To reassemble your device, follow the above steps in reverse order.

Take your e-waste to an R2 or e-Stewards certified recycler.

Repair didn’t go as planned? Try some basic troubleshooting, or ask our Answers community for help.

4 autres ont terminé cette réparation.

Sarah Westberg

Membre depuis le 03/11/19

30 169 Réputation

71 tutoriels rédigés

Équipe

iFixit Membre de l'équipe iFixit

Staff

120 membres

20 021 tutoriels rédigés

1 commentaire de tutoriel

Great guide! Everyone make sure to reconnect the black cable to terminal 2 (on the left) and white to t1 (to the right).

Lorenzo Serrano - Réponse

Ajouter un commentaire

Nombre de vues :

Dernières 24 heures : 9

7 derniers jours : 57

30 derniers jours : 226

Total : 7,871