Introduction
Grâce à ce tutoriel étape apr étape, apprenez à remplacer votre écran iPhone 7 Plus. C'est la pièce la plus exposée au cours de l'utilisation de votre smartphone, que ce soit à travers les chutes, les rayures ou les chocs divers. Changer son écran iPhone 7 Plus est donc une réparation iPhone plus courante que vous ne pourriez le penser. La communauté iFixit partage avec vous ces précieux conseils afin de pouvoir effectuer votre changement d'écran iPhone 7 Plus le plus sereinement possible. Des détails qui redonneront vie à votre smartphone ! De plus, choisir de changer son écran iPhone 7 Plus, c'est limiter la production de déchets électroniques puisque jusqu'à aujourd'hui, les appareils ont souvent du mal à être recyclés dans leur totalité. Un changement d'écran iPhone 7 Plus évite de pousser un mobile encore opérationnel dans cette spirale. Se diriger vers la voie de la réparation iPhone 7 Plus, c'est ainsi faire un geste pour son porte-monnaie mais aussi pour le futur de notre planète.
Cette pièce est livrée avec l'ensemble écran, le haut-parleur interne et le blindage EMI déjà installés, ce qui facilite les réparations iPhone 7 Plus. Vous trouverez également les kits d'outils adaptés sur notre boutique en ligne afin de pouvoir mener à son terme votre réparation iPhone 7 Plus.
Tout ce que vous avez à faire c'est de retirer l'ancien écran et de transférer le bouton home sur le nouvel écran iPhone 7 Plus, pour qu'il fonctionne. Prenez bien soin de ne pas endommager la nappe du bouton home ou bien vous risquez de perdre la fonction Touch ID lors de votre changement d'écran iPhone 7 Plus.
Ce dont vous avez besoin
Vidéo d'introduction
-
-
Éteignez votre iPhone avant de commencer le démontage.
-
Enlevez les deux vis Pentalobe de 3,4 mm sur le bord inférieur de l'iPhone.
-
-
-
Si la vitre de votre écran est fissurée, limitez la casse et évitez de vous blesser au cours de la réparation en recouvrant la vitre de ruban adhésif.
-
Posez des bandes adhésives transparentes se chevauchant sur la vitre de l'iPhone jusqu'à ce que toute la surface soit couverte.
-
Si, au cours des étapes suivantes, la vitre brisée empêche la ventouse de coller, essayez de former une poignée avec un morceau de ruban adhésif solide (comme du ruban adhésif en toile) pour soulever l'écran.
-
-
Outil utilisé dans cette étape :Clampy - Anti-Clamp$24.95
-
Les trois étapes suivantes sont consacrées à la procédure avec l'Anti-Clamp, un outil facilitant les procédures d'ouverture. Si vous n'avez pas d'Anti-Clamp, passez à la procédure alternative deux étapes plus loin.
-
Tirez la poignée bleue vers l'arrière pour débloquer les bras de l'Anti-Clamp.
-
Insérez le bord gauche ou droit de votre iPhone entre les bras de l'Anti-Clamp.
-
Placez les ventouses près du bord inférieur de l'iPhone, juste au-dessus du bouton home - une à l'avant et une à l'arrière.
-
Pressez les ventouses l'une contre l'autre pour appliquer la succion sur la zone souhaitée.
-
-
-
Tirez la poignée bleue vers l'avant pour bloquer les bras.
-
Tournez la poignée dans le sens horaire de 360 degrés ou jusqu'à voir les ventouses commencer à s'étirer.
-
Veillez à ce que les ventouses restent alignées. Si elles commencent à bouger, desserrez légèrement les ventouses et réalignez les bras.
-
-
-
Chauffez un iOpener et passez-le dans les bras de l'Anti-Clamp.
-
Pliez l'iOpener de manière à ce qu'il repose sur le bord inférieur de l'iPhone.
-
Attendez au moins une minute pour permettre à l'adhésif de se décoller et d'ouvrir un interstice.
-
Insérez un médiator dans l'interstice.
-
Passez les trois prochaines étapes.
-
-
-
Chauffer la partie inférieure de l'iPhone aide à ramollir la colle qui fixe l'écran. Il sera alors plus facile d'ouvrir celui-ci.
-
Utilisez un sèche-cheveux ou préparez un iOpener. Posez celui-ci sur la partie inférieure de l'iPhone pendant environ 90 secondes afin de ramollir la couche d'adhésif en dessous.
Hello,
What temperature is suitable for removing the front display ? I bought i-Fixit ProTech which is not include the heating "roller" . Thanks for help
I was about to ask the same Question...
Ich habe eine heiße Wärmflasche verwendet. Das hat gut funktioniert :-)
I used a heated tea kettle and a tea towel, it worked!
I put on the furnace vent for 10 minutes to get it warm to the touch but not hot.
I attached it to the after burner of my rocket ship and that worked.
I used a water-filled ziploc bag, heated it in microwave. fast, cheap, worked.
Agree! Just did it for 2 times to make sure I didn't overheat the phone.
The most effective way to heat up the glue is to leave the phone in full sun - if it's available. In fact I would always wait for a sunny day to repair any glued together Apple device. The heat will be very even and the phone was probably designed to survive anything the sun can throw at it - although it can get very warm. (I'm in the UK) If you leave the phone turned on it will give a warning if it goes near the temperature limit.
I'm sorry but I tried both the hair dryer (for 3 minutes!) and the eye opener (also 3 minutes) and no luck. Not even a hint of loosening the adhesive holding down the display!! Do I send this kit back for a refund or what??!!
No luck, guys. 3 minutes of hair drying and 3 minutes heating up the iopener. What next?
Okay, a half hour later i finally got the screen loose, but not after super heating it for at leat 10 minutes with a hair drying and burning my hand trying to pry it open. Also, watch out for the power button because it inadvertently keeps switching the phone back on while you wrestle with it. More later . . .
. . . and now I need to buy a new phone!!! the cable broke as I was trying to unscrew one of the top screws, so thanks! I FIXed IT but Good!!!!
This part was actually much easier than I thought. I used a hair dryer on max for 2 minutes on each side of the phone, less than half an inch away from the phone, just on the bottom half. It was hot! Screen came right out!
I used a tube sock full of about 1 cup of white rice. Tied a knot in the top of the sock. Put the sock of rice in the microwave on 60% power for 1 minute. Kept doing this until the temp felt right. Put the sock of rice down, put bottom edge on sock, then covered w/ other half of the sock/rice. Put a piece of paper towel between phone and sock/rice to absorb any moisture. When lifting up on front panel, I rested the phone on the sock/rice. Worked nicely once I got the temp of the rice high enough.
(threw the rice away later :-) ) -
-
-
Posez une ventouse sur la partie inférieure de l'écran, juste au-dessus du bouton home.
Even with using high heat from a blow dryer, I had to put the suction cup over the home button or the bottom edge wouldn’t lift at all. That waterproof adhesive is incredibly strong.
As others have said, this part really stinks, but it’ll work if you keep trying. Agree with multiple rounds of hair dryer on high (did about 60-90s each time), and with having to out the suction cup over the home button. You don’t need a big gap to pry it open - it’ll be slight …
Patience is the key here. Expletives and patience. Like previous comments say, putting the suction cup over the home button (I used packing tape to maintain the seal) will allow you to apply force to the proper location to separate the screen. Good luck!
Get a suction cup pliers. It’ll make this part fun
iSclack EVO opened the iPhone easily even without heating with no fear of accidentally over-opening it like with a simple suction cup.
If you don't have the anti-clamp device, to prevent the screen from tearing open when suctioning it, I suggest some layers of tape around it and the back of the phone (the tape has to be stretchy enough to just minimise the momentum when separating the screen), or some big rubberbands
-
-
-
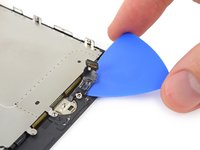
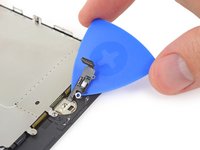
Tirez sur la ventouse de façon ferme et constante pour créer un petit interstice entre l'écran et le châssis.
-
Insérez un médiator dans cet interstice.
Just completed a smashed screen replacement, this is probably the most time consuming part. Used packing tape to cover the screen to help create a suction surface (had to replace it a couple times because it pulls away after a purple good pulls ) Used consistent heat for about 5 minutes, then stuck a pick in the tiniest opening… and pry pry pry!
I failed at this step. No amount of heating, pulling, and rocking opened up enough of a gap to slip in even a knife let alone the blue plastic tool. That's with a phone that has an undamaged screen - just trying to replace the battery. Apple won this round :(
Be really careful here. I placed a sucker to the front and rear to help lever off the screen. However, the whole thing came away much easier than I anticipated and I ripped the front part completely away from the rear, tearing all three connector cables. New iPhone required.
Note that the opening pick they show here does not appear to come with the kit, which is a bummer! The plunger, the mini blue crowbar thing, these are too thick. I ended up using a really thin guitar pick.
Following careful methods can mostly preserve the seal and reusable. Won’t be as water tight but probably still pretty good.
Bottom edge is pull up with suction + separating tool. Use small precision scissor to cut any tape that gets overly stretched upon initial opening.
- For the 2 long edges, use an exacto knife to separate the seal from the screen. This keeps the tape on the chassis. Go slow along the long sides. Becareful to avoid scratching the paint on underside of the screen’s edge.
- Top corners have a thick sealed tape. Best to just use separating tool to twist it open.
In summary, top and bottom edge use separating tool. Side long edges can use exacto knife to gradually gently separate the seal from underside of the screen’s edge.
Intact screen, check. Tool kit, check. Hair dryer hot enough to make the phone too hot to touch, check. Following all instructions, check. Screen still in place and refusing to come off, check.
I heated, reheated, pulled and pulled. I simply could not get it off. Worked at it for an hour and a half, and I’m not a small guy. Yes it is hard to hold, but could get a grip. Just could not get it to budge. Off to the iPhone repair shop tomorrow. Anybody want to buy a repair kit and replacement battery?
After struggling for 30m, I looked up some alternate methods and found this helpful:
https://www.youtube.com/watch?v=25zAK5mG...
- I used a utility knife and pried up right under the home button
- the angle matters! I was trying to go too far down before going in. The top surface of the phone is rather thin, so you go in after barely getting under the chassis lip
- tilt utility knife left to right once you’ve got it under to work it in
- leave the utility knife in, and now add that pick
Pro-tip: don't be an idiot like me. Instead, remove the screen protector you have on the phone before applying the suction cups. Derp.
I struggled with a hair dryer at first and a singular suction cup. However, I tried putting packing tape on the spot where I put the suction job (even though my screen isn't cracked) and I was able to do it first try with ease. Definitely recommend packing tape.
Suction cup pliers. Dead easy
After successful screen replacement, returning to give my thanks here. Excellent tips from you all - if you’re using force, you’re doing it wrong. Heat, very very gentle exact-o knife barely down then fully under the screen below the home button … perfect. Slow and patient around the upper corners, and don’t forget to heat there as well! Thank you all!
The problems with this step are (1) not having three hands and (2) managing to hold the phone in a way that doesn't put reverse pressure somewhere else on the screen. Exacto knife was the best tip. It's a little dangerous. On a misstep you may scratch the screen or jab yourself, but it's what got me in.
I used a razor blade and plenty of heat, and it somehow worked like a charm at the cost of me cutting myself. Definitely be careful when doing this, I used the razor blade on the left side of the iphone then wedged in a small screwdriver and then used the pick to cut the rest of the material away.
-
-
-
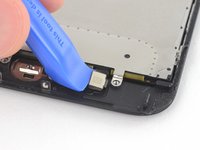
Faites glisser votre médiator le long du côté gauche en commençant par le bord gauche puis en progressant vers les boutons de contrôle du volume et le bouton du silencieux, pour faire céder l'adhésif qui maintient l'écran.
-
Arrêtez-vous juste avant le coin supérieur gauche de l'écran.
-
-
I was trying to replace my battery, and accidentally cut one of the cords on my screen. I marked my pick, so i don't know how it happened.
-
-
-
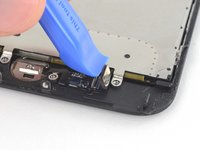
Réinsérez votre outil dans le coin inférieur droit de l'iPhone, faites-le glisser le long du coin, puis progressez vers le haut, le long du bord droit du téléphone, pour faire céder l'adhésif.
-
-
-
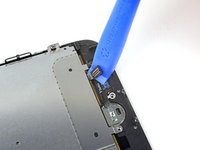
Faites glisser un médiator sous l'écran, le long du bord supérieur gauche et du bord supérieur du téléphone, pour faire céder le reste de l'adhésif.
I did end up using just a smidge of IFIXIT adhesive remover along the edge before opening and that seemed to really help
I have been using the pointed tweezers to pull the adhesive strands apart and out as the display comes off.
This bit was awkward as to get a good grip I kept inadvertently switching the %#*@ phone on!
-
-
-
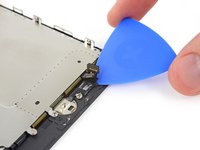
Faites glisser légèrement l'ensemble écran vers le bas (éloignez-le du bord supérieur du téléphone) pour ouvrir les clips le maintenant à la coque arrière.
I had trouble sliding down the display and found I hadn't separated the stop enough.
When you are pulling the display downward, be very careful! I pulled a little too hard and the display cables tore from the downward (toward home button) motion. Now I have to replace the display! 😭
-
-
-
Ouvrez l'iPhone en faisant pivoter l'écran vers le haut en partant du côté gauche, comme s'il s'agissait de la couverture d'un livre.
-
Calez l'écran contre un objet afin qu'il reste bien stable pendant que vous travaillez sur les composants du téléphone.
Nach RECHTS klappen - nicht nach links!
Als ich das Flachbandkabel auf der rechten Seite sah, hab ich mich auch gefragt, ob die das mit nach Links klappen ernst meinen, und das „Buch“ lieber auf japanische Art nach rechts aufgeklappt. Das sollte dringend in der Anleitung korrigiert werden!
“Up from the left” means lift up the left side.
Which is the same as folding to the right.
“Like the back cover of a book” explains it even more clearly.
Maybe it gets lost in translation?
Fold to THE RIGHT - not to the left!
When I saw the ribbon cable on the right side, I also wondered if they were serious about folding it to the left, and the "book" would rather be opened to the right in the Japanese way.This should be corrected urgently in the manual!
Hi Jim, the display opens from the left side, toward the right side. It should look like the back cover of a book. Hope this helps. Good luck with the repair!
DO NOT LAY THE TWO HALVES FLAT!!! There is a reason why the third photo shows the screen half leaning against a box! This really needs to be a warning in addition to the one about not separating the display.
If you're skipping the screen and taptic engine removal like I did, I suggest you tape the back of the phone to the table, and also tape the screen to the vertical object it lays on, so it stays still. That way you will avoid having to constantly readjust it because of the sliding of the housing of the phone when you're working on it. Be careful where you're putting the tape on the screen though, if you're doing it on the internal components.
-
-
-
Retirez les quatre vis tri-point Y000 suivantes fixant le cache de la nappe d'écran inférieur à la carte mère :
-
Trois vis de 1,2 mm
-
Une vis de 2,6 mm
Is it really safe to lay the device fully open like a book? The cable leading to the LCD gets stretched across the sharp edge of the aluminum edge of the back cover.
Generally I'd say no, it's not safe. In reality I've seen a bit of variance in the cable length, and sometimes it'll be fine—but mostly I'd be prepared to prop the display up or hold it in place at a slight angle so it doesn't put too much stress on the cables. On prior iPhones it was easy to rubberband the display to a box or a can of soda, and something like that would probably work well here too. Use your own judgment.
You could stick the suction cup back on, near the right side of the phone, with the blue hook oriented in such a way that it becomes a stand for the screen. That way it won’t open much more than 90 degrees, and leaves both your hands free.
Mark -
The tri wing screws are so hard to remove. What's the trick?
I cannot remove one of the corner screws in this step and i have used the tweezers and the y000 tri tip and i am afraid that it is stripping it. is there a work around for this step?
@katmonday1 No workaround unfortunately. Make sure the driver tip is in good condition and fits the screw correctly. Seat it in the screw, hold the driver perfectly vertical, press down hard (and maintain it), and turn. It’ll come out. If it’s really stripped you’ll have to get more aggressive—try one or more of the techniques in this guide or get some help. Good luck!
A tip to remember which screw is which as the differences are pretty tiny: I used different colored sharpie fine-points and made a mark on the top of the screws before removing. I thought about having strips of tape that I stuck similar sizes to, but the coloring seemed to work more easily. I only did this for step 11 and it saved me down the road when trying to differentiate the 1.2 and the 1.3mm screws!
STOP! Before you remove Any screws, be sure to create several bins to hold the various sizes in… or mark them like Trey suggested. I failed to pay attention because I thought they were all the same… they are not. It is very hard to figure out the sizes if you remove them all and store them in a single location.
i had a piece of paper with the steps numbered that involved screws. I had double sided tape on the paper and the number of screws and thier position marked. This was so helpful in removing and then finding and installing the tiniest screws on earth. And i have TINY hands. I can’t imagine someone with large paws being able to accomplish any of this.
there is one screw thats 1.2 mm but its bigger than the others and will fit in no hole of the entire phone. i got it out bot now i have no idea where it has to go i tried every hole. can somebody help me?
what do i do if one of the screws dont want to come off
I was having a hard time removing one of the screws before I discovered the tip of the screw driver that comes with my replacement battery had already deformed. However after I switched to a better screw driver the screw came off easily. Make sure the tip is in good condition, and avoid those cheap drivers if possible.
-
-
-
Retirez le cache de la nappe d'écran inférieur.
I am confused, please help. LOL the bracket, the very first one being removed. I see it has three screws the same size and one a different size? I've been trying to fix my daughter's phone and ordered a 0.6 mm Tri Wing screwdriver for iPhone 7 plus /Apple watch. It seems to fit the screws and it seems to be turning them although I can't see that well but they're not coming out. However when I used it on a smaller bracket with two screws they came right out so I'm thinking I don't have the right screwdriver I am at my Wit's End!! I have been working on this phone or attempting to for a while now. I cannot find a list anywhere of the exact size screwdrivers needed to Take apart an iPhone 7 plus. Any help would be greatly appreciated.
If your tri-wing screwdriver worked for other tri-point screws in the phone, then it should work for the screws you are struggling with! If it feels like the screws are spinning but not coming out, try to use tweezers to pull them out. I often struggle with tri-point screws, and need to apply some downward pressure to remove them. This can be risky though, as you do not want to strip the screw or damage components underneath the bracket. If you continue to struggle, you can give this driver and this bit a try.
Also be aware that the battery connector might stick to the bottom of the steel bracket. This part had me a bit puzzled at first. lol
Just gently pry the connector off the steel bracket to release it and be sure the connector isn’t allowed to accidentally reconnect to the board.
-
-
-
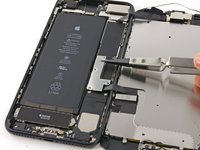
Utilisez la pointe d'une spatule (spudger) pour soulever le connecteur de la batterie de sa prise sur la carte mère.
on reassembly, make sure that the connector cable is back in place, along side the battery, and not up, or on top in any way.
I slipped a small piece of paper under the flap.
After this step it is worth jumping to step 36 and disconnecting the lighting connector assembly (indicated with the orange rectangle) and connecting the new cable to test it out. After attaching the new lightning connector assembly, reattach the battery, and try plugging it in to see if the new assembly works correctly. If it does, then power down the phone, disconnect the battery, and disconnect the new lightning connector assembly. Then continue. If it doesn’t work, this check will save you a couple of hours of work.
-
-
-
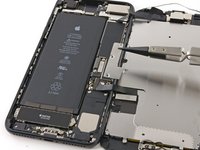
À l'aide de l'extrémité plate d'un spudger (spatule) ou d'un ongle, faites levier sur les deux connecteurs d'écran inférieurs afin de les déconnecter de leurs prises sur la carte mère.
What can happen if the battery is not disconnected before the two lower display connectors?
Hello, by my expierence and what i have learned iphone repair videos you can ‘blow up’ capacitors which one in logic board, screen is sensetive with voltages and etc….
When I removed the lower display cable bracket in step 12, the top connector stuck to the bracket and became disconnected.
My replacement screen wouldn't sit in the display connector properly, (wouldn't clip in both sides at same time) so I made sure it sat on one and it was lined up and got a thin piece of dense sponge and placed that over the connector, then proceeded to install the connector shield and screen works perfectly fine without a hitch. Very good tutorial just earnt me £25 lol
have the same issue, sometimes it doesn’t sit on the left side, other time not on the other, the difference is iphone not starting at all or looping with apple logo reboot…
ibisiki -
-
-
-
Retirez les trois vis tri-point Y000 fixant le support au dessus du connecteur de l'ensemble capteur du panneau frontal:
-
Une vis de 1,3 mm
-
Deux vis de 1,0 mm
-
Retirez le support.
Posted a comment above on the first step. The screwdriver that I ordered Works taking out these two screens shown in the picture. However it does not work on the first bracket that needs to be removed. It seems that all screw sizes are somewhat different but I'm not finding a list showing different screwdriver sizes needed. Does this make sense? Could anybody please give me some advice on this thank you much.
What happens if you break “tear in half” the black tape stuff?
Unfortunately if you tear the black cable you will need to replace it !!!
Chris West the screwdriver that probably came with the kit was pentalobe to get the first two screws out to open the case. you need a .6mm Y tip driver for internal. its deceptively Phillips looking but is not it only has three blades in a Y, not 4 in a +
I called the y tip a triangle tip until I read these comments. Thanks for the correction
Hello is it if I put wrong screw can damage the board?
Care should be taken while removing the last 1.0mm screw, on the far right in the picture. This screw is screwed into another screw (or standoff) beneath the bracket. This standoff may come unscrewed and upon removing the bracket you may find the screw and standoff are still attached to the bracket. Do not lose this part if you decide to separate them , the standoff is not a normal phillips, and may require a special driver to reinstall. I used the phillips to start it back in, and relied on the screw to tighten it upon reassembly.
I know this is late bit a trick I use to put the standoffs in (had to do 2 cause someone lost the screws I was replacing) is to take the screw that goes in it srew them together loosely to give it a fake phillips head then gently screw both into the spot the standoff goes in. you can then take the phillips out (may need to put a spudger between the screw and standoff to keep the standoff down then use a tiny flathead to gently tighten the standoff down. its a few steps but makes life easier if you need to replace it quickly.
I was able to remove the first 1.0 mm three tri-point Y000 screw from the bracket but I cannot for the life of me get the other 1.0 mm screw undone or the one 1.3 mm screw undone. Any tips?
I tried pressing down a bit harder and I even put the first screw back in to see if it helped me loosen the other two but it did not work.
My screwdriver was doing the job up until this point, and I’m worried I’ll strip the screw if I keep trying.
Would appreciate any advice!
Dear IFixit: First, I want You to know I love your repair guides. I consider You to be the absolute best repair manuals available. But, hopefully as your friend I am going to point out once the bracked is removed a 2.0 mm Standoff screw should appear. It’s 1 of 2 screws holding the Antena Flex Cable in place. Rob
-
-
-
Déconnectez le connecteur de l'ensemble capteur du panneau frontal de sa prise sur la carte mère.
Make sure that the orientation of the cable when you attach is correct! See the picture for the correct orientation. If it gets installed 180 degrees out(i.e., the ribbon goes up instead of down, then the earphone, front camera, and Home button will be inoperative. Ask me how I know!?! Worked great when installed correctly!
Thanks Kevin. I would be stuck if I hadn't read your comment!?! Great input.
That's save my life!thanks god!
neg -
-
-
-
Retirez l'écran complet.
When removing the old adhesive from the edges, duct tape can be useful. Simply use small strips of duct tape and your spudger to press the tape’s adhesive side carefully into the edges of the phone’s display and slowly peel the duct tape away from the display. The duct tape should pick up the remaining adhesive and carry it away from the edges. use the tip of the spudger to gently scrape away any remaining dirt or film from the crease around the edge and repeat the action with a new strip of tape to pick up any dirt, adhesive or grime from the surface. This should save considerable time.
Thank you for including a link to the iPhone Display Adhesive Replacement guide, this was very helpful!
is it really necessary to remove the display? the screen connectors are delicate and I fear re-assembly errors. I changed the battery and did not remove any screen connectors. no problems.
Due to the fact that THIS is the repair guide for replacing the DISPLAY it IS necessary to remove the display connectors. There is another guide for changing the battery -- you might want to follow that one.
Hannes -
I did not remove the display and ended up ripping one of the lower display cable ribbons when I turned the phone to remove one of the connectors. Be careful. I had to get a new display and move the Touch ID button.
I think that moving the replacement of the seal lower in the chain of events would be more beneficial. I'm replacing the battery, and stretching the adhesive tabs that held the battery in at a low angle kept sticking themselves to the newly-installed adhesive seal.
In the end, I wound up having to just remove the section of the seal along the bottom of the case :-/
If I'd been looking at the bigger picture, I'd have wanted to put the seal on right before reattaching the screen cables.
This guide does not show you the removal process for the top camera assembly. My screen looks like the one pictured but my replacement doesn't have the top connector or any of the front facing camera components and since the ribbon for the connectors looks like its coming out from underneath the display I can't see how to swap it over to the new display.
-
-
-
Retirez les quatre vis Y000 maintenant le cache du capteur home/Touch ID :
-
Une vis de 1,1 mm
-
Trois vis de 1,3 mm
No reason to touch that screw unless you’re removing the shield—in which case, this step instructs you to remove it.
The link that was mentioned takes you to the heat shield for iphone 7 plus. There’s a slight difference in the two models.
To clarify: the regular/smaller iPhone 7 has no screw on the far left there. The 7 Plus does, but there’s no need to touch it unless you’re removing the large metal shield covering the back of the display. The procedure in the guide is correct.
So I stripped the screw furthest to the left, how can i possibly remove it now? Can I just buy a new LCD shield and home bracket button and screw and will that work just fine on the new screen replacement? this stripped screw of mine is not coming out
That should work, as long as you can still get the home button/sensor out without damage. For removing a stripped screw this size, I’d probably try supergluing it to the driver—or else just drill the top of the screw off and then remove the bracket, leaving the screw shaft embedded in the old display. Good luck!
I used the same driver for all of these screws. Had to apply a lot of pressure before trying to unscrew it and it was fine.
This is wrong, the size you need is Y00 for the 1.1mm screws and Y000 for the 1.3mm one.
The heads on those screws are identical. I’ve never had any trouble using a Y000 for all of them. Use whatever works for you I guess.
I’ve managed to strip the screw on the right hand side - not the far right, just right of the home button. Any ideas on how to get it out without glue (I don’t have any)
My screwdriver is too big to get out the screws
My eyesight isn’t what it used to be. That said, the replacement screen that arrived already had screws in the two outside positions. It took me a minute to figure this out when I was trying to install the home button. I couldn’t figure out why the screws weren’t going in. I thought the holes were filled or something… Nope. screws. Took them out and used them.. all good.
My 7 had quite a bit of loctite holding these bad boys on. I stripped the one to the right of the home button and after using many “sentence enhancers” I was able to remove it using good tweezers and quite a bit of hand strength. I think that heating up the screws here is not an option because the cables lie underneath the plate and would probably get damaged from the amount of heat needed to loosen the loctite. Be patient here, and maybe have spare Y000 drivers because you may damage your driver getting these screws out.
If your having trouble. I recommend you guys to buy the Y00o driver at amazon. It look golden. It works very will .
Hi all, I’m really hoping someone will be able to give me a hand here, so the 1.1mm screw on top of the home button is stripped, and absolutely refuses to get out. I have tried the superglue technique mentioned and am worried it may have even glued the screw to the bracket. The only solution I can think of is to bend the home button bracket on either side of the middle screw, and use the bracket itself to remove the screw from the home button. I have ordered a new home button bracket either way, does anybody have any other ideas? Should I even attempt what I am proposing?
Thanks in Advance.
This worked for me take a Stanley blade and saw a grove across the screw with the edge ofcourse then heat the home button with hair dryer for a couple of minutes take the blade and press it into the groove you scored and turn it
Paul -
Does the ground strap go over or under bracket?
over the bracket
I magically used an X-acto knife tip to lift the edges of the home button screw to loosen it, and then turned it slightly with the X-acto blade tip in the screw slot to get it started, then the 000 screwdriver could finish it.
I can’t stress how important it is to not overtighten the one on the button. I undertightened the center one at first in fear, and then tightened it more when I realized the button was loose. It ended up ruining the home button :(
I was completely unable to get the screw directly over the homebutton off. I definitely stripped it some. Here’s some tips!
1. If you are trying to unscrew and it skips instead of locking in—STOP. Apply more pressure, and then try again. Keep doing this until it comes out. If you continue turning without doing anything, you’ll strip the head of the screw and end up in a way worse situation.
2. If your screw is stripped, first try putting a rubber band between the screwdriver and the screw to fill the gap. Duct tape has worked for many people as well.
3. If you can’t get the screw directly above the home button off of the home button, I found this video that shows how to remove the home button without unscrewing the screw!! Bend the protective plate up 90° on both sides of the home button so the bent plate now fits through the home button hole. Then you can continue to
the next steps and remove the home button with the plate still attached to it.
Don’t know if I did something wrong, but the home button no longer works. I’ll see if I can get someone to repair it.
Found a software workaround, go to General > Accessibility > Assistive Touch. Now you don’t need the home button to work to use the phone
I enabled assistive touch before making a go on this part. Screws are very small, easy to strip, and difficult to find if they go flying when you;re just trying to seat them properly.
VERY SMART!! I would not have thought of doing that. Depending on what my local repair guy charges I may be doing this myself, but in all honestly if the home button does not work on the new screen I'm getting another phone
I’ve never been so stressed at trying to assemble something, O_O I should really get some glasses. I just reassembled all the screws, tried to not screw too tight, but how does one know? Maybe they could include “only twist 3 times, or 2…and maybe provide an ocular. Those screws are very very very tiny, and yes - be careful, because if you attach the right screw first, the left one can be catapulted if not secured and just “set” waiting to screw in. Thankful for the magnetism, but also had to find myself holding the screw in place while securing or else it would just attach to the screwdriver and come out. I'm TOTALLY looking forward to turning this ON after all assembled based on all the disheartened comments…..oy. Here. We. Go.
There’s a small square rubber piece that has a screw hole in it. does anyone know if it goes over the home button? I missed it when I took it apart, but then , there it is on my table.
It slips over one of the posts that the pentalobe screws in step 1 go through. Like a mitten over a hand. It’s incredibly hard to see where the slit is in that tiny rubber piece though.
What do you do if you overtighten the screws? I assume that is why my home button won't click
How can you tell if you’ve over-tightened the screws or if the home button isn’t working for some other reason (other physical damage, shorted out, etc.)?
Die Schraube auf dem Home-Button ist wohl von Apple gewollt schwer zu entfernen. Man sollte sie daher zuerst herausdrehen; denn, ist die Unterlage unterm iPhone nicht hart genug und man drückt jetzt mit Kraft über den Schraubendreher auf die Schraube, wird der Home-Button hinausgedrückt, dabei verbiegt sich die Halterung und besonders schlimm, das eine untere Flachbandkabel reißt ab und der Home-Button ist unbrauchbar.
So from those that do many repairs what do you think is the percentage of repairs in which the home button doesn't work after moving it to a new screen? 10%? 30%? 70%?
-
-
-
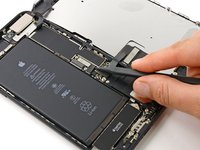
Faites levier sous le bord gauche du connecteur de la nappe du bouton home pour le débrancher de sa prise.
I think you can not do it because your phone is not identify for new cable.
Best thing to do here is to NOT pry up on the connector, but to insert the pry tool on the left side until the connector is dislodged.
Good tip. Worked perfectly. Thx.
Klaus M -
That worked perfectly, thank you!
I did it. :-( i broke it
Anyone having difficulty reconnecting the two ? I’ve been trying for ages with no luck.
Same problem here - can reconnect them once the new LCD is being installed. Not sure what the trick is.
Yes I had to fiddle with it for about 20mins to get it to finally click in place, just don’t apply too much pressure it doesn’t take much, if the alignment of the connector is right you should feel it snap into place. connect the cables together before you screw it in place, also raise the assembly up off the small locator pin until after you get the connectors together. Hope this helps
my Homebutton don´t work after I reconnect all, I checked all flex cables but it still dont work. what can I do?
so, i’m working on an iPhone 7. I was very careful not to break anything, I even bought an iOpener heat pack and applied it, and everything went off without a hitch, but when I tested the button, It does not work, would it help to reconnect it or something?
Thanks a lot!
Broke my cable. The picture is not clear but you have to separate the thin silver end of cable from what looks like a black piece of rubber. I pulled up on it from under the black rubber like the picture shows and broke mine.
This helped me SO much. Watch it before removing home button. Around 4:56ish
Thank you so much!
That’s a very good view. Thank you!
Yup, this video helped me know what people were talking about. It worked and I didn’t rip or break anything…so far XD
Well, I just damaged the home button connector in step 21. It is completely off the cable. What now? Can I buy this connector ?
I’m having a really hard time reconnecting the two together. Any advice?
I used the tweezers in step 21 to separate this connector. I squeezed the tweezers shut then put the flat edge of the points between the connector and slowly released the tweezers. The connector separated really easy.
This tip worked a treat. Thanks!
any tips on reconnecting the connector. I assume it needs to be snuggly fit back in. I can’t seem to connect the two agin. Is it supposed to ‘snap’ together or should I use an adhesive?
Figured it out. I just needed to make sure I aligned them better when feeding the home button backthrough
rwalz -
I found it quite difficult to reconnect the home button cable connector. After putting everything back together, my iPhone said there was an error with the TouchID. I disassembled the phone again, pried off the home button connector and found that I had not lined it up properly with the mated part. I had to push the connector upwards (toward the top of the phone) in order for it to seat properly. It almost felt unnatural to push the connector so far up to make it seat properly. I tested the phone again before reassembling and everything worked fine. If you break the cable on this home button piece, you can only buy a generic home button (about $8 here on Amazon) that will allow you to use the button for navigation but it will not work for TouchID (you will have to use your phone permanently unlocked or use a numeric code to unlock). The original home button is specifically mapped to your phone and cannot be replaced.
Yeah, I couldn't snap it back together either and after giving up a few times, probably the third time I came back to it, about the 10th time trying to line it up, the cable just totally snapped off....
-
-
-
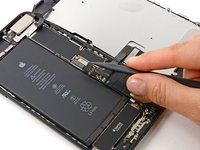
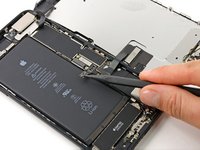
Faites délicatement levier sur le connecteur qui se trouve en dessous et écartez-le de la nappe du capteur home/Touch ID.
-
Si le connecteur ne se soulève pas facilement, prenez un sèche-cheveux ou un iOpener pour faire chauffer et ramollir l'adhésif qui fixe le connecteur, puis réessayez.
Make sure that you fold this cable out when fitting your replacement before you fasten the shield back down. I didn’t but managed to loosen 2 screws on the shield to get the cable out.
If you have isopropyl alcohol on hand. You can use it to help weaken the adhesive temporarily when lifting up the adhered home button.
Just one tiny drop of isopropyl alcohol or it will reach the lcd screen.
Heat is absolutely vital during this step. Care should be taken and you should work very slowly. A new playing card will be useful in separating the ribbon from the device, using heat periodically to soften the adhesive as you go along. The ribbon cable changes size between the connector and the button, creating a weak area that can begin to rip if stressed. Use a card flat against the frame to slowly separate the cable from the frame.
The isopropyl alcohol did the trick for me; all it takes is for you to dip the prying tool in a bit of the alcohol and the rest is magic. I did not have to apply heat and I was able to remove the home button from the original screen to transfer it to the new screen without any issue! Be careful, go slow, don't force things, and when it doubt view and review the video and instructions!
Alcohol or Ifixit adhesive remover is the trick. I used the tweezers to dip in the remover and just a smidgen is all you need, start on the connecter side and work towards the button. - On reassembly, I kept the screen protector on and just peeled it up enough to slide the button in, then used it to hold the button in place while I finished up.
-
-
-
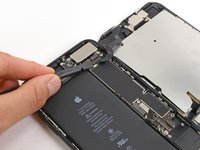
Chauffer la zone tout autour du capteur home/Touch ID contribuera à ramollir l'adhésif fixant la nappe fragile de ce capteur. Il sera alors plus facile de la retirer en toute sécurité.
If you don’t have that heating tool, a hair straightener n a T-shirt worked just fine for me
I did with a heat gun instead. I found the i opener not helpful.
I need just 1 min with my hair drier, then the screen starts to pop and crackle
-
-
-
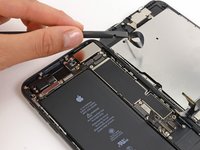
Avec un médiator, séparez délicatement l'adhésif fixant la nappe du capteur home/Touch ID à l'arrière de l'écran.
It cannot be stressed enough that this is the one part of this repair that you can’t screw up. Anything else you’ll deal with during this repair can be easily replaced (The screen, and the sensor/microphone/camera assembly). Tearing this cable means an expensive trip to the apple store. or a very unhappy customer if you’re doing this for someone. Heat is your friend. I don’t even use a spudger or a guitar pick for this one, I use a new playing card to pull this up. Even with the card, you have to be careful. The edge of the playing card can nick the cable if you’re not careful to get it under the ribbon cable. If the adhesive isn’t soft enough for the card to get it up, apply more heat. Again, you can’t screw this step up. It’s all or nothing.
Thanks for the tip! worked great!
Do you know what I need to do if I damage the cable?
Yes playing card is what I used too, worked very well. Just heat it up(I used a 3D printer bed for 30 seconds at 80°). Just go slow from right to left.
Well, no visible damage but the home button won’t work. I contacted a local Apple Authorized Service Center to check options. Since I had personally replaced the screen assembly, they wouldn’t even look at it per Apple policy. They said they would jeopardize their Apple Authorization if they even looked at it. Seems like more of the “Right to Repair” problem to me. Frustrated, but at least I have the accesibility home button working.
Make sure the home button screws aren’t overtightened; that often causes issues. If there’s any damage to the button cable, a repair shop with a skilled microsolderer can patch a new cable on and restore functionality. iPhone 7 home button not working after screen replacement? Worst case scenario, you can also buy a screen repair from Apple, and they’ll include a new home button. I am not a lawyer, but the response you’re describing from the AASP sounds way out of bounds. Good luck!
I don’t know why this step does not include a major warning about it being by far the most challanging step. I started before reading the comments and most likely screwed my home button with it,
I don’t know if it is a broken cable or if it was too much heat later…but I scratched the cable on the first try with the plectrum. It took lots of heat to soften the adhesive and then it worked WAY better for me to start removing the connector from the near side of the home button. And not, as shown, on the far side.
Wish I had known that before - the homebutton ist not working anymore now (and it’s not the screws).
Robert -
Just keep in mind that this is a very delicate step that requires a lot of patience. the part is attached to the body of the phone so firmly and there is no gap to put the opening pick under. So the way I did it was applying a good amount of heat onto the part and not from behind. I did it constantly for 5 minutes, a few minutes at a time, then I pulled the connected up slightly (a little too much pressure on the pull and you will break the wire). Pull it constantly and If the heat has been enough to melt the adhesive, it should come off easily and slowly.
Hi, a little thing to help : i heatened up and then insert a cutter blade to start. Work better
Okay the home button is connected, as touch id works, but I can’t get any motion out of it. I backed off the screws, but that didn’t help. What else can I try?
The home button on an iPhone 7 Plus doesn’t move at all. Anything you feel during normal operation is a small vibration from the Taptic Engine that tricks your brain into thinking the button is moving.
Salve, vorrei un vostro aiuto, ho un problema con il tasto home (il tasto è originale preso dal vecchio display rotto) una volta sostituito il Touch ID funziona perfettamente (l’iPhone si sblocca e legge l’impronta digitale) il tasto invece no (il click per intenderci) cosa può essere? Grazie!
This was a very difficult step… I found using heat wasn't removing the adhesive for my home button. Found a video online that recommended using a playing card and a tiny bit of rubbing alcohol on the corner and slowly sliding it under. I was able to finally remove my home button using this tip.
Heat via hairdryer applied for a solid 3 minutes worked for me.
Thank the stars that I looked at these comments. I managed to do this and transferred the home button successfully. The pick is not good enough to do this job. The suggestion to use a new playing card helped. I also found that if you use a single edged razor to ply apart the bezel from the screen then when you apply heat with the heat gun the bezel will melt and bend a bit out of shape allowing you to use the playing card to lift the home button strip away from the bezel. The adhesive on the old home button strip was enough to stick it to the new screen bezel without having to buy new adhesive.
Thanks for the tip on the new playing card and rubbing some isopropyl alcohol on the corner of the card! I also peeled back the metal plate on the broken screen to get that bracket out of the way for better access to the cable. After applying heat and slowly and steadily working up the cable with the card, the home button popped out in proper working order.
Given that the old screen was already broken. I cut away the part of the screen where the button is, this gave easy access to the side of the ribbon cable which made it simple to gently pry it up and separate it from the plastic case.
After successful screen replacement, returning to give my thanks here. Excellent tips from you all - if you’re using force, you’re doing it wrong. All tips about direct heat, new playing card, bending back the metal bracket on the broken screen, screen protector to hold the replaced home button in place … perfect. Slow and patient, heat and almost no pressurel! Thank you all!
I wish I have read the comments first. Was not patient enough and despite applying heat for several minutes I used force with the thin pick and "successfully" cut away the connector 😔 Can't stress enough I should have been patient and do slowly... even without reading the good advice above!
-
-
-
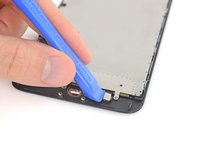
Retirez l'ensemble capteur home/Touch ID en le faisant passer du côté avant de l'écran.
True to this picture, the home button can only be removed (and put back in place) through the front of the LCD assembly.
OHMYGOD! Thank. you for this! After ruining *three* displays while inserting the home button from the back, I finally saw this comment…
In my defense I had no internet access through some of these replacements… but really, I’m sorry to say, this merits a MAJOR warning on the guide.
Cam F -
Had an issue when putting the screen back on, the side where the cables attach would not sit flush. At first I thought the cables were pushing the screen up. Turned out to be the battery cable shield was just a fraction too far down toward home button. After loosening screws, nudging it up slightly and screwing back in, the screen sat flush as it should. In case anyone else has same issue.
My phone is no more turning on after I replace the screen, no reaction if I press home button or power button
This guide is missing the camera transfer and the stupid little black sticker on the earpiece assembly that causes the earpiece not to work if that sticker is not transferred. This guide is wholly incomplete
This guide is meant for the ifixit parts, not other third-party screens.
Since I bought the replacement screen from iFixit and it has NO camera and speaker part anymore, the replacement of those parts should also be in this guide.
And, the replacement of those parts (camera, speaker, true light sensor, and aprox. sensor) is the most difficult!Hannes -
James and @computermason—You’ll want to look up the correct guide for your repair, especially if you’re not using one of the kits for which this guide is designed. The guide for transferring all the smaller components is here.
No home button functionality? I just watched a video on YouTube from two years ago saying that the iPhone 7 and 7+ have to be taken to an Apple repair center for the home button to work. Is this still the case? If so why didn’t you tell me this before I ordered this! Please confirm before I start warning everyone not to purchase from you!
@ghaycock If you’re replacing a screen, the home button will work fine as long as you carefully remove it from the old screen and transfer it to the new one, exactly as explained in the guide. The button itself can’t be replaced without help from Apple (which is why iFixit doesn’t sell home buttons for this model).
@jeffsuovanen If you’re replacing a screen, the home button will work fine as long as you carefully remove it from the old screen and transfer it to the new one, exactly as explained in the guide. The button itself can’t be replaced without help from Apple (which is why iFixit doesn’t sell home buttons for this model).
Jeff Suovanen - 06/11/2019
Jeff Suoven-I bought a new home button from Ifixit for this phone (along with a digitizer assembly) and it doesn’t work.
One thing I don’t see mentioned is the replacement of the rubber gaskets that are on the pentalobe holes. The replacement screen did not come with these on it. I was able to remove them from the OEM screen, but there was no easy way to get them to adhere to the new screen. If they move just a little, you might not be able to properly thread the pentalobe screws. Worst case is that they fall into the body of the phone during this last step of re-assembly. At that point, you’ve already started to have the screen stuck to the adhesive, so you would need to redo the entire adhesive gasket.
You can see the gaskets in this picture: https://d3nevzfk7ii3be.cloudfront.net/ig...
Here they are near the new screen: https://drive.google.com/open?id=14FwpSB...
Thank you! I was wondering what those things did, and even lost one but later was lucky enough to find it.
I saw one mention about those small gaskets in a guide and now I cannot find it. I was able to slip them off the old screen and onto the new one. I would think this is an important step to help seal those holes for the waterproofing. They should edit these screen replacement guides to include this step. Thanks for mentioning it in this guide.
WARNING: When you reassemble the phone, the little screws… You have to be VERY careful to not put any pressure on them until they’re really well seated, otherwise you will flick the screws into another dimension… they’re so small they literally just vanish out of existence lol. I ended up losing two of the smallest screws, one per bracket, and everything seems fine so far.
The glue/seal is also nearly impossible to get right. Just mash it down into the general area that it belongs if it gets stretched/twisted and can’t go in perfectly. Some glue is better than no glue, just assume that any repaired iPhone isn’t water resistant at all.
The biggest issue I'm having now Is replacing the gasket that goes around the home button. The original one got stretched out and the new on is too thick to seat correctly into the hole without being exposed and potentially coming off of the home button after a while.
I ordered a replacement screen from ifixit, but contrary to the description it arrived without the ancillary parts attached. So I had to transfer the front camera & sensor assembly, and the lcd shield. In case anyone else needs to do this, be sure when transferring the lcd shield that the screen cable sits properly underneath it (ie as far up towards the top of the screen as possible) or else the rectangular block on the cable will foul the loudspeaker.
If this happens, the bottom right corner of the screen will stand very slightly proud of the case, and you will end up with a pressure spot on the screen.
Well I transferred all the parts properly, but the front camera wasn’t working. Reseating it fixed the camera but then when I closed the screen it cracked. I backed out to the old screen which is held together by tape, but miraculously everything including the camera and Touch ID is fine. Better luck next time.
I did not realize that the much cheaper 3rd party replacement I purchased also required the further steps of removing and replacing front facing camera and speaker. I was pretty bummed initially as it looked intense…however i totally pushed through using another ifixit guide and saved $50. My only advice to a first timer would be get a $15 heat gun or the bean bag microwave thing, the hardest part is getting it open.
The cable is more than fragile and immediately broke right off my phone! Mine is no good anymore, but I wanted to warn everyone else just one more time…BE SO SUPER GENTLE and PATIENT…and even then, I’m not totally convinced that it is possible!! I was doing so well, right up to the point when I got to the one part that only Apple can fix and that will totally ruin your repair!!! SHAT!!!
Good Luck all!!!
The ribbon in steps 16 and 17, when reconnecting and sealing the phone, is really something to be careful with. I feel like I smooshed it in, and while the phone works after the replacement, I feel like the right side of the phone, near the power button, isn’t quite set in 100 properly. I wish I would have taken better note of how it looked prior to removing the broken screen. Hopefully, it will settle in better once the adhesive sets. At this point, however, the fact that I got through the process with what I would call 99% success is a win for me. Just be careful of the aforementioned ribbon when setting the new screen on.
The home bottom sensor cable does not plugin into the new screen, if put it back to old screen it plugin nicely and directly , but on the new screen it does not stay, it does not plug in the new screen, what to do?
The comments suggest the home button is well stuck down.
Does the home button need adhesive to stick it back onto the new screen? If so, what do you use/where do you get it?
Thanks
Very disappointed. Front camera and home button not working. And overheating too. I would like a refund Ifixit.
Esta incompleto, falta el desmontaje de los elementos de la parte superior de la pantalla
Did this back in 2021 after using i fix it tutorial on replacing battery i accidentally cracked screen when trying to pry it up with suction device and using spudger which felt wasn’t best tool for the job.
Maybe i didn’t heat up device enough to loosen adhesive enough, who knows it was the first time doing this.
Screen alone much easier than a battery replacement, especially second time around after cracking screen had more awareness of job.
They make good tutorials here always like fixing thins myself then paying more to have someone else do it.
-


Comparez votre nouvelle pièce de rechange à la pièce d'origine – vous devrez peut-être transférer les composants restants ou retirer les films adhésifs de la nouvelle pièce avant l'installation.
Pour remonter votre appareil, suivez les étapes ci-dessus dans l'ordre inverse.
Apportez vos déchets électroniques à un un recycleur certifié.
Votre réparation iPhone 7 Plus ne s'est pas déroulée comme prévu ? Essayez nos conseils basiques de diagnostic ou cherchez de l'aide sur notre Forum.
Annulation : je n'ai pas terminé ce tutoriel.
623 autres ont terminé cette réparation.
Merci à ces traducteurs :
100%


Ces traducteurs nous aident réparer le monde ! Vous voulez contribuer ?
Commencez à traduire ›

60 commentaires
Only the glass is broken on my screen. I don't need a new digitizer. Is there a way to just replace the glass? Seems like that would be much cheaper. Thanks!
Unfortunately, by the nature of the technology, cracked glass likely means your digitizer is out of commission (does touch still register on the cracked screen?). Below that is the LCD, and that might not be broken (if the image is fine, then the LCD is likely fine). The problem is that these components are VERY VERY difficult to separate. This makes the individual replacements a nightmare. I hate to say anything is impossible, but separating these components will feel impossible without expensive tools and extensive knowledge. It will also likely end in a mess of broken components. When there is a will, there is a way. But the separation project will demand a lot of will.
Our store is having trouble with the earpiece speaker working after screen repair on just the 7 Plus, not with the 7. We have tried different techniques and still get figure what we are doing wrong. Has anyone else had this problem and know the solution?
My earpiece speaker also won't work with new screen... this is frustrating. Any solution
Ben -
There are some connections for the earpiece speaker that can be a little tricky to get properly connected during reassembly. If you look at the third photo in step 22 of the iPhone 7 Plus teardown you can see four copper pads on the cable, and four protruding copper connections on the speaker. For starters, make sure that these are all clean. When reassembling, make sure that the metal pads on the cable firmly touch the metal pins on the speaker. These are actually electrical connections, and are a little tougher to seat properly because they don't snap in like press or ZIF connectors. If the metal is all lined up and pressed against each other, then electricity should be flowing and sound should result! If the earpiece speaker was not removed and this guide was followed as is, it is most likely an issue with the connectors in step 19 of this guide.
I am an amateur and have successfully transferred all components to a replacement screen earphone and home button as well as the large metal bracket on the back without a problem. During the process though the flex cable for the ear piece gave me some issue because the flex cable is actually 2 separate pieces that are held together by some adhesive. Underneath it there are some connectors that have to line up perfectly. If you are doing repairs on a hot surface that adhesive will become more likely to separate when you try to relieve it from the broken screen. Keep that in mind. If it does come separated like mine did during replacement simply line the connectors up and give it a squeeze for a few seconds to get the adhesive to take then let it cool down before re installation.
Make sure when you are connecting the earpiece ribbon cable you attach it the correct way. It seems like it should be connected with the excess of the ribbon cable going upwards but that is incorrect and will render the speaker useless. You have to make sure when you connect it the the excess is going downwards. This will make the ribbon cable appear as though it is twisted tangled but that is how it has to be connected. I wish I could upload pictures
why do you need to change the touch ID sensor? if your replacement screen comes with a touch ID, do you still need to swap it?
For security reasons, each iPhone's Touch ID sensor is uniquely paired to the logic board at the factory. If you replace your screen without transferring over your original home button, you will lose Touch ID functionality. If your replacement screen came with a replacement home button anyway, take it off and carefully replace it with your original home button.
For the 7, the home button also must detect a fingerprint in order for the home button functionality to work. Because the security feature turns off the TouchID function, the iPhone stops trying to detect a fingerprint and makes the home button not work at all. You want to keep the original home button and be careful not to rip the cable because for this particular generation of iPhone, there is no replacing the home button.
Absolutely. The iSclack isn't strong enough to fully separate the display without first cutting the adhesive, but you can certainly use it to create that initial gap under the display so you can fit a tool underneath.
I changed my display that came with no earpiece speaker, it doesn't work anymore after i switched, i tried pressing it firmly on the 4 copper things still nothing, another problem i got is my phone doesn't make call neither receives them, it restarts! HELP
I am curious as to why you chose to use the suction cup to lift the screen. In my experience, as long as you are careful, the iSesamo or Jimmy opening tools are safer and more reliable. The suction cup is more likely to slip and rip the digitizer and lcd cables.
The suction cup isn't meant to forcibly separate the screen; the display adhesive is too strong for that anyway. The suction cup should be used only to create enough of a gap to slip your tool in and start cutting the adhesive. Once the adhesive is cut, you can lift the display using the suction cup as a handle, but it shouldn't require any force. If you try to force your way in with an iSesamo it'll probably still work, but you're much more likely to leave visible damage.
Can someome please tell me the name and size of screwdrivers needed to take apart the iPhone 7 plus? After thoroughly researching this topic I was under the impression that I needed a 0.6 mm why TriPoint or Tri Wing screwdriver I ordered it and it does not fit for the very first step. After looking further on steps and pictures it shows the screwdrivers being different sizes meaning I would need different size screwdrivers correct? I have a ton of screwdrivers however this is the first iPhone 7 I have taken apart. So I was trying to make sure I had all the correct size of screwdrivers extremely frustrated because I have already ordered what I thought I needed and it's working? Any help would be greatly appreciated
The tools needed are listed at the top of this guide—you need a P2 pentalobe driver to remove the first two screws and open the iPhone. For the tri-point screws you need a Y000 driver (just one size). For additional repairs beyond the scope of this guide, you may also need a single small Phillips/JIS driver (00 or 000 should work) and either a small flat-head or a standoff driver bit. Not all driver types/sizes are standardized, so different tool manufacturers may call them something else. If you plan on doing any other electronics repair, save yourself the headache of tracking down individual drivers and just get a 64-bit kit or something similar. Good luck!
I replaced an iPhone 7 plus screen and even with the old screen back on I get just a light no display
hallo
after i changed my display the iphone is so slow no any tone no any vibertaion ….. and it will take 4 min to turn on ……
please help !!
Same for me, iPhone seems to work fine apart from it being Extremely slow to start and respond to screen input on all ”home” screens…..inside the apps it works fine..ang suggestions?
I would double check all your screw lengths. I had a customer bring in a disassembled phone with all the screws stuck to the speaker. I’m using a digital caliper to try and find the appropriate screws based off of this guide and none of them are matching up. I have no 1.3mm screws and several much longer screws that don’t seem to be on the guide at all.
The screw lengths here are accurate, but only to the nearest 0.1 mm. You can’t do much better than that because the screw manufacturing tolerances aren’t that tight; with an accurate digital caliper, you can pull the same screw from several phones and get slightly different measurements on each one. I’ve done what you’re doing (reassembled a phone from a mixed pile of screws) and it’s definitely not easy! You can use these measurements as a guide, but you also have to use a light touch and be willing to back out and try another screw if the one you’re installing doesn’t quite seem to fit. Also, remember that your customer may have already installed some screws in the wrong place and left you with others that don't belong anywhere in this guide. Good luck!
Successful digitizer swap. Home button doesn’t work at all. I re-disassembled and checked all connections and still nothing. Doesn’t work at all. Any advice for troubleshooting. I used the ifixit kit and this is my 3rd or fourth iPhone repair. So I was very careful with the ribbon cables and connectors. This is an iPhone 7 Plus. Any help greatly appreciated.
Burt
I’ve repaired my wife’s iPhone 7Plus with success. It’s working really good. I
I took my time with it. It was hard since I couldn’t find my reading glasses and lights were mediocre. The instructions were very clear and helpful.
On home button, I have to be really really careful and manage to place it on the new screen and now it works great.
>> I would suggest to people repairing the iPhone to use a LED Magnifying Lamp that’ll clamp to a work desk. That will help a lot. I was using my head lamp that I used for camping and it was ok. <<
Yo guys are never going to believe this but I just received my new iphone 7+ LCD Screen and Digitizer Full Assembly and I was cutting open the bubble wrap with a pair of scissors and I managed to cut off the head of the longer of the two cables stuck on the side of the LCD. Moral of the Story -Make sure you cut open the bubble wrap at the top and not down the side. !!! $99 down the poo poo hole !?%$^&&**
It’s worth mentioning that you may need to do a hard reset after installing the assembly to get it to work.
Just finished replacing the screen and it works perfectly although the colors on the screen a somewhat washed out. Imagine this problem arises with aftermarket screens. Fortunately, I had also purchased the adhesive seal (in case I damaged the one with the screen!!!). However the replacement screen does not include a seal. And also disappointing is the fact that the pentalobe screw brackets do not include the washer seals - had to retrieve them from the original broken screen (not sure tho’ if they’ll do the seal job they’re supposed to do!!)
New screen no touch response. Have repaired many, many phones over the years, and this is a first. Checked cables, reinstalled broken screen. Broken still works aside from the area most cracked, but new screen, only home button from old screen works, though it does turn on. Just no response on touch screen. Maybe the above-mentioned hard reset, or just a defective part? I know I can depend on the ifixit parts, but this was replacement screen was bought by the friend of the phone owner, off amazon…
@kitabel This can sometimes happen if the display or touch panel came from a different manufacturer than the one that was on the phone originally. You can usually cure it by simply trying a different screen. It doesn’t necessarily mean your screen is defective (although that’s another possibility)—it’s usually more of a calibration issue than a defect. This page explains how to identify the manufacturer of your display so you can make sure your second attempt will be more successful. Good luck!
just whatever you all do, do NOT long screw the board. likewise for the screws facing the glass. if you put a long screw where a short screw goes, it will add pressure to or break the glass entirely, and then its back to square one with an added 5 days wait for delivery of a new screen if you’re one of those people who dont have many on hand. :)
I have a broken screen and home butto , I did not realize that this repair kit does not come with a home button. Reading through the other posts I see that the home button is paired to the logic board… sooo how can I replace my home button? Thanks for your help!
This too me two and half hours, but worked! Minor issue until I figure out how to resolve it is that I have some minor light bleed bottom right of the screen. No clue what’s caused it.
I bought a “for parts” iPhone and want to just swap this screen out for my cracked screen.. Is there any reason I would need to switch the home button? The new one has a button in place already. Thanks
Replacement buttons won’t work, sorry. Keep the original button and carefully transfer it to your new screen, as explained in the guide.
Iphone 7 Plus, had the screen replaced once in a mall, they didn’t use proper adhesive and the screen felt low quality. Bike ride in the rain, water ingress killed the large speaker and Taptic stopped working. Screen broke again and I fixed it myself this time with tools, parts, adhesive and this excellent guide (and the speaker replacement one too). Everything works wonderfully including Touch ID. My daughter now has an iPhone 7 Plus. Thanks Paige and all the people who posted helpful comments that made this soooo easy.
The repair went smooth!It took me roughly 30min. Like the instruction say, use heat for the glue so you do not damage the sensitive instruments. Everything else will go smooth. Like always, good step-by-step instruction, good replacement parts, and tools. Thank you iFixit. Keep this business model and I will be a loyal customer as long as repairs are needed. Actually one complaint, I never get a free sticker for my laptop : ( Its good advertisement…hahaha.
Thank you for your comment and for sharing your experience. You are awesome. :)
Ugh. I tried it and the earpiece speaker didnt work. also the homebutton didnt work as well.
I can't stress enough the importance of the screw lengths. If you use a longer screw up near the earpiece it can actually break your screen or it can show up through the glass!!
I am about to try this. My phone is cracked pretty bad and has a few black spots. The screen still works, as far as touching is concerned so I assume just the LCD display is damaged. Would this product solve the problem? iPhone 7 Plus Screen
Just wanted to make sure before I started. Thanks!
That should be the right part! Be sure to read through the guide and guide comments. Good luck with the repair!
The kit comes with the adhesive for the screen but no mention on how to replace that/install it.
Hi Michael,
Here is a guide to apply the screen adhesive, and here is a general guide for custom-cut adhesive. Hope those help!
Question: Is the iPhone still water-proof after replacement?
Hi Miguel,
The phone will not retain water resistance after you open it.
question, Is there any problem with the phone if you didnt remove the battery connector when replacing the screen and also by noy disconnecting the battery connector will it cause the screen not to work when replacing it ?
Hi Miguel,
If you do not disconnect the battery, there is a chance that the display’s backlight may blow out when you reconnect the LCD. To check, turn on the phone and shine a flashlight at the screen. If you can see graphics on the dark display, then the backlight is not working.
Hello, it seems this guide shows me how to remove the broken screen, but doesn’t show me how to install the new screen. Am I missing something?
Hi Brian,
To install the new screen, follow the instructions in reverse order. Be sure to take note of any special reassembly bullets, which are marked with a pin.
The instructions for disassembly are nicely laid out and complete to follow, easily. The simple instruction of reverse the process to re-assemble, which is the most difficult it would be best to have some additional assembly notes. 1. Putting the top connector, as it has to be twisted to lay properly, is simplest to do first with the screen aligned at the top of the phone so that it would resemble a stenographers tablet. This way the connector just lays over the socket without torque trying to turn it up. Then once connected close the top and reopen like a book putting the proper twist into it to match the rest of the procedure. 2. Start out putting everything into a rectangle cake tray with a white paper on the bottom. This will catch and the extremely small screws as you try to push to reinsert them should they fly. They will crawl up the magnetized screwdriver and hide or pop across the table. Use the black spudger pointed end to align the bracket holes and screw holes.
Dose anybody know if there are specific spots on the Screen or in the Body for Force touch? (I don’t mean 3D-Touch). After I changed the battery of my phone force touch stoped working. I also bought a new (refurbished) display and force touch didn’t want to work with it too.. so I think maybe the Problem is that the adhesive is maybe missing on or some spots needs extra adhesive or so in order to make forcetouch work?
any ideas?
Cheers
First time phone screen and battery replacement and all works great! I took my sweet time. I was initally stuck trying to remove the home button system from the old screen. Turns out the cheap Y screwdrivers I was using have worn out. Had to go out and buy a proper screwdriver set and this afternoon I got back to work to transferring the home button. Another setback was when I was testing the screen before I redid the screws (just in case the screen didn’t work). The screen works but the touch feature wasn’t. Turns out I had to reseat the 2 cables into the sockets properly (took a few tries). Presto! The phone now works so I got to work reassembling the brackets and screws. A 6 year old phone with a brand new screen and battery and this was my first time doing it! Saved me a lot of money and it was fun doing it. Thank you so much for helping me with this guide. :) -ozgeek81
You failed to show how to remove the front facing camera and put on new screen (so now I don’t have a front facing camera nor functional earpiece). Thankfully I don’t necessarily need either of those & the iPhone (which is my old phone that I’m going to use as an iPod since I removed the SIM card) still works. Did not install adhesive strip in case I decide to spend an unanticipated $45 for the front camera replacement (unless you want to send me one gratis).
The recommendation of discharging the battery is completely unnecessary. Even a 25% charged battery can explode. Completely ridiculous suggestion.
pargoff - Réponse
The risk of thermal runaway on these batteries decreases with the battery's SOC (state of charge). Below 50% charge the risk is fairly low, and at 25% charge the risk of a thermal event is near zero. If I recall correctly, the same suggestion appears in Apple's official (non-public) service manuals for the iPhone.
Jeff Suovanen -
@jeffsu Yes, that is correct. Apple does require all certified staff to discharge the battery below 25%. This is an industry standard for all LiION batteries. If you don’t want to do this, just make sure to not puncture the battery and disconnect it first thing.
iHelpU.Tech - Réponse
Hang on a second here, doesn’t the Ifixit part I ordered come with the seals? The display assembly? It doesn’t. Now I have to wait another week?!
Vanessa Pinter - Réponse
How do you turn off if the screen isn’t responding to touch?
adam - Réponse
The replacement battery came with the seal—but how do you put it on???
lkollar - Réponse
Instructions for replacing the seal are here: Remplacement des bandes adhésives fixant l'écran d'un iPhone
bester - Réponse
I just found the instructions on how to install the seals AFTER I was completed and had to figure it out. Maybe, just maybe you should link this somewhere on the guild instead of buried in a comment. Just a thought.
Charles Meitin - Réponse
Step 1 is: Read through all the steps and comments or the method prior to starting on this Step 1. There's a lot of much needed information and experience that you can learn from which will reduce the chance of struggling, wasting time or even breaking your device.
My favourites are:
Use a hot water bottle.
Label all screws you remove with their size and location on a piece of paper with double sided sticky tape.
Test the lightning assembly at step 13
There is a Standoff driver bit in the box, don't use a screwdriver.
etc...
Neil Eriksen - Réponse
A tip for looking out for all those little screws. I used an ice block tray, for all the little screws etc. I numbered each with the step number, as in the instructions, but not all steps have bits to look out for. Where two different size screws are used I had a tray for each size and marked step a and step b. For this I coloured each tray sticker with the colour of the screw as shown in the instructions. All this worked a treat with no confusion or using the wrong part.
Herb
Herb Adler - Réponse
The screw size for those with a screw set is P2.
Gareth Flandro - Réponse