
Remplacement de la batterie du Dell XPS 13.
Introduction
Passez à l'étape 1Cliquez ici pour une version actualisée de ce tutoriel. Le tutoriel que vous voyez actuellement n'est archivé ici que pour des raisons historiques. [ … ]
Ce dont vous avez besoin
Kit de réparation
Ce kit contient toutes les pièces et tous les outils nécessaires à la réalisation de ce tutoriel.

Pièces

Outils


Afficher plus…
-
-
Utilisez un outil d'ouverture plastique pour ouvrir la trappe 'XPS' au milieu.
No flap or screw on the XPS 9370, just a press-fit latch at the centre of the cover. This can be gently prised off.
-
-
-
-
Utilisez des médiators ou un outil en plastique pour faire levier pour détacher les clips du boîtier en commençant par le bord arrière.
It’s not that easy to lift actually, cause there are latches. Had t release them gently all around beforehand.
Also there’s one additional screw under that plate on the bottom!
Maybe the later models are different, since it should be from the front: https://www.youtube.com/watch?v=xFIE2SKs...
Very difficult step, Proceed very carefull
If you are replacing the battery of a 9360 or latter (2016 onward) make sure to do the FRONT first. There are latches on the back that you may break if you try to force it open that way. After prying up the front and the sides, just lift up the front like you would open a hinged box. You shouldn’t feel that much resistance as the back hinges off towards you after you’ve lifted it around 30-40 degrees.
-
-
-
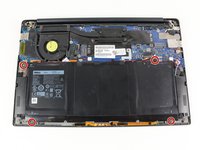
Retirez le couvercle inférieur.
good evening, is there a site that sells the back part because it's broken
good evening, is there a site that sells the
back part because it's broken
-
-
-
Retirez les quatre vis Phillips #0 de 3 mm situées à chaque coin de la batterie.
There are two additional screws holding sound speakers.
And there is a another small screw holding the battery right above the “M1 6x4” print.
You also do not need to remove any speaker screws or the speaker, you just have to remove the tape holding the speaker wire to the battery.
-
-
-
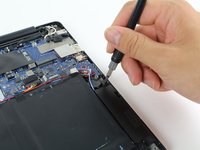
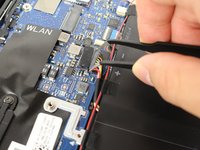
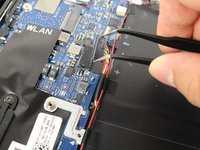
Tirer le connecteur du câble de la batterie vers la batterie pour le débrancher de sa prise.
-


Pour remonter votre appareil, suivez ces instructions dans l'ordre inverse.
Pour remonter votre appareil, suivez ces instructions dans l'ordre inverse.
Annulation : je n'ai pas terminé ce tutoriel.
23 autres ont terminé cette réparation.
Merci à ces traducteurs :
100%


Ces traducteurs nous aident réparer le monde ! Vous voulez contribuer ?
Commencez à traduire ›
Équipe

Cal Poly, Team S21-G6, Livingston Spring 2017 Membre de l'équipe Cal Poly, Team S21-G6, Livingston Spring 2017
CPSU-LIVINGSTON-S17S21G6
5 membres
30 tutoriels rédigés
6 commentaires de tutoriel
There is a #00 Phillips under the XPS cover on the bottom. Also one of the #0 screws holding the battery down is #00. It is not necessary to remove the speakers but the wires are taped to the battery so pick and remove the tape.
Took me about 45 minutes.
Couple of complexities:
1. The speaker removal, it’s easier just to unscrew and pull out that way. Moreover, it’s easier the same way to replace, the problem is if you push in the speakers can remain wobbly unless you properly attach to the flexible plastic things.
2. When replacing the screws on the battery, do the little screw first. It shows it on the images, but doesn’t mention it, it’s a different sized screw (step 3).
3. Removing the screws on the back of the laptop is tough unless you have a good screw driver. In the end, I bought one from China from Aliexpress that was bang on what I needed.
Does anyone have a source for a replacement battery? I checked Amazon but reviews were sketchy at best.
I was concerned about the Amazon reviews as well. I ordered my battery directly from Dell for $85.
Great guide! Came in real handy when I needed to replace a swollen battery.
Although the speaker removal part can be skipped completely.
Just remove the 4 Philip battery screws and peel off the black tapes securing the red/white speaker wires would be sufficient to allow the battery to slide right off.
Excellent guide. It took me about 20 minutes and I’m a complete novice to this stuff. I didn’t need to lift the speakers at all.
I got my battery from Duracell Direct (UK), for half the price Dell were charging and thanks to this guide giving me confidence I’ve made the change early enough that my keyboard has dropped straight back into shape and isn’t deformed any more. Am very happy. Thanks
Missing a step about removing the tiny Phillips head screw under the XPS flip up cover in the middle. Also, there are hooks all the way around the cover so it doesn’t simply lift off.
curtis_p_brown - Réponse
What about step 3???
Peter Hecht -
Please dont hurry , take your Time to follow this procedure. It takes 20 min (not 5) and step 4 requires half of this Time. Good luck.
Peter Hecht - Réponse
+1 Peter Hecht is right - getting the little clips the back is snapped on with is time consuming and a bit fiddly for people not used to “spudging” off covers. Starting from the back is the key those come loose much easier and help with the rest
Doug Steinschneider - Réponse
Great guide. It took me 20 minutes and there were no surprises. Battery installed. :)
dhenniga - Réponse