Il est possible que cette traduction ne reflète pas les dernières mises à jour du tutoriel source. Aidez à mettre à jour la traduction ou bien consultez le tutoriel source.
Introduction
Utilisez ce tutoriel pour remplacer le SSD.
Ce dont vous avez besoin
-
Outil utilisé dans cette étape :Magnetic Project Mat$16.96
-
Dévissez les dix vis suivantes fixant le boîtier inférieur au boîtier supérieur :
-
Deux vis Pentalobe P5 de 2,3 mm
-
Huit vis Pentalobe P5 de 3,0 mm
-
-
-
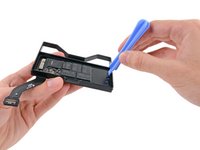
Retirez le cache en plastique couvrant la carte de contact de la batterie.
-
-
-
Outil utilisé dans cette étape :Tweezers$4.99
-
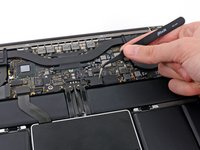
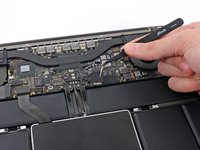
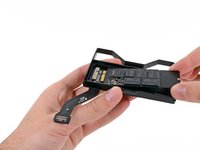
Saisissez l'interposeur avec une pincette.
-
Soulevez l'interposeur et mettez-le de côté.
-
-
-
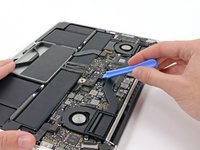
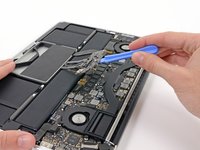
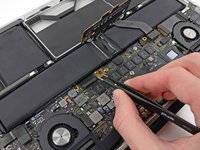
Utilisez l'extrémité plate d'un spudger pour retirer le connecteur de la nappe SSD de sa prise sur la carte mère.
-


Pour réassembler votre appareil, suivez ces instructions dans l'ordre inverse.
Annulation : je n'ai pas terminé ce tutoriel.
106 autres ont terminé cette réparation.
Merci à ces traducteurs :
80%

Ces traducteurs nous aident réparer le monde ! Vous voulez contribuer ?
Commencez à traduire ›

9 commentaires de tutoriel
I followed the guide and was able to upgrade my wife's MacBook from 128GB to 240 GB!
One thing I noticed was that when I removed the plastic clip in step 6, it left behind a glue dot on the screw head I had to remove in step 7. I wasn't sure why my screwdriver kept rotating until I realized the clear dot was covering the screwed! Then I tweeze the dot off, and put it in the recess on the underside of the clip and all was good.
Everything went to the letter after, until it came time to restart and initialize the new disk. It turns out the old disk had some directory damage, so when it was copied to the new internal SSD, then the Mac wouldn't boot from it until I did a couple FSCK and Repair Disk fixes.
Vignesh,
Here is an option to recover your data and get a tiny speedy external SSD drive for 28.85
Sam,
The 2012 MacBook Pro uses an PCI Express Mini Card connection between the logic board and the SSD.
"Some notebooks (notably the Asus Eee PC, the MacBook Air, and the Dell mini9 and mini10) use a variant of the PCI Express Mini Card as an SSD. This variant uses the reserved and several non-reserved pins to implement SATA and IDE interface passthrough, keeping only USB, ground lines, and sometimes the core PCIe 1x bus intact.[11] This makes the 'miniPCIe' flash and solid state drives sold for netbooks largely incompatible with true PCI Express Mini implementations."
I fully agree, Especially as it turned out to be a little tricky to get the connector back in his position properly. Don't think there is a higher risk of damage through electric shock or so. Next time I will for sure skip it ;-)
Timpetou -
Aren’t steps 4-10 completely unnecessary?