Introduction
Les batteries d'Apple sont estimées tenir 80 % de leur charge pendant près de 500 cycles, ce qui équivaut à environ 18–24 mois pour la plupart des utilisateurs. Ensuite, il se peut que votre iPhone doive être chargé plus souvent ou qu'iOS vous avertisse que les performances ont été affectées (en gros, votre téléphone tournera au ralenti). Remplacez votre batterie avec ce tutoriel et votre iPhone sera à nouveau au top de ses performances.
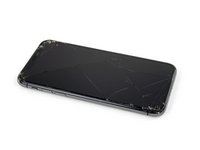
Si votre batterie iPhone XS a gonflé, prenez les précautions appropriées.
Remarque: après la réparation, votre iPhone pourrait afficher un avertissement à propos de "l'authenticité" de la batterie, même si vous avez utilisé une pièce d'origine Apple. Si votre iPhone fonctionne correctement, vous pouvez ignorer cet avertissement en toute sécurité.
Pour obtenir des performances optimales après avoir complété le tutoriel, calibrez votre batterie nouvellement installée : Chargez-la à 100% et laissez-la charger pendant deux heures supplémentaires. Puis utilisez le téléphone jusqu'à ce qu'il s'éteigne à cause de la batterie faible. Rechargez-le ensuite sans interruption jusqu'à 100%.
Ce dont vous avez besoin
Vidéo d'introduction
-
-
Éteignez votre téléphone avant de commencer le démontage.
-
Dévissez les deux vis Pentalobe de 6,9 mm de long en bas de l'iPhone.
-
-
-
Mesurez 3 mm à partir de la pointe et tracez une ligne sur le médiator avec un marqueur permanent.
Got to step 2 and realized the fix kit doesn't include an opening pick! Looks like a guitar pick, and I have those lying around. Is that expected? Looks like the pick is used in many steps below. There's a little blue crowbar that isn't mentioned in the instructions. Perhaps that replaces the opening pick?
Hi! I can't see which guide you were using when writing this comment. Can you reply here with which guide and fix kit you used?
I see you posted this in Meta. I hope it's resolved soon! In the meantime, a guitar pick may work well enough for your repair.
what fix kit?
My fix kit didn't include an opening pick either
My AliExpress refurbished screen came with a pick that has a coin-like circle that pops out, so no modification was necessary
It's not an Ifixit KIT if it doesn't include everything. You'll need to order the opening pic separately. Or head to Walmart like myself and look for guitar pics. Hopefully, this will work just as well.
No pick in mine as well. It’s really not clear that you have to order this separately when ordering an IPhone SE 202/2022 screen repair kit. Is this the case?
Frustrated, I ordered a compact package where everything was encapsulated. Useless suction tools could not separate the screen. If it is unable to decouple the screen, then why sucking suction tools you have provided.
For my kit the triangle pick was stuck inside the box with the screen not with the other tools maybe it's also there for you
Y’all are getting far, FAR too detailed with some of this stuff…. Measuring and marking the pick that you won’t actually use to open the device?!? lol that’s kinda funny. Just heat it up, grab a spudger, and the back just pops right off! The iFixit tech need to stick to the KISS method more often, you know KEEP IT SIMPLE STUPID!!! Like l, for reals, I’ve been doing this stuff for YEARS and using iFixit guides regularly and this is just ridiculous at this point!
Will the phone still work if the sensor assembly on the back of the screen is damaged?
-
-
-
Recouvrez l'écran de bandes de ruban adhésif, qui se chevauchent, jusqu'à ce que toute la surface soit couverte.
-
Si la ventouse n'adhère pas au cours des étapes suivantes, pliez un morceau de ruban adhésif épais (du ruban adhésif toilé p.e.) pour former une poignée et soulevez l'écran de cette façon.
-
-
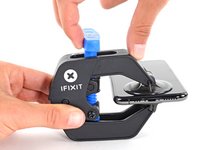
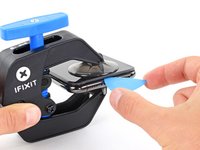
Outil utilisé dans cette étape :Clampy - Anti-Clamp$24.95
-
Tirez la poignée bleue vers l'arrière pour débloquer les bras de l'Anti-Clamp.
-
Insérez le côté droit ou gauche de votre iPhone entre les bras.
-
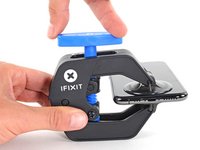
Positionnez les ventouses près du bord inférieur de l'iPhone, une devant et une derrière.
-
Appuyez sur les ventouses pour les faire adhérer à l'endroit désiré.
-
-
-
Tirez la poignée bleue vers l'avant pour bloquer les bras.
-
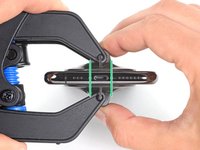
Tournez la poignée dans le sens des aiguilles d'une montre, de 360 degrés ou jusqu'à ce que les ventouses commencent à s'étirer.
-
Vérifiez que les ventouses restent bien alignées entre elles. Si elles commencent à se décaler, détachez-les pour les réaligner.
-
-
-
Chauffez un iOpener et faites-le passer à travers les bras de l'Anti-Clamp.
-
Pliez l'iOpener de façon qu'il repose sur le bord inférieur de l'iPhone.
-
Attendez une minute que l'adhésif se ramollisse et qu'un espace s'ouvre.
-
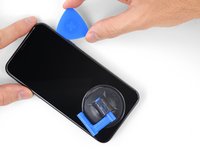
Insérez un médiator dans l'espace sous l'écran et le joint en plastique, et non dans l'écran.
-
Passez les trois étapes suivantes.
-
-
-
Servez-vous d'un sèche-cheveux ou d'un pistolet à air chaud. Ou bien préparez un iOpener et posez-le sur le bord inférieur de l'iPhone pendant environ une minute afin de ramollir l'adhésif qui se trouve en dessous.
-
-
-
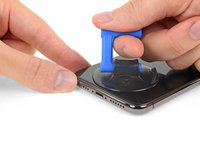
Tirez fermement et constamment sur la ventouse pour ouvrir un léger interstice entre le panneau frontal et la coque arrière.
-
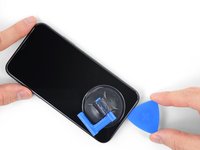
Insérez un médiator dans l'interstice sous l'écran et le joint en plastique, pas dans l'écran lui-même.
It seems like I need a third hand to do this. To hold the phone; hold the suction cup; and push the pick in the space.
-
-
-
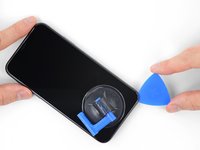
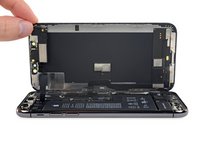
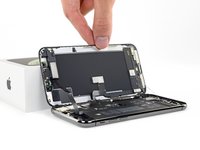
Ouvrez l'iPhone en faisant pivoter le bord gauche de l'écran, comme la couverture arrière d'un livre.
-
Appuyez l'écran contre un objet pour le maintenir à la verticale pendant que vous travaillez sur le téléphone.
-
-
-
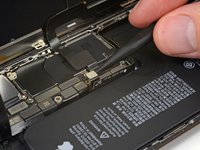
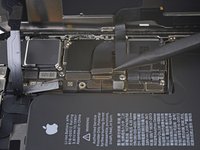
Dévissez les cinq vis de différentes longueurs, qui fixent le cache du connecteur de la carte mère :
-
Trois vis Y000 de 1 mm
-
Une vis Y000 de 1,3 mm
-
Une vis cruciforme de 3,7 mm
FYI: I used a tiny piece of scotch tape to hold those 1mm screws in place while aligning the magnetic screwdriver. Otherwise they are so tiny the magnetic bit pulls them right out the hole.
-
-
-
-
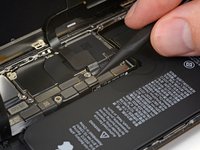
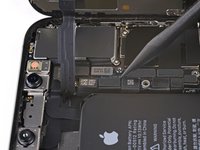
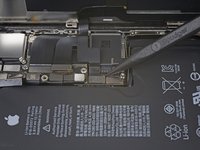
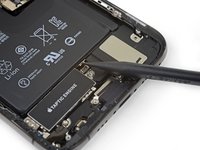
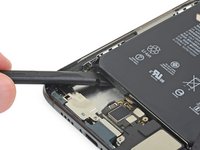
Faites levier avec une spatule (spudger) ou un ongle propre pour soulever le connecteur de la batterie hors de sa prise sur la carte mère.
-
Repliez et écartez légèrement le connecteur de la carte mère pour éviter qu'il touche accidentellement sa prise et que le téléphone soit alimenté pendant la réparation.
-
-
-
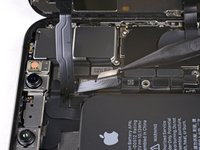
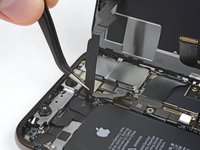
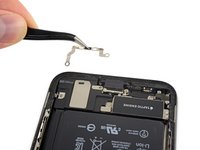
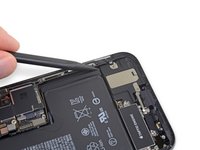
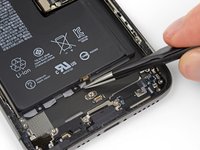
Servez-vous d'une spatule ou d'un ongle pour soulever et débrancher le connecteur de la nappe des capteurs du panneau frontal.
In my phone the connector made poor contact with the socket resulting in no sound audible through the phone receiver/headset. There was an overhang of insulation close to the socket which I believe may have prevented a good connection. So if you have these kinds of audio problems you might see if this is the problem.
-
-
-
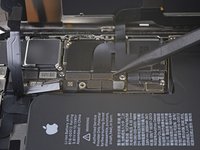
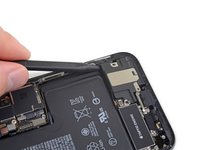
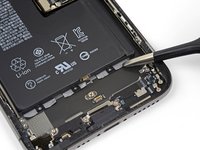
Avec une spatule on un ongle, débranchez le connecteur de la nappe du panneau OLED.
-
-
-
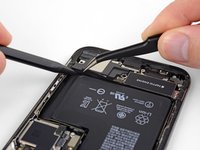
Prenez une spatule ou un ongle pour débrancher le connecteur de la nappe de la vitre tactile de sa prise.
Reassembly: reconnecting the press connectors upon reassembly was so hard, even for the ones not seated in a recessed location !! It took me two days to get them reconnected. What helped me was to shine bright lights on all sides of the iPhone and then hold the iPhone vertically like a book and press it in that way. They are now all in, but the touchscreen functionality has disappeared :( so I will need to reconnect that one.
-
-
-
Soulevez délicatement la nappe pour la décoller.
Will replacing camera and sensors fix damaged face I'd
No, FaceID will be disabled because the original sensors are paired with the logic board.
-
-
-
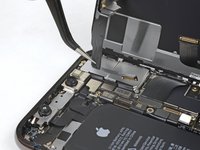
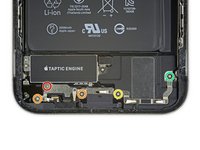
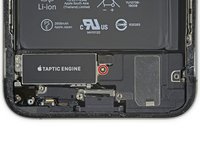
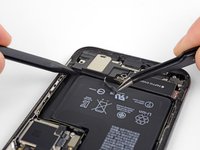
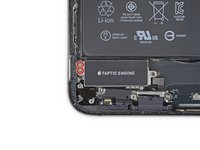
Dévissez les cinq vis qui fixent les deux supports en dessous du Taptic Engine et du haut-parleur principal :
-
Une vis tri-point Y000 de 1 mm
-
Deux vis cruciformes de 1,3 mm
-
Une vis cruciforme de 1,7 mm
-
Une vis cruciforme de 1,8 mm
Bonjour,
Plus pratique avec une Y000. Dans mon cas c’était impossible en Y00.
Bonne journée. :)
got stuck on the 1.8 mm screw and had to abort. The Phillips head provided “PH000” didn’t quite fit and stripped the screw.
I ended up skipping this step through 32. It’s not necessary to take the speaker and taptic thing off. I just used the thin black spudger flat edge and pried under the battery on the L-shaped edge and dislodged the adhesive and then did the same on the top edge. You will end up bending the old battery but that’s ok—just don’t poke it. keep poking the flat edge of the spudger in there kind of like a knife to break the adhesive. once you get at least two spots of the adhesive pulled, the rest comes up quite easily when you lift the whole battery.
I agree with R.J. The bracket screws are minute. They are much easier to remove than to put back. Avoid taking them out if you can.
-
-
-
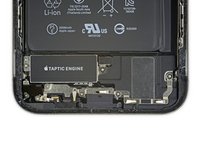
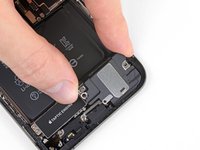
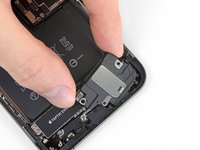
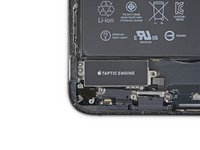
Pour les décoller, soulevez-les délicatement et ôtez-les l'un après l'autre en faisant attention à ne pas les déformer.
-
Si nécessaire, faites-les un peu chauffer avec un sèche-cheveux ou un pistolet thermique pour ramollir l'adhésif. (Il est déconseillé de poser un iOpener sur les supports, car vous pourriez déformer les contacts à ressort le long du bord supérieur.)
-
-
-
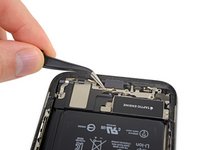
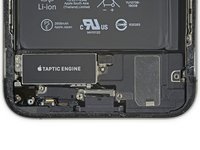
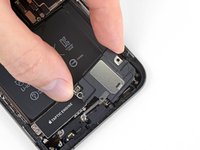
Retirez le haut-parleur.
I thought my speaker gasket was also missing, however looking back into the part box I found it tucked under the flap at the other (unopened) side of the box. Glad I took a second (and closer) look. IFIXIT needs to do a better job securing very small parts as it is very easy for these types of parts to get jostled during shipping and then could fall out or stuck in the box unnoticed. I've purchased iFixit products for more than 10 years and am super satisfied their quality in parts and provided instructions. Hopefully they'll make some adjustments to their shipping containers as I'd love to continue using them.
My speaker gasket was stuck to the inside of the box also. Unfortunately it has the back peal removed and has stuck itself to the cardboard box. I tried to remove it but it was firmly attached. Bummer. This is my first iFixIt. Please package it more carefully as the other person said.
I can't find mine in the part box. Is it possible it was excluded?
It might have fallen out. Search in the crevasses of the box. If you still cannot find it contact iFixit.
Update to last comment, I looked again at the listing for the battery with and without the "fix it kit". I ordered without, and apparently, the speaker gasket is part of the kit. Will need to order separately and take the phone apart again and replace the seal and battery adhesive again to install the gasket.
It's kind of ridiculous that the gasket is ONLY included with the kit, that includes a bunch of tools that I already have too many of (yes, I've bought several screen kits...). The fact is, to properly do the repair, you require the gasket. As such, it really should be included with the battery part and not only sold with the entire kit. Most of us do not need yet a nother suction cup, more screwdrivers (ok, maybe the bits), etc. My first few orders, I bought the kit because the extra cost gave me more bits, handle, spudgers (always need more), etc. However, I didn't need any of those for this repair so I opted for only the part - the battery.
I am so irked that I have to redo this again just because ifixit put the gasket with the kit and not the part that requires it. It's not even highlighted AT ALL that the gasket is required and not included. I'll have to find a way to bring this up to ifixit.
-
-
-
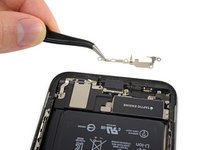
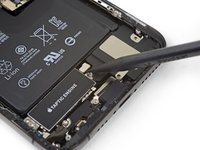
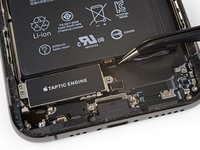
Soulevez la nappe du Taptic Engine tout droit vers le haut avec une spatule pour la déconnecter de sa prise.
-
-
-
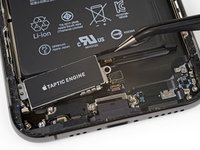
Ôtez le module Taptic Engine.
Where's the rest??? Help!
This guide is used as a prerequisite before moving on to other components, you'll find the full list of guides here: iPhone XS
-
-
-
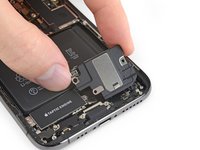
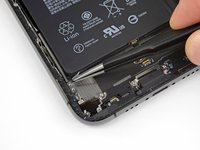
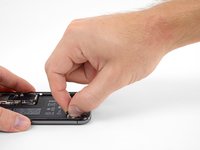
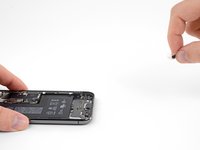
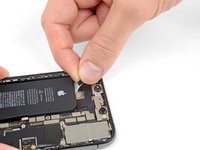
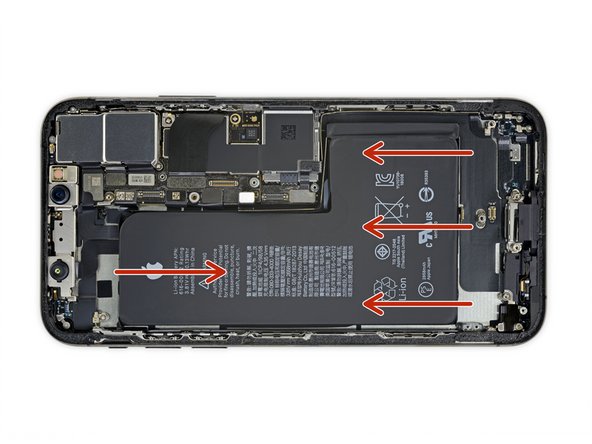
Chaque bande est munie au bout d'une languette noire d'extraction qui adhère légèrement au bord de la batterie.
-
-
-
Décollez la première languette adhésive de la partie inférieure de la batterie.
The adhesive we're meant to pull is affixed to another layer of heavier material affixed to the battery. Be sure to peel only the first layer.
-
-
-
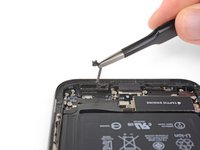
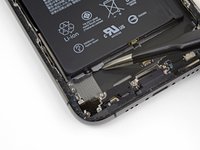
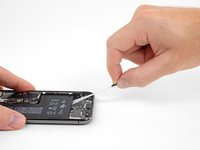
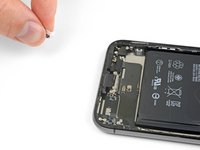
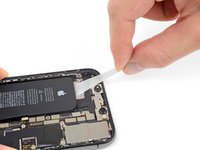
Répétez les étapes ci-dessus pour séparer les deux languettes restantes du bord inférieur de la batterie.
The tabs are stuck on with the same glue that is holding the battery down. It is fairly strong but will come off with some patience and consistent progress.
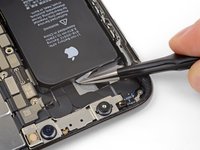
Despite the photo, I do NOT suggest using the tweezers for this but the black plastic spudger that comes with the kit. I say this after having the tweezers lose grip and slide across the bottom black ribbon attached to the case. If you must use the tweezers because of the strength of the glue, use a downward force into the case bottom, not an outward force. That way, you will not have the same happen to you…
Here is hoping the slight scratch did not damage anything vital…
-
-
-
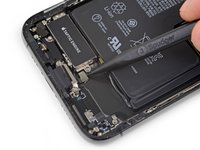
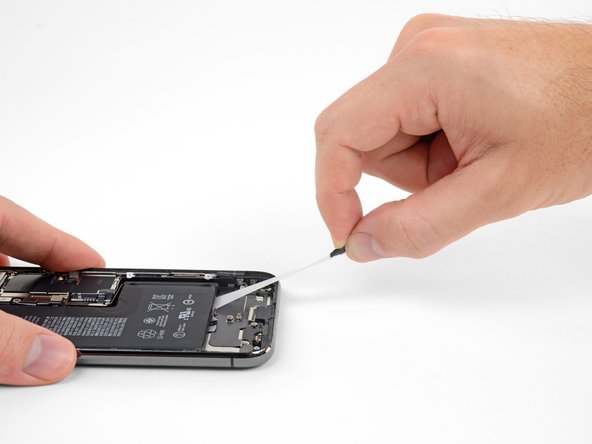
Pour augmenter vos chances de succès :
-
N'appuyez pas sur la batterie. Tenez fermement l'iPhone par les côtés.
-
Veillez à ce que les bandes restent le plus horizontales possible et ne fassent pas de plis pendant que vous tirez dessus.
-
Tirez très lentement pour donner aux bandes le temps de s'étirer et de se détacher. Elles ont besoin pour cela d'environ 15 à 30 secondes.
-
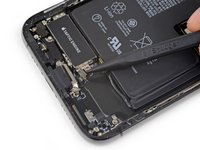
Veillez à ce que la bande reste le plus horizontale possible et ne reste accrochée au bord inférieur de l'iPhone.
-
Si vous déchirez une bande sous la batterie et n'arrivez pas à la récupérer, essayez de décoller les autres bandes, puis référez-vous aux instructions spécifiques plus bas.
Pour cette étape, vous pouvez saisir les bandes adhésives avec une pince à bouts ronds (pour éviter de percer la batterie) et l’enrouler petit à petit.
-
-
Outil utilisé dans cette étape :Tweezers$4.99
-
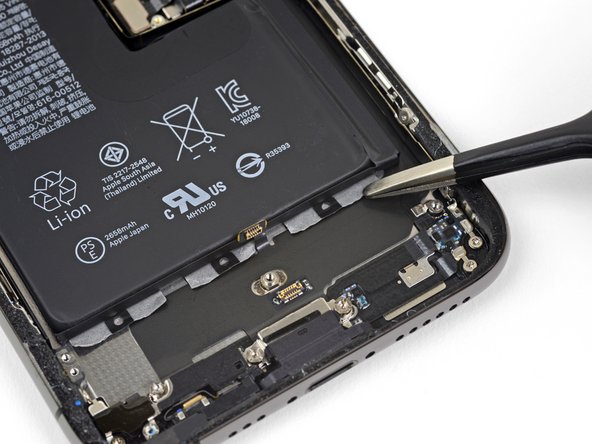
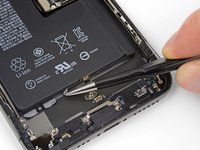
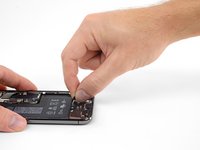
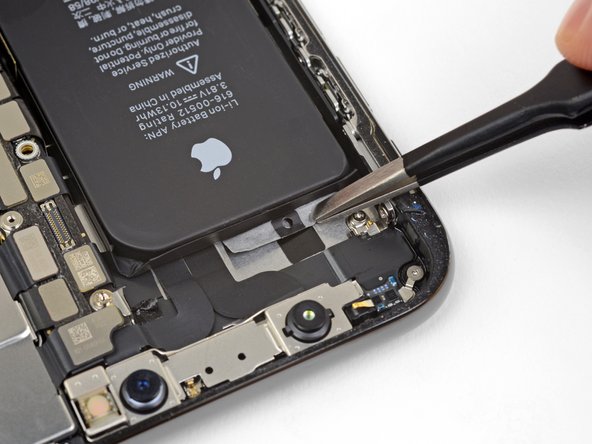
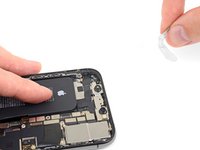
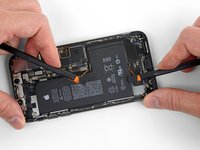
Saisissez une des languettes adhésives extérieures et éloignez-la lentement de la batterie, vers le bas de l'iPhone.
-
Tirez régulièrement, en exerçant une tension constante sur la bande, jusqu'à ce qu'elle glisse hors de son emplacement entre la batterie et la coque arrière.
-
-
-
Si une des bandes adhésives s'est cassée et que la batterie est encore maintenue en place dans la coque arrière, décollez-la en ajoutant quelques gouttes d'alcool isopropylique (90 % ou plus) sous la batterie, près de la ou des bandes encore collées.
-
Après environ une minute, soulevez doucement la batterie.
It's mentioned elsewhere, but it is worth emphasizing that when using the alternative method of dissolving the adhesive with isopropyl alcohol, it is important to exercise great caution when prying under the battery. My spudger got away from me due to my impatience, and I accidentally bent and slightly severed the ribbon connector underneath, rendering my volume buttons and muting switch inoperable.
-
-
-
Si une des bandes adhésives s'est déchirée et que la batterie reste coincée dans la coque arrière, préparez un iOpener ou servez-vous d'un sèche-cheveux afin de chauffer la coque arrière derrière la batterie.
-
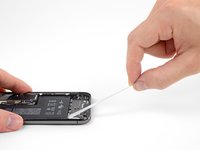
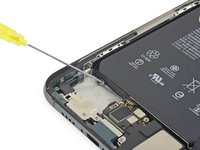
Retournez l'iPhone et faites glisser une ficelle solide (du fil dentaire ou une fine corde de guitare par exemple) sous la batterie.
-
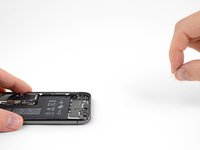
Tirez la ficelle d'un côté puis de l'autre avec un mouvement de scie pour faire céder l'adhésif. Cela risque de prendre du temps, car l'adhésif cède lentement. Soyez patient et vous en viendrez à bout. Ne déformez ni endommagez la batterie.
-
Commencez en haut ou en bas de la batterie et progressez vers le milieu. Ne faites pas passer la ficelle sous le tiers central de la batterie, vous pourriez endommager les nappes ou la bobine de recharge sans fil, qui se trouvent juste en dessous.
I didn't have any of the alcholol, so came in straight here. Can't over stress the need for patience, but once I put the phone on my microwaved sock of rice (that's how we roll) and started to gently saw away with the floss - it all came good.
-
-
-
Saisissez la batterie par le bas et ôtez-la de l'iPhone.
-
Collez la batterie, déconnectez-la et continuez le réassemblage de votre appareil.
For those that plan to proceed with the hack that eliminates the “battery is not genuine” message and no battery health information (requires extra tools that most don’t have), be careful not to bend the original battery’s flex cable too much. I found out the hard way that the flex cable doesn’t really “flex” much and ended up snapping in half when trying to hook it up to a programmer. So much for trying to do the hack :(
How do I force restart and calibrate the battery at the same time?
-


Comparez votre nouvelle pièce de rechange à la pièce d'origine, car vous devrez peut-être transférer les composants restants ou enlever les films adhésifs au dos de la nouvelle pièce avant de l'installer.
Pour ré-assembler votre appareil, suivez les étapes ci-dessus dans l'ordre inverse.
Apportez vos déchets électroniques à un recycleur R2 ou de déchets électroniques certifié.
La réparation ne s'est pas déroulée comme prévu ? Consultez notre Forum pour obtenir de l'aide au diagnostic.
Annulation : je n'ai pas terminé ce tutoriel.
131 autres ont terminé cette réparation.
Merci à ces traducteurs :
100%


Ces traducteurs nous aident réparer le monde ! Vous voulez contribuer ?
Commencez à traduire ›


17 commentaires
i don’t know what happened but now my iphone xs will only boot into recovery mode and there is nothing showing up on the display. i have double triple quadruple checked and dont know what my issue is. any feedback on the matter would be greatly appreciated.
My iPhone has been turned off completely for the past few weeks, I have tried to hard restart it but nothing seems to work. It has a black screen and isn’t responding to anything. Nothing has ever been wrong with the phone it just shut down one day and hasn’t restarted since. Do you have a suggestion to get my phone working again?
Anyone have an issue where the phone won’t charge after replacing the battery/
Yes, I cant figure out why. I wonder if because its not the original battery, it wont let the new one charge? Idk.
Nick Lo -
It is possible the you went to deep with the plectrum, knocking of a capacitor from the logic board. I think it’s best you take it to a really good repair shop where the owner has expert solder skills to replace it.
Good luck
I ended up skipping steps 20-32. The kit didn’t come with the right screwdriver top and I realized it’s not necessary to take the speaker and taptic thing off.
I just used the thin black spudger flat edge and pried under the battery on the L-shaped edge and dislodged the adhesive and then did the same on the top edge. You will end up bending the old battery but that’s ok—just don’t poke it. keep poking the flat edge of the spudger in there kind of like a knife to break the adhesive. once you get at least two spots of the adhesive pulled, the rest comes up quite easily when you lift the whole battery.
Hey, after changing the battery the volume and silent buttons stopped working. There is no apparent reason as why they would, what could it be and can it be fixed before I close the phone ??
you've likely damaged the volume flex cable that lies under the battery, it is very thin and easily damaged. unfortunately pull tabs rarely work as intended. alcohol is the best method for loosening adhesive.
I skipped removing the taptic engine and speaker because I knew I was going to break the adhesive strips when pulling as they break very easily. Just dripped some alcohol, waited 10 minutes and with a bit of force the battery came right off without even bending. Makes the process much quicker although that’s not the intended way of removal.
Ive got a metal protection plate of some sort in-between the screen and the battery around the inside perimeter of the phone. it is blocking access to most of the bottom screws. and does look like it pulls out. might be fixed at the bottom or sides.
anyone found one of these plates in their attempts? might have been placed by a repairer at some point
that is the display frame you have damaged it and you will need to replace the display because the display has its own frame and that frame holds it in place.
My phone's touch screen and camera were unresponsive after reassembly. I prised it all apart and checked all the connections 3 times unfortunately ruining the glue around the edge and then after Googling found a Forced Restart cleared the problem. Press and release volume up button then the volume down button then hold and keep holding the on off button on the right until the apple appeared. And hey presto it all worked!!! I'm well chuffed as I'm a 64 year old 'girl' with no experience of this sort of thing but am pretty competant with practical things - I thought 'how difficult can it be?' Not too difficult, except for removing the adhesive from behind the battery (should have read the detailed instructions properly) which I eventually did with some Isopropyl alcohol following the further instructions.
My top tip! I found putting all the screws on a bit of 'blue tac' kept them safe and in order.
Very tricky indeed but thankfully I managed to replace battery and screen and it worked 😊
After the change of battery the lower speaker has stopped to work. The battery it's ok and works fine but i have only speaker working right now.
I have tried to connect and disconnect it, with and without the battery connected but nothing. I don't thing that the speaker is dameged, but maybe the connector? What i can verify?
After replacing battery, I am getting ghost typing and activity on the touchscreen without touching it. And the phone is hot. What did I do wrong? Replaced a battery in my iPhone 6s prior to trying battery replacement on the XS, thought I would have equal success, not! Also noted the warning about the genuineness of the new battery, don't mind that but I also lost the health of the battery status; was that supposed to happen?
Friendly Suggestion: would have purchased the full fix kit had I know I would need to replace the adhesive gasket during reassembly. Having purchased many kits before, I have all the tools. When looking at the photo, it didn't seem to include anything other than the battery, so I just ordered the battery. Missed the tiny adhesive gasket! Might want to highlight items like that so when people order, they don't make a similar mistake.
Der Original Akku ist codiert. Egal, ob man einen zweiten Apple Original Akku oder einen neuen Fremdakku einbaut erscheint bereits in den Einstellungen eine "Wichtige Batterienachricht" mit einem roten Punkt. "Unbekanntes Bauteil" und die "Informationen zum Batteriezustand" sind nicht verfügbar. Diese Nachricht verbleibt immer und nervt auf Dauer immens.
Der Akku muss angelernt werden und dieses können von jetzt an nur authorisierte Apple Servicebetriebe und diesen ist es durch Apple verboten die notwendige Info weiterzugeben.
Dies ist nicht zu verwechseln mit der bereits bekannten Rekalibrierung seit iOS 14.5.
Seit dieser neuen Codierung kostet der Akkutausch bei Apple auch nicht mehr 75 € sondern aktuell 99 € (Stand Novmber 2023 in Deutschland).
Damit sind künftig alle nicht authorisierten Servicebetriebe raus - denn wer will schon dauernd diese Mitteilung auf dem Bildschirm haben?
Überlegt vorher, ob unter diesen Bedingungen ein eigener Akkutausch noch sinnvoll ist .....
Manfred Wachtel - Réponse
Lieben Dank @manfredwachtel ! Mehr Infos dazu haben wir auch in unserem Blog zusammengefasst: https://de.ifixit.com/News/78890/teileko...
Sandra Hiller -